使用 DECLI 配置Exadata上cell节点的celladmin的信任关系

在Exadata上缺省没有配置cell节点的celladmin用户的信任关系,但是有时候我们需要用,那么手工配置一下吧。

借助dcli工具,使得配置很简单:

[celladmin@dm01cel01 ~]$ mkdir ~/.ssh
[celladmin@dm01cel01 ~]$ chmod 700 ~/.ssh
[celladmin@dm01cel01 ~]$ 

[celladmin@dm01cel02 ~]$ mkdir ~/.ssh
[celladmin@dm01cel02 ~]$ chmod 700 ~/.ssh
[celladmin@dm01cel02 ~]$ 

[root@dm01cel03 ~]# su - celladmin
[celladmin@dm01cel03 ~]$ mkdir ~/.ssh
[celladmin@dm01cel03 ~]$ chmod 700 ~/.ssh
[celladmin@dm01cel03 ~]$ 


[celladmin@dm01cel01 ~]$ cat cell.txt
dm01cel01
dm01cel02
dm01cel03
[celladmin@dm01cel01 ~]$ 

[celladmin@dm01cel01 ~]$ dcli -k -g cells.txt
Error: Neither RSA nor DSA keys have been generated for current user.
Run 'ssh-keygen -t rsa' to generate an ssh key pair.
[celladmin@dm01cel01 ~]$ 

[celladmin@dm01cel01 ~]$ ssh-keygen -t dsa
Generating public/private dsa key pair.
Enter file in which to save the key (/home/celladmin/.ssh/id_dsa): 
Enter passphrase (empty for no passphrase): 
Enter same passphrase again: 
Your identification has been saved in /home/celladmin/.ssh/id_dsa.
Your public key has been saved in /home/celladmin/.ssh/id_dsa.pub.
The key fingerprint is:
04:62:d8:41:b6:62:bd:3f:8c:14:41:6e:dc:9a:f3:0a celladmin@dm01cel01.lunar.com
[celladmin@dm01cel01 ~]$ 


[celladmin@dm01cel01 ~]$ dcli -k -g cell.txt
The authenticity of host 'dm01cel01 (192.168.1.12)' can't be established.
RSA key fingerprint is 52:bf:9a:5f:f7:00:6f:ad:8d:d6:17:74:3f:37:56:fe.
Are you sure you want to continue connecting (yes/no)? yes
Warning: Permanently added 'dm01cel01,192.168.1.12' (RSA) to the list of known hosts.
celladmin@dm01cel01's password: 
The authenticity of host 'dm01cel03 (192.168.1.14)' can't be established.
RSA key fingerprint is e6:63:e6:57:b6:b8:66:0c:01:ba:78:23:41:e7:30:8d.
Are you sure you want to continue connecting (yes/no)? yes
Warning: Permanently added 'dm01cel03,192.168.1.14' (RSA) to the list of known hosts.
celladmin@dm01cel03's password: 
The authenticity of host 'dm01cel02 (192.168.1.13)' can't be established.
RSA key fingerprint is 08:64:74:44:c3:63:d1:2d:d3:c2:45:19:5a:3d:60:0f.
Are you sure you want to continue connecting (yes/no)? yes
Warning: Permanently added 'dm01cel02,192.168.1.13' (RSA) to the list of known hosts.
celladmin@dm01cel02's password: 
dm01cel01: ssh key added
dm01cel02: ssh key added
dm01cel03: ssh key added
[celladmin@dm01cel01 ~]$ 


[celladmin@dm01cel01 ~]$ dcli -g cell.txt "cellcli -e list cell"
dm01cel01: dm01cel01     online
dm01cel02: dm01cel02     online
dm01cel03: dm01cel03     online
[celladmin@dm01cel01 ~]$ 

[celladmin@dm01cel01 ~]$ dcli -g cell.txt "date"
dm01cel01: Wed Mar 19 15:12:50 CST 2014
dm01cel02: Wed Mar 19 15:12:50 CST 2014
dm01cel03: Wed Mar 19 15:12:50 CST 2014
[celladmin@dm01cel01 ~]$ 
发表在 FAQ, 日常运维 | 留下评论

HOW TO GENERATE SYSTEMSTATE ON THE CELLSRV TO IDENTIFY MEMORY LEAKS

1. Executing command kill -12 on the cellsrv pid.

Identify the pid of cellsrv process -> ps -ef |grep ‘cellsrv 100’
kill -12
Example:

# ps -ef |grep 'cellsrv 100'
root 15182 30943 0 16:34 pts/0 00:00:00 grep cellsrv 100
root 25280 25278 0 Aug08 ? 00:18:38 /opt/oracle/cell11.2.2.2.0_LINUX.X64_101206.2/cellsrv/bin/cellsrv 100 5000 9 5042

#kill -12 25280

2. On the storage cell, obtain the statedump by running command from cellcli:

cellcli>alter cell events = "immediate cellsrv.cellsrv_statedump(0,0)"

3. Provide to the Service Request the trace file generated on the storage cell, located under:

#cd $ADR_BASE/diag/asm/cell/<hostname>/trace

The statedump is generated on the thread 0 of cellsrv. The file will have name like svtrc__0.trc.
Collect all the the files svtrc__X.trc, together with ms-odl* and alert.log

发表在 FAQ, 故障诊断 | 留下评论

在Exadata上修改操作系统用户口令的方法

注意修改完了要用这个用户登录一次才可以:

[root@dm01db01 onecommand]# dcli -g cell_group -l root "echo welcome | passwd --stdin celladmin"
dm01cel01: Changing password for user celladmin.
dm01cel01: passwd: all authentication tokens updated successfully.
dm01cel02: Changing password for user celladmin.
dm01cel02: passwd: all authentication tokens updated successfully.
dm01cel03: Changing password for user celladmin.
dm01cel03: passwd: all authentication tokens updated successfully.
[root@dm01db01 onecommand]# 
[root@dm01db01 onecommand]# 
[root@dm01db01 onecommand]# dcli -g dbs_group -l root "echo \"welcome1\" | passwd --stdin root"
dm01db01: Changing password for user root.
dm01db01: passwd: all authentication tokens updated successfully.
dm01db02: Changing password for user root.
dm01db02: passwd: all authentication tokens updated successfully.
[root@dm01db01 onecommand]# 


[root@dm01db01 onecommand]# dcli -g cell_group -l root "pam_tally2 -r -u celladmin"
dm01cel01: Login           Failures Latest failure     From
dm01cel01: celladmin          26    03/19/14 14:38:07  dm01cel01.lunar.com
dm01cel02: Login           Failures Latest failure     From
dm01cel02: celladmin           4    01/03/12 15:49:57  dm01db01.lunar.com
dm01cel03: Login           Failures Latest failure     From
dm01cel03: celladmin           4    03/30/12 13:27:20  dm01db01.lunar.com
[root@dm01db01 onecommand]# 
[root@dm01db01 onecommand]# 
[root@dm01db01 onecommand]# 
[root@dm01db01 onecommand]# dcli -g cell_group -l root "pam_tally2 -r -u root"
dm01cel01: Login           Failures Latest failure     From
dm01cel01: root                0
dm01cel02: Login           Failures Latest failure     From
dm01cel02: root                0
dm01cel03: Login           Failures Latest failure     From
dm01cel03: root                0
[root@dm01db01 onecommand]# 
发表在 FAQ, 日常运维 | 留下评论

Exadata上一次POC的记录——PDML

下面的一次POC中的某2个语句的执行,可以看到除了CTAS创建的表名称不同,其余都是一样:
同样的都是Exadata x3-2,同样的环境(表结构,数据等等),但是执行效率却大相径庭:

SQL1 :CREATE TABLE test1 AS SELECT * FROM LunarTest t WHERE t.col1 =1766

sql1


从执行计划上看,SQL1执行时间了44秒:
1,在select阶段,所有Slave进程以直接路径读的方式并行的从cell上读取数据
2,所有Slave进程并行的将读取的数据发送给Query Coordinator,然后仍然以直接路径读取的方式并行的写入到数据文件
3,Query Coordinator进程从并行数据流中接收数据,并在所有并行写入结束后,将执行结果(Table created)反馈给SQL1

SQL2 :create table test2 as select * from LunarTest t where t.col1 =1766

sql2


从执行计划上看,SQL1执行时间了9.3分钟:
1,在select阶段,所有Slave进程以直接路径读的方式并行的从cell上读取数据
2,所有Slave进程并行的将读取的数据发送给Query Coordinator
3,Query Coordinator进程等待所有Slave进程都执行结束后,将接收到的数据以直接路径度的方式写入到数据文件,将执行结果(Table created)反馈给SQL2


这个2个SQL的区别就在于PDML需要单独enable,缺省的只有SELECT会采用parallel。
也就是说,在执行SQL1之前,我执行了:
alter session force parallel query;
alter session force parallel dml;
alter session force parallel ddl;
.
而在执行SQL2的会话中,我没有enable PDML。

.

发表在 POC和性能调整 | 标签为 , , | 一条评论

Exadata上的常用工具介绍(Troubleshooting Tools)

Utility Path Usage/Comments
Infiniband Some of these tools may be found in /opt/oracle.SupportTools/ibdiagtools on cells or database servers. Also see the  Infiniband Triage wiki page.
/opt/oracle.SupportTools/ibdiagtools/infinicheck
/opt/oracle.SupportTools/ibdiagtools/verify-topology
ibqueryerrors
/usr/bin/ibdiagnet Detecting fabric issues
/usr/sbin/ibaddr Examining HCA state & guids
/usr/sbin/ibcheckerrors Detecting fabric issues
/usr/sbin/ibcheckerrs Detecting fabric issues
/usr/sbin/ibcheckstate Detecting fabric issues
/usr/sbin/ibcheckwidth Detecting fabric issues
/usr/sbin/ibclearcounters Reset counters when detecting fabric issues
/usr/sbin/ibclearerrors Reset counters when detecting fabric issues
/usr/sbin/ibdatacounters Not directly used. perfquery is used instead
/usr/sbin/ibdatacounts Not directly used. perfquery is used instead
/usr/sbin/ibhosts Lising cells/db nodes
/usr/sbin/iblinkinfo.pl Obtaining the fabric topology
/usr/sbin/ibnetdiscover Obtaining the fabric topology
/usr/sbin/ibnodes Lising cells/db nodes/switches
/usr/sbin/ibping Checking IB level connectivity
/usr/sbin/ibportstate Testing port failure/disabling bad links
/usr/sbin/ibqueryerrors.pl Detecting fabric issues
/usr/sbin/ibstat Examining HCA state & guids
/usr/sbin/ibstatus Examining HCA state & guids
/usr/sbin/ibswitches Listing IB switch names
/usr/sbin/ibtracert Examining IB routes
/usr/sbin/perfquery Computing throughput, detecting fabric errors
/usr/sbin/saquery Not directly used
/usr/sbin/set_nodedesc.sh Setting the HCA node description based on node type
/usr/sbin/sminfo Determing location of master SM
/usr/sbin/smpdump not directly used
/usr/sbin/smpquery not directly used
/usr/sbin/vendstat not directly used
/usr/bin/ibv_devices listing local HCAs
/usr/bin/ibv_devinfo listing details of local HCAs
/usr/bin/ibv_rc_pingpong Determining working status of HCA
/usr/bin/ibv_srq_pingpong Determining working status of HCA
/usr/bin/ibv_uc_pingpong Determining working status of HCA
/usr/bin/ibv_ud_pingpong Determining working status of HCA
/usr/bin/mstflint Burning new HCA firmware/obtaining current firmware version
/usr/bin/ib_rdma_bw Computing IB level stats for troubleshooting
/usr/bin/ib_rdma_lat Computing IB level stats for troubleshooting
/usr/bin/ib_read_bw Computing IB level stats for troubleshooting
/usr/bin/ib_read_lat Computing IB level stats for troubleshooting
/usr/bin/ib_send_bw Computing IB level stats for troubleshooting
/usr/bin/ib_send_lat Computing IB level stats for troubleshooting
/usr/bin/ib_write_bw Computing IB level stats for troubleshooting
/usr/bin/ib_write_lat Computing IB level stats for troubleshooting
/usr/bin/qperf Computing throughput for RDS/TCP/SDP protocols
/sbin/ifconfig Determining configuration/status of network interfaces
/usr/bin/ib-bond Determining active slave interface for bond0
/usr/bin/rds-gen Not directly used
/usr/bin/rds-info Examining RDS state
/usr/bin/rds-ping Determining RDS connectivity
/usr/bin/rds-sink Not directly used
/usr/bin/rds-stress Profiling RDS performance
Imaging and versions These tools are related to imaging status and info as well as versions installed
imagehistory
imageinfo Only on database servers version >= 11.2.1.3
/opt/oracle.cellos/CheckHWnFWProfile Only applicable on cells. With the -d option, it will display versions found. Without options, it will report any mismatches against known correct vaiues.
/opt/oracle.SupportTools/CheckSWProfile.sh Only applicable on cells. Without options, displays any mismatch against known good configurations.
collectlogs.sh for collecting logs from onecommand deployments
Networking  
cat /proc/net/bonding/bond*
cat /sys/class/net/eth?/operstate
cat /sys/class/net/bond*/operstate
ifconfig
ethtool <interface_name> reports information about the interface like link mode capabilities
Logfiles on both database server and cells
/var/log/messages Older versions of this file will be automatically renamed as messages.<number> with number 1 being the most recent history.
dmesg (a command that displays log)
/var/log/cellos/validations.log
/var/log/cellos/validations/*log
Logfiles on cells
$ADR_BASE/diag/asm/cell/<hostname>/trace/alert.log Cell’s alert log. Also will find cell’s trace files in the same directory as the alert.log
Logfiles on database servers
$ORACLE_BASE/diag/asm/+asm/<instname>/trace/alert_<instname>.log ASM alert logfile
$ORACLE_BASE/diag/rdbms/<dbname>/<instname>/trace/alert_<instname>.log DB alert log – one for each database running…may be more than one DB
/u01/app/11.2.0/grid/log/<hostname>/alert<hostname>.log Grid Infrastructure alert logfile. This log is relatively high-level and will often lead you to one of the logs mentioned in the entry just below this one.
/u01/app/11.2.0/grid/log/<hostname>/[cssd,crsd,diskmon]/*.log Logfiles for CSSD, CRSD, and diskmon processes. These processes are the most likely ones to have issues and will expose most issues.
Infiniband Switches These commands may be run on IB switches
sminfo shows the current subnet master switch in the fabric – there should be exactly one regardless of how many switches are present in the fabric
ibswitches lists all IB switches in the fabric
showunhealthy shows any unhealthy sensors
env_test lists all the data from the environmental sensors in the switch
nm2version shows the current versions – use this to determine what version the switch is running right now
getfanspeed shows the speed of the internal fans in the switch – can be useful if showunhealthy indicates a problem with one of the fans
Cell software commands (cellcli and friends) These commands may be run from within cellcli
list cell detail
list alerthistory
list celldisk detail
list griddisk detail
list lun detail
list physicaldisk detail
list flashcache detail
list griddisk attributes name,status,asmmodestatus,asmdeactivationoutcome
alter cell validate configuration
adrci show incident
mdadm –misc –detail /dev/md* for an overview of the state of the raid devices on the storage cell
cat /proc/mdstat for a view of the status of the devices
/usr/local/bin/ipconf –verify
mdadm -Q –detail /dev/md? state information on a particular meta device
<GRID_HOME>/bin/kfod disks=all lists disks available from DB node for ASM use (run on DB node)
Hardware These commands may be run to query hardware status. Unless otherwise noted, they apply to cells and database servers.
ipmitool sel list Lists the system event logs – these logs sometimes show HW events that aren’t seen elsewhere.
ipmitool sunoem cli ‘show /SYS’ Shows system serial number, fault_state (overall fault state, not necessarily a rollup – may be a fault on a component-level)
/opt/MegaRAID/MegaCli/MegaCli64 -adpallinfo -a0 All adapter info
/opt/MegaRAID/MegaCli/MegaCli64 -FwTermLog -dsply -a0 Diplay controller’s log
/opt/MegaRAID/MegaCli/MegaCli64 -AdpBbuCmd -GetBbuStatus -a0 Get battery status
/opt/MegaRAID/MegaCli/MegaCli64 -AdpBbuCmd -GetBbuProperties -a0 Get battery properties
/opt/MegaRAID/MegaCli/MegaCli64 -LDinfo -Lall -aALL Looking for WriteThrough? on the Current Cache Policy – if disabled, may affect performance; easier to get this information from cellcli -e list lun attributes name,lunWriteCacheMode,status
/opt/MegaRAID/MegaCli/MegaCli64 -LDPdInfo -aAll Helpful to investigate predictive failure if necessary
/opt/MegaRAID/MegaCli/MegaCli64 -PDList -a0 The Inquiry Data will contain the drive firmware, but decoding the string to get the firmware requires special instructions – beyond what is here. Check list physicaldisk attributes physicalFirmware in cellcli for drive FW version.
lspci [-v [ -v [ -v ]]] Listing PCI devices. The more -v arguments you add, the more information detail it provides
lsscsi Especially helpful on cells. Flash cards will show up as MARVELL devices. There should be 16 flash devices listed. If not, there’s a card missing or not visible to the OS.
/opt/oracle.cellos/scripts_aura.sh This script lists the flash disks as will be seen from the cell software
/opt/oracle.SupportTools/sundiag.sh Gathers many diagnostic command outputs and important logfiles for analysis of storage cell and disk issues
发表在 FAQ, 内部机制, 故障诊断, 日常运维 | 标签为 , , | 留下评论

Exadata上的IOPS和MBPS

关于IOPS和MPBS的概念网上可以有很多详细的解释和介绍。
.
IOPS (Input/OutputPer Second),,即每秒读写(I/O)操作的次数总和,多用于OLTP/数据库或者小IO/小文件等场合,衡量系统的随机访问的性能。
.
我们知道,磁盘完成一个I/O请求所花费时间就磁盘本身的因素来说,跟寻道时间、转数和数据传输都有关系。
也就是说, IOPS(每秒IO次数) = 1s/(寻道时间+旋转延迟+数据传输时间)
.
而实际应用中IOPS还受到很多其他因素的影响,比如存储配置和不同操作系统上的相关配置等等(读写比例,顺序和随机,工作线程数,队列深度……),因此对比测量磁盘IOPS时应该在相同的测试基准下进行。
.
与之对应的是 MBPS ,另一个重要指标是数据吞吐量(Throughput),指单位时间内可以成功传输的数据数量。对于大量顺序读写的应用,如VOD(Video On Demand),则更关注吞吐量指标。

传统磁盘也就是我们常说的机械盘,如SAS, SATA磁盘等等,在Exadata的存储节点上每个cell配置了12块SAS盘或者SATA盘:
Exadata V1 存储节点上磁盘的选择: 300 GB串行连接SCSI (SAS) 磁盘 或者 1TB串行连接(SATA) 磁盘(3.5寸)
Exadata V2 存储节点上磁盘的选择: 600 GB串行连接SCSI (SAS) 磁盘 或者 2TB串行连接(SATA) 磁盘(3.5寸)
Exadata X2-2 存储节点上磁盘的选择: 600 GB 15,000 RPM 高性能SAS硬盘 或 2TB 7,200 RPM 高容量SAS硬盘(3.5寸)
Exadata X3-2 存储节点上磁盘的选择: 600 GB 15,000 RPM 高性能SAS硬盘 或 3TB 7,200 RPM 高容量SAS硬盘(3.5寸)
Exadata X4-2 存储节点上磁盘的选择: 1.2 TB 10,000 RPM 高性能SAS硬盘 或 4TB 7,200 RPM 高容量SAS硬盘(2.5寸)

关于Exadata上Database IOPS的介绍以前在 Maclean的网站上看到过一篇讲的很清楚的介绍,今天search了一下,没找到原文了,找到了一篇转载于这篇完整的:
http://storage.chinabyte.com/387/12533387.shtml

有兴趣看原文的可以联系他(liu.maclean@gmail.com), O(∩_∩)O哈哈~

我这里稍微补充一下,其实Exadata上测试IOPS的“calibrate force”命令,本质上也是调用了“orion”,下面记录某此客户现场的实测结果:


这里我们看到,在安装Exadata时有一步“RunCalibrate”(不同版本的步骤稍有不同),我这是X2-2 1/4 Rack Image 11.2.3.2.1,采用了HP磁盘(即,每个cell12块600 GB 15,000 RPM 高性能SAS硬盘),该步骤为Step 9。

该步骤本质上是在所有cell节点上执行 “calibrate force”操作(该操作是一个只读操作)。

[root@dm01db01 tmp]# tail -f STEP-9-20121217123712.log
INFO: Logging all actions in /opt/oracle.SupportTools/onecommand/tmp/STEP-9-20121217123712.log and traces in /opt/oracle.SupportTools/onecommand/tmp/STEP-9-20121217123712.trc
INFO: Loading configuration file /opt/oracle.SupportTools/onecommand/onecommand.params...
INFO: 2012-12-17 12:37:12
INFO: Step 9  RunCalibrate
INFO: checking nodes in /opt/oracle.SupportTools/onecommand/all_group...
SUCCESS: All nodes in /opt/oracle.SupportTools/onecommand/all_group are pingable and alive.
INFO: Going to run calibrate, will take 10 or so minutes...
INFO: Running /usr/local/bin/dcli -g /opt/oracle.SupportTools/onecommand/cell_group -l root cellcli -e calibrate force to calibrate cells...
SUCCESS: Ran /usr/local/bin/dcli -g /opt/oracle.SupportTools/onecommand/cell_group -l root cellcli -e calibrate force and it returned: RC=0
dm01cel01: Calibration will take a few minutes...
 dm01cel01: Aggregate random read throughput across all hard disk LUNs: 1962 MBPS
 dm01cel01: Aggregate random read throughput across all flash disk LUNs: 4184.04 MBPS
 dm01cel01: Aggregate random read IOs per second (IOPS) across all hard disk LUNs: 4832
 dm01cel01: Aggregate random read IOs per second (IOPS) across all flash disk LUNs: 146413
 dm01cel01: Controller read throughput: 1957.14 MBPS
 dm01cel01: Calibrating hard disks (read only) ...
 dm01cel01: LUN 0_0  on drive [20:0     ] random read throughput: 166.84 MBPS, and 394 IOPS
 dm01cel01: LUN 0_1  on drive [20:1     ] random read throughput: 172.72 MBPS, and 406 IOPS
 dm01cel01: LUN 0_10 on drive [20:10    ] random read throughput: 170.37 MBPS, and 412 IOPS
 dm01cel01: LUN 0_11 on drive [20:11    ] random read throughput: 168.08 MBPS, and 404 IOPS
 dm01cel01: LUN 0_2  on drive [20:2     ] random read throughput: 171.44 MBPS, and 413 IOPS
 dm01cel01: LUN 0_3  on drive [20:3     ] random read throughput: 168.67 MBPS, and 420 IOPS
 dm01cel01: LUN 0_4  on drive [20:4     ] random read throughput: 166.21 MBPS, and 419 IOPS
 dm01cel01: LUN 0_5  on drive [20:5     ] random read throughput: 170.13 MBPS, and 414 IOPS
 dm01cel01: LUN 0_6  on drive [20:6     ] random read throughput: 170.32 MBPS, and 416 IOPS
 dm01cel01: LUN 0_7  on drive [20:7     ] random read throughput: 172.66 MBPS, and 402 IOPS
 dm01cel01: LUN 0_8  on drive [20:8     ] random read throughput: 169.86 MBPS, and 419 IOPS
 dm01cel01: LUN 0_9  on drive [20:9     ] random read throughput: 170.38 MBPS, and 417 IOPS
 dm01cel01: Calibrating flash disks (read only, note that writes will be significantly slower) ...
 dm01cel01: LUN 1_0  on drive [FLASH_1_0] random read throughput: 272.61 MBPS, and 19945 IOPS
 dm01cel01: LUN 1_1  on drive [FLASH_1_1] random read throughput: 271.77 MBPS, and 19946 IOPS
 dm01cel01: LUN 1_2  on drive [FLASH_1_2] random read throughput: 271.81 MBPS, and 19930 IOPS
 dm01cel01: LUN 1_3  on drive [FLASH_1_3] random read throughput: 272.08 MBPS, and 19908 IOPS
 dm01cel01: LUN 2_0  on drive [FLASH_2_0] random read throughput: 272.59 MBPS, and 20694 IOPS
 dm01cel01: LUN 2_1  on drive [FLASH_2_1] random read throughput: 272.45 MBPS, and 20675 IOPS
 dm01cel01: LUN 2_2  on drive [FLASH_2_2] random read throughput: 272.33 MBPS, and 20697 IOPS
 dm01cel01: LUN 2_3  on drive [FLASH_2_3] random read throughput: 272.24 MBPS, and 20707 IOPS
 dm01cel01: LUN 4_0  on drive [FLASH_4_0] random read throughput: 271.91 MBPS, and 19961 IOPS
 dm01cel01: LUN 4_1  on drive [FLASH_4_1] random read throughput: 271.84 MBPS, and 19969 IOPS
 dm01cel01: LUN 4_2  on drive [FLASH_4_2] random read throughput: 271.78 MBPS, and 19958 IOPS
 dm01cel01: LUN 4_3  on drive [FLASH_4_3] random read throughput: 271.45 MBPS, and 19960 IOPS
 dm01cel01: LUN 5_0  on drive [FLASH_5_0] random read throughput: 271.69 MBPS, and 19965 IOPS
 dm01cel01: LUN 5_1  on drive [FLASH_5_1] random read throughput: 270.85 MBPS, and 19942 IOPS
 dm01cel01: LUN 5_2  on drive [FLASH_5_2] random read throughput: 270.77 MBPS, and 19926 IOPS
 dm01cel01: LUN 5_3  on drive [FLASH_5_3] random read throughput: 271.17 MBPS, and 19907 IOPS
 dm01cel01: CALIBRATE results are within an acceptable range.
 dm01cel01: Calibration has finished.
.........

在执行“calibrate force”操作期间,我们使用top观察一下cell的资源使用情况:


top


可以看到实际上cell上启动了6个orion 进程。
这里我们看到每个cell的平均IOPS(Aggregate random read IOs per second)和平均MBPS(Aggregate random read throughput)都是大体一致的,即:

 .........

dm01cel01: Aggregate random read throughput across all hard disk LUNs: 1962 MBPS
 dm01cel01: Aggregate random read throughput across all flash disk LUNs: 4184.04 MBPS
 dm01cel01: Aggregate random read IOs per second (IOPS) across all hard disk LUNs: 4832
 dm01cel01: Aggregate random read IOs per second (IOPS) across all flash disk LUNs: 146413
 dm01cel01: Controller read throughput: 1957.14 MBPS

.........

dm01cel02: Calibration will take a few minutes...
 dm01cel02: Aggregate random read throughput across all hard disk LUNs: 1926 MBPS
 dm01cel02: Aggregate random read throughput across all flash disk LUNs: 4184.11 MBPS
 dm01cel02: Aggregate random read IOs per second (IOPS) across all hard disk LUNs: 4919
 dm01cel02: Aggregate random read IOs per second (IOPS) across all flash disk LUNs: 137525
 dm01cel02: Controller read throughput: 2014.53 MBPS

.........

 dm01cel03: Aggregate random read throughput across all hard disk LUNs: 1934 MBPS
 dm01cel03: Aggregate random read throughput across all flash disk LUNs: 4139.36 MBPS
 dm01cel03: Aggregate random read IOs per second (IOPS) across all hard disk LUNs: 4824
 dm01cel03: Aggregate random read IOs per second (IOPS) across all flash disk LUNs: 121355
 dm01cel03: Controller read throughput: 2000.5 MBPS
 dm01cel03: Calibrating hard disks (read only) ...

由此,我们可以推断下,如果是这款机器,满配的IOPS和MBPS是多少?
.
满配机器(14个cell)hard disk LUNs的MBPS推算: 1962*14个cell=27468
满配机器(14个cell)flash disk LUNs的MBPS推算: 4184*14个cell=58576
满配机器(14个cell)hard disk LUNs的IOPS推算: 4832*14个cell=67648
满配机器(14个cell)flash disk LUNs的IOPS推算:146413*14个cell=2049782
.
官方给出的满配的标准数据如下:
Aggregate random read throughput across all hard disk LUNs: 25GB MBPS
Aggregate random read throughput across all flash disk LUNs: 75 MBPS
Aggregate random read IOs per second (IOPS) across all hard disk LUNs: 50000
Aggregate random read IOs per second (IOPS) across all flash disk LUNs: 1500000
.
上述推断结果相比官方指标基本吻合,而且都比官方指标略高(只有flash disk LUNs的稍微偏低)。
最后还要强调一点,这里的数据仅仅适用于Exadata,Exadata是软件和硬件的完美结合
…………

发表在 FAQ, POC和性能调整 | 标签为 , , | 留下评论

Exadata的数据保护机制(冗余机制)-4-ASM PST

Exadata的数据保护机制(冗余机制)- 1

Exadata的数据保护机制(冗余机制)- 2

Exadata的数据保护机制(冗余机制)- 3- Failure Group

为了补充前面两篇的一些概念,这里,我们简单介绍下ASM的PST。

我们知道,asmfile extent是分布在多个磁盘之间,称为partner,Partner disk会存放在一个或者多个分离的failure group上。ASM自动选择Disk partner并限制其数量,这是受隐含参数”_asm_partner_target_disk_part”控制的。在10g中,每盘都会存在最多10个Disk partner,而在11gR2中每盘都会存在最多8个Disk partner。ASM会自动创建和维护Partner关系,如果磁盘损坏(failure),那么ASM会更新其extent map使今后的读取操作指向剩余的健康的partner。


对于external redundancy 的磁盘组,每个磁盘组只有一个PST table,对于normal redundancy 的磁盘组,每个磁盘组有3个PST table,对于high redundancy 的磁盘组,每个磁盘组有5个PST table。
.
PST的信息是由GMON进程维护的。PST 包含了一个磁盘组中ASM disk的状态信息:disk number,status(online or offline),partner disk number,heartbeat的信息,11g的ASM中,PST 还引包含了failure group的信息。因此,ASM根据PST(Partner Status Table)的信息就知道哪个盘的partner是offline状态的。
.
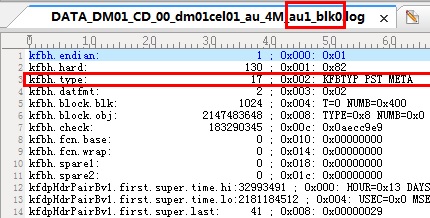
在每一个磁盘组中的第2个AU(也就是编号为1的AU)的第一个block中(ASM的AU和block都是从0开始编号的,即 aun=1 blkn=0)中保存了PST header的信息。例如:


pst1


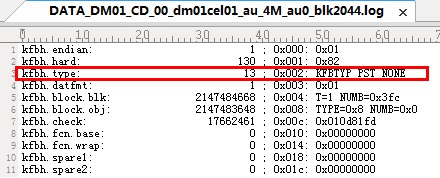
在磁盘上,不含有PST copy的块内容类似如下:


pst2


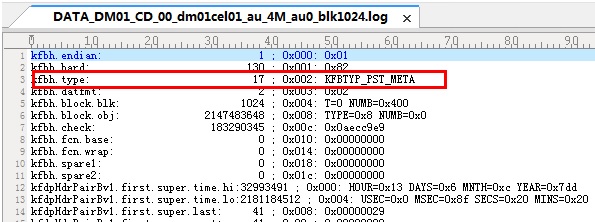
个含有PST copy的块内容类似如下(本例是Exadata的11.2.0.2环境,在10g的ASM中,下列定义的名称稍有区别):


pst4


11.2数据库中,PST header(即 PST元数据)内容如下:


pst3


其他详细信息略去了…………


pst5


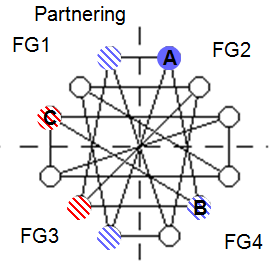
磁盘组中的Partiner关系是对称的两个盘(或者多个盘,10g最多10个,11g中最多8个),比如Disk A中记录了Disk B是他的Partiner Disk,那么在Disk B中也同样记录了Disk A是他的Partiner。
但是磁盘组的Partiner的关系不是传递关系,比如Disk A和Disk B是Partiner关系,Disk B和Disk C是Partiner关系,并不意味着Disk A和Disk C也是Partiner。
有Partner关系disk都是来自于不同Failure Group的,多个镜像的Partner Disk在同一个Failure Group

Partner的选择是执行rebalance操作的第一部分,通常发生在创建Disk Group、向一个磁盘组中添加磁盘或者从磁盘组中删除磁盘的过程中。

发表在 ASM, 体系架构, 内部机制 | 标签为 , , | 留下评论

Exadata的数据保护机制(冗余机制)- 3-Failure Group

Exadata的数据保护机制(冗余机制)- 1

Exadata的数据保护机制(冗余机制)- 2

为了补充前面两篇的一些概念,这里,我们简单介绍下ASM的Failgroup。

ASM提供了3种冗余方法。

EXTERNAL,即ASM本身不做镜像,而依赖于底层存储阵列资深实现镜像;在External下任何的写错误都会导致Disk Group被强制dismount。在此模式下所有的ASM DISK必须都完好,否则Disk Group将无法MOUNT。
.
NORMAL, 即ASM将为每一个asmfile extent创建一个额外的拷贝以便实现冗余;默认情况下所有的asmfile都会被镜像,这样每一个asmfile extent都有2份拷贝。若写错误发生在2个Disk上且这2个Disk是partners时将导致disk Disk Group被强制dismount。若发生失败的磁盘不是partners则不会引起数据丢失和不可用。
.
HIGH, 即ASM为每一个asmfile extent创建两个额外的拷贝以便实现更高的冗余。2个互为partners的Disk的失败不会引起数据丢失,当然,不能有更多的partners Disk失败了。
数据镜像依赖于failure group和extent partnering实现。
.
ASM在NORMAL 或 HIGH 冗余度下可以容许丢失一个failure group中所有的磁盘。
.
下面我来详细说下,Oracle如何通过failure group来提供数据的高可用性。
首先,ASM使用的镜像算法并不是镜像整个disk,而是作extent级的镜像。ASM会自动优化文件分布以降低设备故障造成数据丢失的可能性。
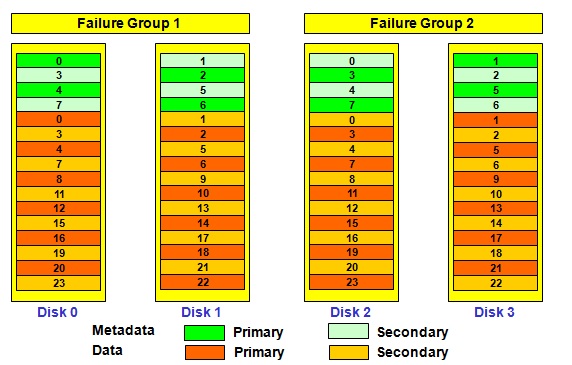
在normal redundancy模式下,ASM的按照extent进行striping时是在一个DiskGroup中完成的(即,在一个DG的2个Fail group之间完成的,而不是一个单独的FG中完成),ASM环境中每分配一个extent都会有一个primary copy和一个secondary copy,ASM的算法保证了secondary copy和primary copy一定是在不同的failure group中,这就是failure group的意义。


fg1


这里我们看到:这里有一个Normal Redundancy的磁盘组,他有2个Failure Group(FG1和FG2),每一个Failure Group中包含了2块磁盘(FG1中包含了Disk0和Disk1,FG2中包含了Disk2和Disk3)

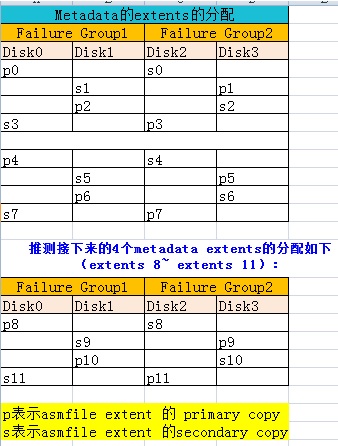
可以看到,ASM分配extents时(asmfile的extent,对应到磁盘上就是AU),extent的分配并不是杂乱无章的,非常有规律的(有一个算法)。


fg2


上述推测可以在data extents的分配中得到验证。当然,实际情况可能是,每个Failure Group存在很多盘,但是分配的算法还是类似这样的。

.
在10g ASM中,默认情况下读取数据时,数据库实例(RDBMS)总是去读取主primary extent,ASM实例不让RDBMS去读备用的镜像拷贝extent(除非是primary copy不可用,才能读取secondary copy),即使这样IO还是均衡的。当数据库实例(RDBMS)将数据写入文件的时候,primary copy可能在任何一个failure group中,而secondary copy则在另外的failure group中。
.
11.1的ASM引入了Fast mirror resync特性,该特性主要为extended distance RAC设计,不建议在常规ASM中使用。
.
Fast mirror resync特性主要是根据11.1引入的PREFERRED_READ_FAILURE_GROUP参数来设置让本地节点优先读取某个failure group中的extent。
.


fg3


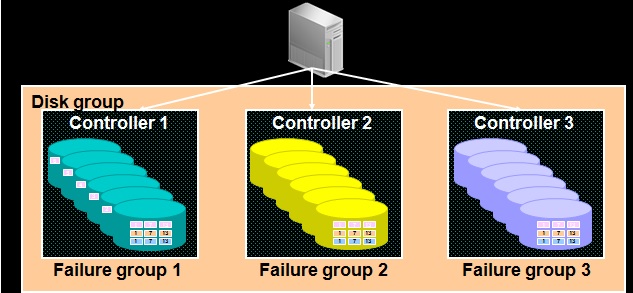
Failure Group的构成是与设备相关的。用户要根据系统中各组件的容错要求来设定Failure Group。
例如,系统中有五块磁盘及一个 SCSI 控制器(SCSI controller)。如果 SCSI 控制器发生故障将导致所有磁盘失效。在此种情况下,用户应将每个磁盘放入不同的Failure Group(在不同的SCSI 控制器下)。

例如这里,我们有3个SCSI 控制器(SCSI controller),每个控制器上连接了6块磁盘,好的设计是针对每一个SCSI 控制器(SCSI controller)下面盘分别创建Failure Group,这样才能真正利用Failure Group的概念来容错。
.
在Exadata上,每个cell都是一个failure group……

发表在 ASM, 体系架构, 内部机制 | 标签为 , , | 留下评论

为Exadata 服务器创建共享文件系统(DBFS)

DBFS是Oracle 11.2的新特性,他提供了在Linux操作系统中将Oracle的ASM数据库映射成文件系统来使用的功能。操作上的文件在DBFS内部是以SecureFiles LOBs(SecureFiles LOB是11.1的新特性,对比与以前的BasicFiles LOBs,Oracle称SecureFiles LOBs为全新设计的LOBs)的形式存储在数据表中。由于篇幅关系,这里不详细描述SecureFiles LOBs了。

其配置过程非常简单,具体参见MOS:

Configuring a Database for DBFS on Oracle Database Machine [ID 1191144.1]
List of Critical Patches Required For Oracle 11.2 DBFS and DBFS Client [ID 1150157.1]

在Exadata上数据库节点的本地磁盘空间是有限的,因此,在做数据加载时,我们需要想办法使用更大的空间来存放数据(以便后续加载到exadata上的数据库中),通常,DBFS是一个很好的选择。

如果经常使用的话,写一个shell自己动完成所有过程,测试过,也就是几分钟,O(∩_∩)O哈哈~。

下面详细讲解一下配置的过程:

配置DBFS 文件系统

为Exadata 服务器创建共享文件系统(DBFS)

创建过程

1、 Run these commands as the root user.

1. add the oracle user to the fuse group on Linux

#su – root

#dcli -g dbs_group -l root usermod -a -G fuse oracle

2. Create an empty directory that will be used as the mount point for the DBFS filesystem

# dcli -g dbs_group -l root mkdir /dbfsmnt

3. Change ownership on the mount point directory so oracle can access it

# dcli -g dbs_group -l root chown oracle:dba /dbfsmnt

4. Create the /etc/fuse.conf file with the user_allow_other option. Ensure proper privileges are applied to this file

# dcli -g dbs_group -l root “echo user_allow_other > /etc/fuse.conf”

#dcli -g dbs_group -l root chmod 644 /etc/fuse.conf

2、To pick up the additional group (fuse) membership for the oracle user, Clusterware must be restarted. For example, to restart Clusterware on all nodes at the same time (non-rolling), you can use the following commands as root:

# /u01/app/11.2.0/grid/bin/crsctl stop cluster -all

# /u01/app/11.2.0/grid/bin/crsctl start cluster –all

or

# /u01/app/11.2.0/grid/bin/crsctl stop cluster -f

3、Create a database to hold the DBFS repository. Follow Note 1191144.1 to create the DBFS repository database.

可以利用现有数据库,或创建新db

4、Create the DBFS repository inside the repository database. To create the repository, create a new tablespace to hold the DBFS objects and a database user that will own the objects.

create tablespace dbfsts datafile ‘+DBFS_DG’ size 30g;

alter tablespace dbfsts add datafile ‘+DBFS_DG’ size 30g;

alter tablespace dbfsts add datafile ‘+DBFS_DG’ size 30g;

alter tablespace dbfsts add datafile ‘+DBFS_DG’ size 30g;

alter tablespace dbfsts add datafile ‘+DBFS_DG’ size 30g;

alter tablespace dbfsts add datafile ‘+DBFS_DG’ size 30g;

alter tablespace dbfsts add datafile ‘+DBFS_DG’ size 30g;

alter tablespace dbfsts add datafile ‘+DBFS_DG’ size 30g;

alter tablespace dbfsts add datafile ‘+DBFS_DG’ size 30g;

alter tablespace dbfsts add datafile ‘+DBFS_DG’ size 30g;

alter tablespace dbfsts add datafile ‘+DBFS_DG’ size 30g;

alter tablespace dbfsts add datafile ‘+DBFS_DG’ size 30g;

alter tablespace dbfsts add datafile ‘+DBFS_DG’ size 30g;

alter tablespace dbfsts add datafile ‘+DBFS_DG’ size 30g;

alter tablespace dbfsts add datafile ‘+DBFS_DG’ size 30g;

alter tablespace dbfsts add datafile ‘+DBFS_DG’ size 30g;

alter tablespace dbfsts add datafile ‘+DBFS_DG’ size 30g;

alter tablespace dbfsts add datafile ‘+DBFS_DG’ size 30g;

alter tablespace dbfsts add datafile ‘+DBFS_DG’ size 30g;

alter tablespace dbfsts add datafile ‘+DBFS_DG’ size 30g;

alter tablespace dbfsts add datafile ‘+DBFS_DG’ size 30g;

alter tablespace dbfsts add datafile ‘+DBFS_DG’ size 30g;

alter tablespace dbfsts add datafile ‘+DBFS_DG’ size 30g;

alter tablespace dbfsts add datafile ‘+DBFS_DG’ size 30g;

alter tablespace dbfsts add datafile ‘+DBFS_DG’ size 30g;

alter tablespace dbfsts add datafile ‘+DBFS_DG’ size 30g;

alter tablespace dbfsts add datafile ‘+DBFS_DG’ size 30g;

alter tablespace dbfsts add datafile ‘+DBFS_DG’ size 30g;

alter tablespace dbfsts add datafile ‘+DBFS_DG’ size 30g;

alter tablespace dbfsts add datafile ‘+DBFS_DG’ size 30g;

–创建dbfs用户

create user dbfs_user identified by dbfs_passwd default tablespace dbfsts quota unlimited on dbfsts;

–为dbfs用户授权

grant create session, create table, create procedure, dbfs_role to dbfs_user;

5、Start DBFS with dbfs user

$ cd $ORACLE_HOME/rdbms/admin

$ sqlplus dbfs_user/dbfs_passwd

SQL>start dbfs_create_filesystem_advanced dbfsts FS1 nocompress nodeduplicate noencrypt non-partition

注:This script takes six arguments:

  • dbfsts: tablespace for the DBFS database objects
  • FS1: filesystem name, this can be any string and will appear as a directory under the mount point
  • nocompress: compression setting
  • nodeduplicate: deduplication setting
  • noencrypt: encryption setting
  • non-partition: partitioning setting

For more information about these arguments, see the DBFS documentation at http://download.oracle.com/docs/cd/E11882_01/appdev.112/e18294/adlob_client.htm#CIHDJHDD.

6、Perform the one-time setup steps for mounting the filesystem.

注:·  There are two options for mounting the DBFS filesystem and each will result in the filesystem being available at /dbfs_direct. Choose one of the two options.

  1. The first option is to utilize the dbfs_client command directly, without using an Oracle Wallet. There are no additional setup steps required to use this option.

本次安装选择了方法A。

  1. The second option is to use the Oracle Wallet to store the password and make use of the mount command. The wallet directory (/home/oracle/dbfs/wallet in the example here) may be any oracle-writable directory (creating a new, empty directory is recommended). All commands in this section should be run by the oracle user unless otherwise noted.

7、Download the mount-dbfs.sh script

如果是win下编辑的文件,需要用如下方法转换。本次下载的文件未转换

# dos2unix /tmp/mount-dbfs.sh

8、编辑mount-dbfs.sh文件

主要包括如下几项:

  • DBNAME
  • MOUNT_POINT
  • DBFS_USER
  • ORACLE_HOME (should be the RDBMS ORACLE_HOME directory)
  • NOHUP_LOG (used only if WALLET=false)
  • DBFS_PASSWD (used only if WALLET=false)
  • DBFS_PWDFILE (used only if WALET=false)
  • WALLET (must be true or false)
  • TNS_ADMIN (used only if WALLET=true)

# cat mount-dbfs.sh

#!/bin/bash

### This script is from Note 1054431.1, ensure you have the latest version

### Note 1054431.1 provides information about the setup required to use this script

### updated 22-MAR-2011

###########################################

### Everyone must set these values

###########################################

### Database name for the DBFS repository as used in “srvctl status database -d $DBNAME”

DBNAME=lunar3

### Mount point where DBFS should be mounted

MOUNT_POINT=/dbfsmnt

### Username of the DBFS repository owner in database $DBNAME

DBFS_USER=dbfs_user

### RDBMS ORACLE_HOME directory path

ORACLE_HOME=/u01/app/oracle/product/11.2.0/dbhome_1

### Full path to a logfile (or /dev/null) for output from dbfs_client’s nohup

### Useful for debugging, normally use /dev/null

NOHUP_LOG=/dev/null

### Syslog facility name (default local3)

### This is only needed if you want to capture debug outputs using syslog

LOGGER_FACILITY=local3

###########################################

### If using password-based authentication, set these

###########################################

### This is the plain text password for the DBFS_USER user

DBFS_PASSWD=dbfs_passwd

### The file used to temporarily store the DBFS_PASSWD so dbfs_client can read it

### This file is removed immediately after it is read by dbfs_client

DBFS_PWDFILE=/home/oracle/.dbfs-passwd.txt

### mount options for dbfs_client

MOUNT_OPTIONS=allow_other,direct_io

###########################################

### If using wallet-based authentication, modify these

###########################################

### WALLET should be true if using a wallet, otherwise, false

WALLET=false

### TNS_ADMIN is the directory containing tnsnames.ora and sqlnet.ora used by DBFS

TNS_ADMIN=/home/oracle/dbfs/tnsadmin

### mount options for wallet-based mounts are in /etc/fstab

###########################################

### No editing is required below this point

###########################################

MOUNT=/bin/mount

GREP=/bin/grep

AWK=/bin/awk

XARGS=’/usr/bin/xargs -r’

ECHO=/bin/echo

LOGGER=’/bin/logger -t DBFS’

RMF=’/bin/rm -f’

PS=/bin/ps

SLEEP=/bin/sleep

KILL=/bin/kill

READLINK=/usr/bin/readlink

BASENAME=/bin/basename

FUSERMOUNT=/bin/fusermount

ID=/usr/bin/id

SRVCTL=$ORACLE_HOME/bin/srvctl

DBFS_CLIENT=$ORACLE_HOME/bin/dbfs_client

HN=/bin/hostname

LD_LIBRARY_PATH=$ORACLE_HOME/lib:/lib64

export ORACLE_HOME LD_LIBRARY_PATH TNS_ADMIN

export PATH=$ORACLE_HOME/bin:$PATH

logit () {

### type: info, error, debug

type=$1

msg=$2

if [ “$type” = “info” ]; then

$ECHO $msg

$LOGGER -p ${LOGGER_FACILITY}.info $msg

elif [ “$type” = “error” ]; then

$ECHO $msg

$LOGGER -p ${LOGGER_FACILITY}.error $msg

elif [ “$type” = “debug” ]; then

$ECHO $msg

$LOGGER -p ${LOGGER_FACILITY}.debug $msg

fi

}

### must not be root

if [ `$ID -u` -eq 0 ]; then

logit error “Run this as the Oracle software owner, not root”

exit 1

fi

### determine how we were called, derive location

SCRIPTPATH=`$READLINK -f $0`

SCRIPTNAME=`$BASENAME $SCRIPTPATH`

### must cd to a directory where the oracle owner can get CWD

cd /tmp

case “$1” in

‘start’)

logit info “$SCRIPTNAME mounting DBFS at $MOUNT_POINT from database $DBNAME”

### check to see if it is already mounted

$SCRIPTPATH status > /dev/null 2>&1

if [ $? -eq 0 ]; then

logit error “$MOUNT_POINT already mounted, use \”$SCRIPTNAME stop\” “\

“before attempting to start”

$SCRIPTPATH status

exit 1

fi

### set the ORACLE_SID dynamically based on OCR info, if it is running

export ORACLE_SID=$($SRVCTL status instance -d $DBNAME -n `$HN -s`| \

$GREP ‘is running’ | $AWK ‘{print $2}’ )

logit info “ORACLE_SID is $ORACLE_SID”

### if there’s no SID defined locally or it isn’t running, stop

if [ -z “$ORACLE_SID” -a “$WALLET” = ‘false’ ]; then

logit error “No running ORACLE_SID available on this host, exiting”

exit 2

fi

### if using password-based startup, use this

if [ “$WALLET” = ‘false’ -a -n “$DBFS_PASSWD” ]; then

$RMF $DBFS_PWDFILE

if [ -f $DBFS_PWDFILE ]; then

logit error “please remove $DBFS_PWDFILE and try again”

exit 1

fi

$ECHO $DBFS_PASSWD > $DBFS_PWDFILE

logit info “spawning dbfs_client command using SID $ORACLE_SID”

(nohup $DBFS_CLIENT ${DBFS_USER}@ -o $MOUNT_OPTIONS \

$MOUNT_POINT < $DBFS_PWDFILE | $LOGGER -p ${LOGGER_FACILITY}.info 2>&1 & ) &

$RMF $DBFS_PWDFILE

elif [ “$WALLET” = true ]; then

### in this case, expect that the /etc/fstab entry is configured,

###   just mount (assume ORACLE_SID is already set too)

logit info “doing mount $MOUNT_POINT using SID $ORACLE_SID with wallet now”

$MOUNT $MOUNT_POINT

fi

### allow time for the mount table update before checking it

$SLEEP 1

### set return code based on success of mountin

$SCRIPTPATH status > /dev/null 2>&1

if [ $? -eq 0 ]; then

logit info “Start — ONLINE”

exit 0

else

logit info “Start — OFFLINE”

exit 1

fi

;;

‘stop’)

$SCRIPTPATH status > /dev/null

if [ $? -eq 0 ]; then

logit info “unmounting DBFS from $MOUNT_POINT”

$FUSERMOUNT -u $MOUNT_POINT

$SCRIPTPATH status > /dev/null

if [ $? -eq 0 ]; then

logit error “Stop – stopped, but still mounted, error”

exit 1

else

logit info “Stop – stopped, now not mounted”

exit 0

fi

else

logit error “filesystem $MOUNT_POINT not currently mounted, no need to stop”

fi

;;

‘check’|’status’)

### check to see if it is mounted

$MOUNT | $GREP “${MOUNT_POINT} ” > /dev/null

if [ $? -eq 0 ]; then

logit debug “Check — ONLINE”

exit 0

else

logit debug “Check — OFFLINE”

exit 1

fi

;;

‘restart’)

logit info “restarting DBFS”

$SCRIPTPATH stop

$SLEEP 2

$SCRIPTPATH start

;;

‘clean’|’abort’)

logit info “cleaning up DBFS using fusermount and kill on dbfs_client and mount.dbfs”

$FUSERMOUNT -u $MOUNT_POINT

$SLEEP 1

$PS -ef | $GREP “$MOUNT_POINT ” | $GREP dbfs_client| $GREP -v grep | \

$AWK ‘{print $2}’ | $XARGS $KILL -9

$PS -ef | $GREP “$MOUNT_POINT ” | $GREP mount.dbfs | $GREP -v grep | \

$AWK ‘{print $2}’ | $XARGS $KILL -9

;;

*)

$ECHO “Usage: $SCRIPTNAME { start | stop | check | status | restart | clean | abort }”

;;

esac

9、After editing, copy the script (rename it if desired or needed) to the proper location (GI_HOME/crs/script) on database nodes and set proper permissions on it, as the root user:

#dcli -g dbs_group -l root -d /u01/app/11.2.0/grid/crs/script -f /tmp/mount-dbfs.sh

#dcli -g dbs_group -l root chown oracle:dba /u01/app/11.2.0/grid/crs/script/mount-dbfs.sh

#dcli -g dbs_group -l root chmod 750 /u01/app/11.2.0/grid/crs/script/mount-dbfs.sh

如果提示fusermount permission denied

#dcli -g dbs_group -l root chmod o+rx /bin/fusermount

10、用oracle用户执行下面的步骤在RAC中注册信息

ACTION_SCRIPT=/u01/app/11.2.0/grid/crs/script/mount-dbfs.sh

RESNAME=dbfs_mount

DBNAME=lunar3

DBNAMEL=`echo $DBNAME | tr A-Z a-z`

ORACLE_HOME=/u01/app/oracle/product/11.2.0/dbhome_1

PATH=$ORACLE_HOME/bin:$PATH

export PATH ORACLE_HOME

crsctl add resource $RESNAME \

-type local_resource \

-attr “ACTION_SCRIPT=$ACTION_SCRIPT, \

CHECK_INTERVAL=30, \

START_DEPENDENCIES=’hard(ora.$DBNAMEL.db)pullup(ora.$DBNAMEL.db)’,\

STOP_DEPENDENCIES=’hard(ora.$DBNAMEL.db)’,\

SCRIPT_TIMEOUT=300”

11、After the resource is created, you should be able to see the dbfs_mount resource by running crsctl stat res dbfs_mount and it should show OFFLINE on all nodes. For example:

[oracle@dm01db04 ~]$ srvctl stop database -d lunar3

[oracle@dm01db04 ~]$ crsctl status resource -t

——————————————————————————–

NAME           TARGET  STATE        SERVER                   STATE_DETAILS

——————————————————————————–

Local Resources

——————————————————————————–

dbfs_mount

OFFLINE OFFLINE      dm01db01

OFFLINE OFFLINE      dm01db02

OFFLINE OFFLINE      dm01db03

OFFLINE OFFLINE      dm01db04

ora.DATA_DM01.dg

ONLINE  ONLINE       dm01db01

ONLINE  ONLINE       dm01db02

ONLINE  ONLINE       dm01db03

ONLINE  ONLINE       dm01db04

ora.DBFS_DG.dg

ONLINE  ONLINE       dm01db01

ONLINE  ONLINE       dm01db02

ONLINE  ONLINE       dm01db03

ONLINE  ONLINE       dm01db04

ora.LISTENER.lsnr

ONLINE  ONLINE       dm01db01

ONLINE  ONLINE       dm01db02

ONLINE  ONLINE       dm01db03

ONLINE  ONLINE       dm01db04

ora.RECO_DM01.dg

ONLINE  ONLINE       dm01db01

ONLINE  ONLINE       dm01db02

ONLINE  ONLINE       dm01db03

ONLINE  ONLINE       dm01db04

ora.asm

ONLINE  ONLINE       dm01db01

ONLINE  ONLINE       dm01db02

ONLINE  ONLINE       dm01db03

ONLINE  ONLINE       dm01db04

ora.gsd

OFFLINE OFFLINE      dm01db01

OFFLINE OFFLINE      dm01db02

OFFLINE OFFLINE      dm01db03

OFFLINE OFFLINE      dm01db04

ora.net1.network

ONLINE  ONLINE       dm01db01

ONLINE  ONLINE       dm01db02

ONLINE  ONLINE       dm01db03

ONLINE  ONLINE       dm01db04

ora.ons

ONLINE  ONLINE       dm01db01

ONLINE  ONLINE       dm01db02

ONLINE  ONLINE       dm01db03

ONLINE  ONLINE       dm01db04

ora.registry.acfs

ONLINE  ONLINE       dm01db01

ONLINE  ONLINE       dm01db02

ONLINE  ONLINE       dm01db03

ONLINE  ONLINE       dm01db04

——————————————————————————–

Cluster Resources

——————————————————————————–

ora.LISTENER_SCAN1.lsnr

1        ONLINE  ONLINE       dm01db04

ora.LISTENER_SCAN2.lsnr

1        ONLINE  ONLINE       dm01db03

ora.LISTENER_SCAN3.lsnr

1        ONLINE  ONLINE       dm01db01

ora.cvu

1        ONLINE  ONLINE       dm01db02

ora.dm01db01.vip

1        ONLINE  ONLINE       dm01db01

ora.dm01db02.vip

1        ONLINE  ONLINE       dm01db02

ora.dm01db03.vip

1        ONLINE  ONLINE       dm01db03

ora.dm01db04.vip

1        ONLINE  ONLINE       dm01db04

ora.lunar1.db

1        ONLINE  ONLINE       dm01db01                 Open

2        ONLINE  ONLINE       dm01db02                 Open

3        ONLINE  ONLINE       dm01db03                 Open

4        ONLINE  ONLINE       dm01db04                 Open

ora.lunar1.lunar1_pub.svc

1        ONLINE  ONLINE       dm01db01

ora.lunar2.db

1        ONLINE  ONLINE       dm01db02                 Open

2        ONLINE  ONLINE       dm01db01                 Open

3        ONLINE  ONLINE       dm01db03                 Open

4        ONLINE  ONLINE       dm01db04                 Open

ora.lunar2.lunar2_pub.svc

1        ONLINE  ONLINE       dm01db02

ora.lunar3.db

1        OFFLINE OFFLINE                               Instance Shutdown

2        OFFLINE OFFLINE                               Instance Shutdown

3        OFFLINE OFFLINE                               Instance Shutdown

4        OFFLINE OFFLINE                               Instance Shutdown

ora.lunar3.lunar3_pub.svc

1        OFFLINE OFFLINE

ora.oc4j

1        ONLINE  ONLINE       dm01db02

ora.scan1.vip

1        ONLINE  ONLINE       dm01db04

ora.scan2.vip

1        ONLINE  ONLINE       dm01db03

ora.scan3.vip

1        ONLINE  ONLINE       dm01db01

[oracle@dm01db04 ~]$ crsctl stat res dbfs_mount -t

——————————————————————————–

NAME           TARGET  STATE        SERVER                   STATE_DETAILS

——————————————————————————–

Local Resources

——————————————————————————–

dbfs_mount

OFFLINE OFFLINE      dm01db01

OFFLINE OFFLINE      dm01db02

OFFLINE OFFLINE      dm01db03

OFFLINE OFFLINE      dm01db04

12、To bring dbfs_mount online which will mount the filesystem on all nodes, run crsctl start resource dbfs_mount from any cluster node

[oracle@dm01db04 ~]$ crsctl start resource dbfs_mount

CRS-2672: Attempting to start ‘ora.lunar3.db’ on ‘dm01db03’

CRS-2672: Attempting to start ‘ora.lunar3.db’ on ‘dm01db01’

CRS-2672: Attempting to start ‘ora.lunar3.db’ on ‘dm01db02’

CRS-2672: Attempting to start ‘ora.lunar3.db’ on ‘dm01db04’

CRS-2676: Start of ‘ora.lunar3.db’ on ‘dm01db01’ succeeded

CRS-2672: Attempting to start ‘dbfs_mount’ on ‘dm01db01’

CRS-2676: Start of ‘ora.lunar3.db’ on ‘dm01db03’ succeeded

CRS-2672: Attempting to start ‘ora.lunar3.lunar3_pub.svc’ on ‘dm01db03’

CRS-2672: Attempting to start ‘dbfs_mount’ on ‘dm01db03’

CRS-2676: Start of ‘ora.lunar3.db’ on ‘dm01db04’ succeeded

CRS-2672: Attempting to start ‘dbfs_mount’ on ‘dm01db04’

CRS-5809: Failed to execute ‘ACTION_SCRIPT’ value of ‘/u01/app/11.2.0/grid/crs/script/mount-dbfs.sh’ for ‘dbfs_mount’. Error information ‘no exe permission, file [/u01/app/11.2.0/grid/crs/script/mount-dbfs.sh]’

CRS-5809: Failed to execute ‘ACTION_SCRIPT’ value of ‘/u01/app/11.2.0/grid/crs/script/mount-dbfs.sh’ for ‘dbfs_mount’. Error information ‘no exe permission, file [/u01/app/11.2.0/grid/crs/script/mount-dbfs.sh]’

CRS-2674: Start of ‘dbfs_mount’ on ‘dm01db01’ failed

CRS-2679: Attempting to clean ‘dbfs_mount’ on ‘dm01db01’

CRS-5809: Failed to execute ‘ACTION_SCRIPT’ value of ‘/u01/app/11.2.0/grid/crs/script/mount-dbfs.sh’ for ‘dbfs_mount’. Error information ‘no exe permission, file [/u01/app/11.2.0/grid/crs/script/mount-dbfs.sh]’

CRS-5809: Failed to execute ‘ACTION_SCRIPT’ value of ‘/u01/app/11.2.0/grid/crs/script/mount-dbfs.sh’ for ‘dbfs_mount’. Error information ‘no exe permission, file [/u01/app/11.2.0/grid/crs/script/mount-dbfs.sh]’

CRS-2674: Start of ‘dbfs_mount’ on ‘dm01db03’ failed

CRS-2679: Attempting to clean ‘dbfs_mount’ on ‘dm01db03’

CRS-5809: Failed to execute ‘ACTION_SCRIPT’ value of ‘/u01/app/11.2.0/grid/crs/script/mount-dbfs.sh’ for ‘dbfs_mount’. Error information ‘no exe permission, file [/u01/app/11.2.0/grid/crs/script/mount-dbfs.sh]’

CRS-5809: Failed to execute ‘ACTION_SCRIPT’ value of ‘/u01/app/11.2.0/grid/crs/script/mount-dbfs.sh’ for ‘dbfs_mount’. Error information ‘no exe permission, file [/u01/app/11.2.0/grid/crs/script/mount-dbfs.sh]’

CRS-2674: Start of ‘dbfs_mount’ on ‘dm01db04’ failed

CRS-2679: Attempting to clean ‘dbfs_mount’ on ‘dm01db04’

CRS-2676: Start of ‘ora.lunar3.lunar3_pub.svc’ on ‘dm01db03’ succeeded

CRS-2676: Start of ‘ora.lunar3.db’ on ‘dm01db02’ succeeded

CRS-2672: Attempting to start ‘dbfs_mount’ on ‘dm01db02’

CRS-5809: Failed to execute ‘ACTION_SCRIPT’ value of ‘/u01/app/11.2.0/grid/crs/script/mount-dbfs.sh’ for ‘dbfs_mount’. Error information ‘no exe permission, file [/u01/app/11.2.0/grid/crs/script/mount-dbfs.sh]’

CRS-5809: Failed to execute ‘ACTION_SCRIPT’ value of ‘/u01/app/11.2.0/grid/crs/script/mount-dbfs.sh’ for ‘dbfs_mount’. Error information ‘no exe permission, file [/u01/app/11.2.0/grid/crs/script/mount-dbfs.sh]’

CRS-2674: Start of ‘dbfs_mount’ on ‘dm01db02’ failed

CRS-2679: Attempting to clean ‘dbfs_mount’ on ‘dm01db02’

CRS-5809: Failed to execute ‘ACTION_SCRIPT’ value of ‘/u01/app/11.2.0/grid/crs/script/mount-dbfs.sh’ for ‘dbfs_mount’. Error information ‘no exe permission, file [/u01/app/11.2.0/grid/crs/script/mount-dbfs.sh]’

CRS-5809: Failed to execute ‘ACTION_SCRIPT’ value of ‘/u01/app/11.2.0/grid/crs/script/mount-dbfs.sh’ for ‘dbfs_mount’. Error information ‘no exe permission, file [/u01/app/11.2.0/grid/crs/script/mount-dbfs.sh]’

CRS-2678: ‘dbfs_mount’ on ‘dm01db02’ has experienced an unrecoverable failure

CRS-0267: Human intervention required to resume its availability.

CRS-2673: Attempting to stop ‘ora.lunar3.db’ on ‘dm01db02’

CRS-5809: Failed to execute ‘ACTION_SCRIPT’ value of ‘/u01/app/11.2.0/grid/crs/script/mount-dbfs.sh’ for ‘dbfs_mount’. Error information ‘no exe permission, file [/u01/app/11.2.0/grid/crs/script/mount-dbfs.sh]’

CRS-5809: Failed to execute ‘ACTION_SCRIPT’ value of ‘/u01/app/11.2.0/grid/crs/script/mount-dbfs.sh’ for ‘dbfs_mount’. Error information ‘no exe permission, file [/u01/app/11.2.0/grid/crs/script/mount-dbfs.sh]’

CRS-2678: ‘dbfs_mount’ on ‘dm01db01’ has experienced an unrecoverable failure

CRS-0267: Human intervention required to resume its availability.

CRS-2673: Attempting to stop ‘ora.lunar3.db’ on ‘dm01db01’

CRS-5809: Failed to execute ‘ACTION_SCRIPT’ value of ‘/u01/app/11.2.0/grid/crs/script/mount-dbfs.sh’ for ‘dbfs_mount’. Error information ‘no exe permission, file [/u01/app/11.2.0/grid/crs/script/mount-dbfs.sh]’

CRS-5809: Failed to execute ‘ACTION_SCRIPT’ value of ‘/u01/app/11.2.0/grid/crs/script/mount-dbfs.sh’ for ‘dbfs_mount’. Error information ‘no exe permission, file [/u01/app/11.2.0/grid/crs/script/mount-dbfs.sh]’

CRS-2678: ‘dbfs_mount’ on ‘dm01db03’ has experienced an unrecoverable failure

CRS-0267: Human intervention required to resume its availability.

CRS-2673: Attempting to stop ‘ora.lunar3.lunar3_pub.svc’ on ‘dm01db03’

CRS-5809: Failed to execute ‘ACTION_SCRIPT’ value of ‘/u01/app/11.2.0/grid/crs/script/mount-dbfs.sh’ for ‘dbfs_mount’. Error information ‘no exe permission, file [/u01/app/11.2.0/grid/crs/script/mount-dbfs.sh]’

CRS-5809: Failed to execute ‘ACTION_SCRIPT’ value of ‘/u01/app/11.2.0/grid/crs/script/mount-dbfs.sh’ for ‘dbfs_mount’. Error information ‘no exe permission, file [/u01/app/11.2.0/grid/crs/script/mount-dbfs.sh]’

CRS-2678: ‘dbfs_mount’ on ‘dm01db04’ has experienced an unrecoverable failure

CRS-0267: Human intervention required to resume its availability.

CRS-2673: Attempting to stop ‘ora.lunar3.db’ on ‘dm01db04’

CRS-2677: Stop of ‘ora.lunar3.lunar3_pub.svc’ on ‘dm01db03’ succeeded

CRS-2673: Attempting to stop ‘ora.lunar3.db’ on ‘dm01db03’

CRS-2677: Stop of ‘ora.lunar3.db’ on ‘dm01db02’ succeeded

CRS-2677: Stop of ‘ora.lunar3.db’ on ‘dm01db01’ succeeded

CRS-2677: Stop of ‘ora.lunar3.db’ on ‘dm01db04’ succeeded

CRS-2677: Stop of ‘ora.lunar3.db’ on ‘dm01db03’ succeeded

CRS-4000: Command Start failed, or completed with errors.

上面提示mount-dbfs.sh权限不足,需要做如下授权:

—————————————————————-

#dcli -g dbs_group -l root chmod 755 /u01/app/11.2.0/grid/crs/script/mount-dbfs.sh

单独在一个节点上执行mount-dbfs.sh ,方法如下:

#/u01/app/11.2.0/grid/crs/script/mount-dbfs.sh [ start | stop | check ]

Q1:使用grid用户注册dbfs 资源后crsctl start resource dbfs-mount 显示db启动后,dbfs-mount在各节点上failed。后来将该dbfs资源删除后,使用oracle用户重新在crs中注册,该问题解决。

oracle@dm01db04 ~]$ crsctl start resource dbfs_mount -f

CRS-2672: Attempting to start ‘ora.lunar3.db’ on ‘dm01db04’

CRS-2672: Attempting to start ‘ora.lunar3.db’ on ‘dm01db03’

CRS-2672: Attempting to start ‘ora.lunar3.db’ on ‘dm01db01’

CRS-2672: Attempting to start ‘ora.lunar3.db’ on ‘dm01db02’

CRS-2676: Start of ‘ora.lunar3.db’ on ‘dm01db03’ succeeded

CRS-2672: Attempting to start ‘ora.lunar3.lunar3_pub.svc’ on ‘dm01db03’

CRS-2672: Attempting to start ‘dbfs_mount’ on ‘dm01db03’

CRS-2676: Start of ‘ora.lunar3.db’ on ‘dm01db02’ succeeded

CRS-2672: Attempting to start ‘dbfs_mount’ on ‘dm01db02’

CRS-2676: Start of ‘ora.lunar3.db’ on ‘dm01db04’ succeeded

CRS-2672: Attempting to start ‘dbfs_mount’ on ‘dm01db04’

CRS-2676: Start of ‘ora.lunar3.db’ on ‘dm01db01’ succeeded

CRS-2672: Attempting to start ‘dbfs_mount’ on ‘dm01db01’

CRS-2676: Start of ‘ora.lunar3.lunar3_pub.svc’ on ‘dm01db03’ succeeded

CRS-2674: Start of ‘dbfs_mount’ on ‘dm01db02’ failed

CRS-2679: Attempting to clean ‘dbfs_mount’ on ‘dm01db02’

CRS-2674: Start of ‘dbfs_mount’ on ‘dm01db04’ failed

CRS-2679: Attempting to clean ‘dbfs_mount’ on ‘dm01db04’

CRS-2674: Start of ‘dbfs_mount’ on ‘dm01db01’ failed

CRS-2679: Attempting to clean ‘dbfs_mount’ on ‘dm01db01’

CRS-2674: Start of ‘dbfs_mount’ on ‘dm01db03’ failed

CRS-2679: Attempting to clean ‘dbfs_mount’ on ‘dm01db03’

CRS-2681: Clean of ‘dbfs_mount’ on ‘dm01db02’ succeeded

CRS-2673: Attempting to stop ‘ora.lunar3.db’ on ‘dm01db02’

CRS-2681: Clean of ‘dbfs_mount’ on ‘dm01db03’ succeeded

CRS-2673: Attempting to stop ‘ora.lunar3.lunar3_pub.svc’ on ‘dm01db03’

CRS-2677: Stop of ‘ora.lunar3.lunar3_pub.svc’ on ‘dm01db03’ succeeded

CRS-2673: Attempting to stop ‘ora.lunar3.db’ on ‘dm01db03’

CRS-2681: Clean of ‘dbfs_mount’ on ‘dm01db04’ succeeded

CRS-2673: Attempting to stop ‘ora.lunar3.db’ on ‘dm01db04’

CRS-2681: Clean of ‘dbfs_mount’ on ‘dm01db01’ succeeded

CRS-2673: Attempting to stop ‘ora.lunar3.db’ on ‘dm01db01’

CRS-2677: Stop of ‘ora.lunar3.db’ on ‘dm01db02’ succeeded

CRS-2677: Stop of ‘ora.lunar3.db’ on ‘dm01db03’ succeeded

CRS-2677: Stop of ‘ora.lunar3.db’ on ‘dm01db04’ succeeded

CRS-2677: Stop of ‘ora.lunar3.db’ on ‘dm01db01’ succeeded

CRS-4000: Command Start failed, or completed with errors.

Mount后验证

[root@dm01db03 ~]# df -h

Filesystem            Size  Used Avail Use% Mounted on

/dev/mapper/VGExaDb-LVDbSys1

                       30G  5.9G   23G  21% /

/dev/sda1             124M   16M  102M  14% /boot

/dev/mapper/VGExaDb-LVDbOra1

                       99G   38G   56G  41% /u01

tmpfs                  81G  192M   81G   1% /dev/shm

dbfs-dbfs_user@:/     900G  313M  900G   1% /dbfsmnt

发表在 FAQ, 安装和升级, 日常运维 | 2 条评论

Exadata的数据保护机制(冗余机制)- 2

在上一篇中,我们讲了存储节点上的盘的划分,请参考Exadata的数据保护机制(冗余机制)- 1
那么这次我们来说说,在Exadata上有ASM哪些不同于传统架构(非Exadata环境)的特点,他是怎么保护数据的。
首先我们来回顾一下ASM的相关知识点
au
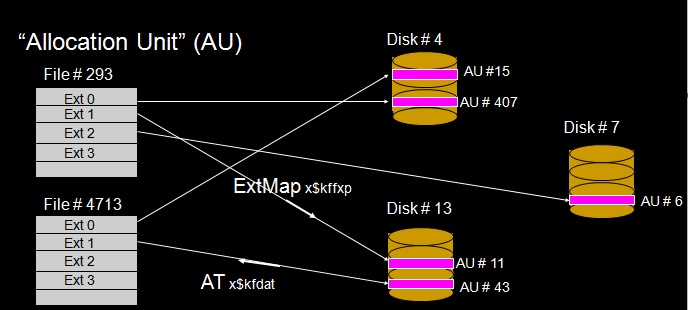
我们知道,就像数据库文件从逻辑上分为很多extents一样(每个segment由多个extents组成),ASM的文件(ASM FILE)也分为很多extent(ASM FILE EXTENTS)。也就是说,数据库中datafile包含的逻辑存储单元是segment,extent等等,而ASM上ASMFILE的逻辑存储单元是asmfile extent。
数据库文件的物理单元是block,而ASM文件的物理单元是AU。
因此,我们知道了,每个ASM file包含很多extent,ASM FILE和extent之间对应关系就是 EXTENT MAP(每个asmfile上extents的分布)
每个物理磁盘包含很多AU,磁盘和AU之间的对应关系就在ALLOCATION TABLE中(每个磁盘上AU的分布)
ASM的镜像是基于文件extent的粒度,extent分布在多个磁盘之间,称为partner。Partner disk会存放在一个或者多个分离的failure group上。

在ASM中,每个文件都按照AU的尺寸打散到磁盘组中所有的磁盘上,我们把这种条带划叫做粗糙条带划(COARSE striping),粗糙条带划是根据AU的尺寸的(即,缺省为1M,Exadata上通常为4M)。对于控制文件的条带划,是采用128k的Striping的,称之为“Fine striping”。
AU的缺省尺寸是1M,ASM的block缺省大小是4k,这其实是受隐含参数控制的:
_asm_blksize 4096 metadata block size
_asm_ausize 1048576 allocation unit size

在Exadata上缺省的AU为4M(推荐值),ASM block为4k。
查询各种文件条带划的信息(下面是在我的Exadata VM上测试的输出):
SQL> select distinct name,stripe from v$asm_template;

NAME                           STRIPE
------------------------------ ------
ARCHIVELOG                     COARSE
ASMPARAMETERFILE               COARSE
AUTOBACKUP                     COARSE
BACKUPSET                      COARSE
CHANGETRACKING                 COARSE
CONTROLFILE                    FINE ------只有控制文件是按照128k进行条带划的
DATAFILE                       COARSE
DATAGUARDCONFIG                COARSE
DUMPSET                        COARSE
FLASHBACK                      COARSE
FLASHFILE                      COARSE
OCRFILE                        COARSE
ONLINELOG                      COARSE
PARAMETERFILE                  COARSE
TEMPFILE                       COARSE
XTRANSPORT                     COARSE

16 rows selected.

SQL> 

在 Exadata 上, ASM Diskgroup 是按照 Normal Redundancy 创建的(可以选择 High Redundancy来选择,但是这样选择的客户很少)。
因此,每个AU采用双份Fail Group的保护方式,也就是说,数据将会同时在两个Failgroup中个存有一个副本。
而在上一节中《Exadata的数据保护机制(冗余机制)- 1 》 ,我们已经讨论了不同的Failgroup一定不会来自于同一个Storage Cell。
这样就确保了不论是一块磁盘损坏还是有整个Storage Cell损坏都不会丢失数据。ASM镜像的原理请参见官方的解释:
1
综上,在10g中,每盘都会存在最多10个Disk partner,而在11gR2中每盘都会存在最多8个Disk partner。
(它是受到隐含参数”_asm_partner_target_disk_part”控制的)。

因此,在re-balance过程中,如果再次发生磁盘的故障,必须故障磁盘是和原有损坏磁盘有partner关系的有限数量的磁盘(Exadata上是小于8块盘)才可能发生数据丢失的情况。每个cell上12块盘,一个1/4 Rack也有36块盘(36块盘分别是36个celldisk,然后每个celldisk上划分一块空间创建了griddisk,缺省创建3个前缀的griddisk(DATA_,RECO_,DBFS_),共108个griddisk,创建ASM磁盘组的时候,从来自于3个cell的108个griddisk中那盘…………太罗嗦了,不说了),因此,这个概率是很小的。

当发生了一块磁盘损坏的情况下,由于这个磁盘在其他Failgroup上有镜像数据,ASM将控制其他可用的Failgroup(没有损坏的)进行Reblance操作。
这么做的意义,主要是为了将丢失了保护的数据(单份数据)再次实现跨Failgroup的重新分布,从而,确保在Reblance结束后,该数据在其他没有损坏的盘上再次构建了Normal Redundancy的保护(即,又有两份数据来保护了)。

需要注意的是,一个磁盘并不会和不在同一个Failgroup的其他所有磁盘构成partner disk关系。

检查group#=1号 disk#=0号磁盘的partner关系:
[grid@dm01db01 ~]$ sqlplus /nolog

SQL*Plus: Release 11.2.0.3.0 Production on Thu Mar 31 16:05:17 2012

Copyright (c) 1982, 2010, Oracle. All rights reserved.

SQL> connect / as sysasm;
Connected.
SQL> select p.number_kfdpartner,d.failgroup
2 from x$kfdpartner p,v$asm_disk d
3 where p.disk=0
4 and p.grp=1
5 and p.grp=group_number
6 and p.number_kfdpartner=d.disk_number;

NUMBER_KFDPARTNER FAILGROUP
—————– ——————————
167 DM01CEL01
165 DM01CEL01
15 DM01CEL03
33 DM01CEL04
23 DM01CEL03
26 DM01CEL04
151 DM01CEL14
150 DM01CEL14

8 rows selected.

SQL>
这里我们看到,这是一个满配的Exadata,这块盘(group#1, disk#0)的数据镜像分布在其它8块partner disk中(参见《Doc ID 1086199.1》(10g中是10块,11.2以后是8块),其partner disk分别在4个cell上(cell1, cell3, cell4, cell14)的8个磁盘上。
因此,在re-balance过程中,如果再次发生磁盘的故障,必须故障磁盘是和原有损坏磁盘有partner关系的有限数量的磁盘(小于10块盘)才可能发生数据丢失的情况。
可见,这个数据丢失的概率是非常小的(满配的 Exadata 上,14*12=168块盘)。

在更加恶劣的情况下,例如一个Storage Cell损坏,也不会导致数据丢失。ASM会控制位于剩余的Storage Cell的Failgroup对这时候没保护的数据进行重分布,当然,前提是你还有多余的空间让他做Reblance操作。

如果这个由于这个cell损坏,系统在做Rebalance时,再坏了一个Cell会怎么样呢?

当你明白了上面的原理,这个我不说你也知道了,O(∩_∩)O哈哈~

答案: 分两种情况。

发表在 体系架构, 内部机制 | 标签为 , , , | 留下评论