看图说话——Exadata和Exalogic(或者Exadata)级联-2

上一篇,我们梳理了Exadata内部连接和2个Exadata的连接

看图说话——Exadata的网络架构

看图说话——Exadata和Exalogic(或者Exadata)级联-1

事实上,Exalogic和Exadata的 物理连线和两个Exadata之间的物理连线没有太大区别,只是对外出口,如果是Exalogic和Exadata的话,通常客户会买万兆模块,这个万兆模块从Exalogic上连接到客户的核心工作网络,提供应用接口。

当然,如果客户数据量很大,对备份有较高要求,那么也可以购买万兆模块安装在Exadata上,用于连接到客户的备份服务网络中(一般用在每个db节点的net3上)。

下面的图是一个1/4 Exalogic和1/4 Exadata的连接:

Double-2-4-1

1/4 Rack没有Spine switch,因此,从这个图,我们看到,每个Leaf switch都需要连接到其他的Leaf switch上。小学2今年的奥数中貌似有类似的题目,O(∩_∩)O哈哈~

计算下,总共几根线?

答:  每个Leaf switch需要连接两外3个Leaf switch,那么不考虑冗余的话,加上单机柜中本身两个Leaf switch的连线,总共是6跟。也就是说,客户最少需要额外购买的4根Infiniband线(客户可以从oracle购买,也可以自己找符合要求的厂商定做),当然,如果考虑冗余的话,需要至少8跟。

下面看下1/4 Exalogic跟1/2 Exadata或者Full Rack连接的情况:

Double-2-full
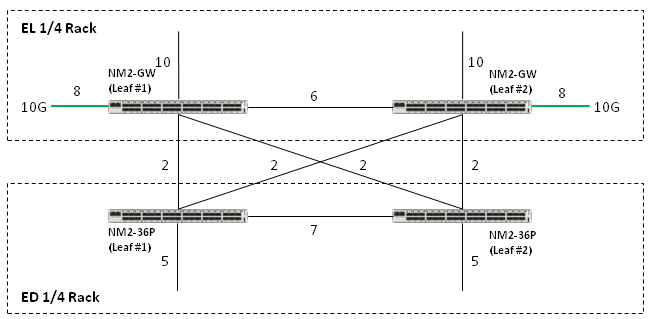
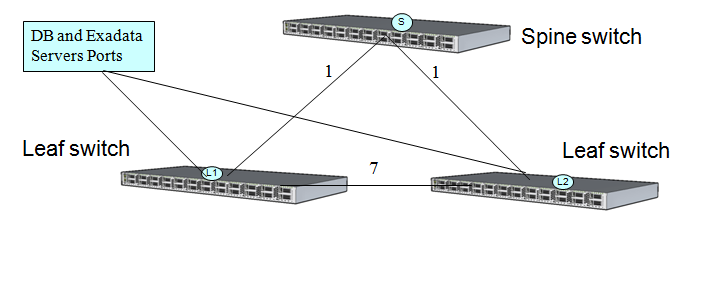
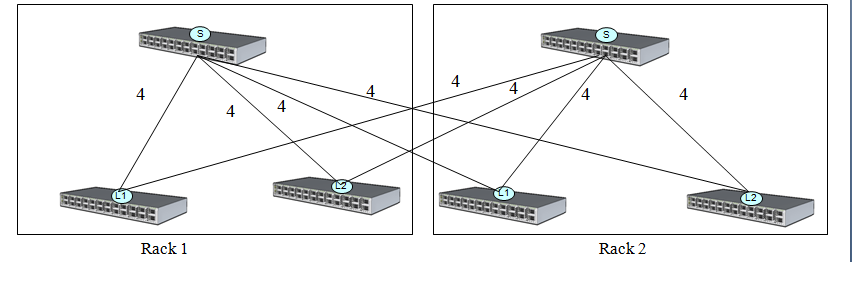
我们看到,实际上,除了Exadata上本身两个Leaf连接自身的Spine switch外,没有多余的概念,也就是仍然是客户需要额外购买至少4跟Infiniband,考虑冗余的话,需要至少8根。
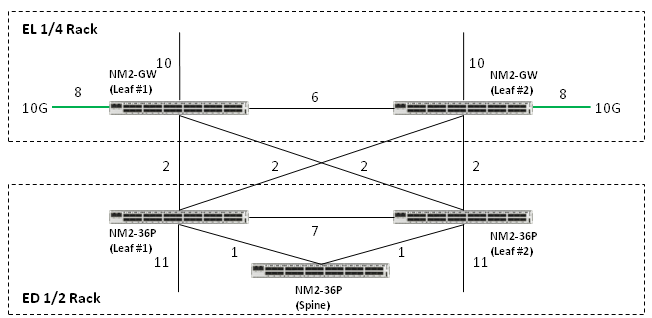
就这么简单的算法,学过奥数的同学们或者家里有宝宝学习奥数的,下次有这样需求,直接出一道题给孩纸们,他们会很快算出来的,O(∩_∩)O哈哈~

从上我们讲的Exalogic连接Exadata,我们知道他们走了Infiniband的高速互联网络,那么这个网络在软件层面如何搭建呢? 如何配置他们的SDP连接?

下次,我们讲这个,O(∩_∩)O哈哈~

发表在 体系架构 | 标签为 , , , , | 留下评论

看图说话——Exadata和Exalogic(或者Exadata)级联-1

上一篇,我们梳理了Exadata的网络架构,今天我们说说Double-E的物理联线。

看图说话——Exadata的网络架构

通常我们说Double-E,这里E可以使Exadata,也可以是Exalogic,Double—E级联的方法都差不多,但是X4以后会有变化,因为X3-2和X3-2以前,从1/2 Rack开始都带有一个Spine switch,也就是你在真机上看到的位于机柜最下层的IB Switch,这个Spine Switch主要作用就是用于机柜间的级联。而中间的两个IB Switch叫做Leaf switch,这个适用于机柜内部节点间通信(db和db通信,db和cell通信等)。

现在我们先说说,在一个机柜的情况:

switch-X3

从这个图,我们很清晰的看到,在一个机柜中,每个Leaf switch都需要跟另一个Leaf switch连接,同时,每个Spine switch还需要和机柜中的所有Leaf switch连接。也就是他们之间至少3根Infiniband连线。

那么如果是两个满配的Exadata如何连接呢?full-X3

可以看到,如果两个满配的机柜级联,那么每个Leaf switch都会有两根线,分别连接到两个机柜的Spine switch,而在每个机柜中的2个Leaf switch之间无需连接了。

其实看这个图,如果数据比较好的同学马上就发现了,一共需要多少根连线?

X3和X3以前,1/2 Rack和Full Rack都出厂自带2个Leaf switch和1个Spine switch。X4没有带了,需要单独购买,连接方式也有变化)。这里,每个机柜中的Spine  switch都需要连接本机柜和其他机柜的所有Leaf switch,那么两个机柜中就有4个Leaf switch,总共2个Spine switch,因此,就需要至少8根连线。

我们可以推算一下,如果有3个柜子级联,那么每个Spine Switch上需要多少根线呢?3个机柜级联,总共需要多少根线呢?

答:

(1)每个Spine switch上有6根线。

(2)每个柜子2个leaf switch,3个柜子共6个leaf switch,因此,每个Spine switch上至少会出来6根线,因此3*6=18根连线

X4开始,每个Leaf switch的连接都需要连接到其他的Leaf switch上了,类似于下一篇,我们要讲解的1/4 Exalogic和 1/4 Exadata的连接……

……待续

发表在 体系架构 | 标签为 , , | 留下评论

看图说话——Exadata的网络架构

下面两个图是Exadata的Owner Guide中讲解网络链接和部署的。

安装好了Exadata,我们需要熟悉Exadata上都有哪些部件,比如数据库服务器,存储服务器,思科交换机,2个PDU(用于冗余)等等,他们是怎么接到咱们的生成环境的,他们之间是怎么连接的,我们怎么去管理他们。。。

X2-2和X3-2的连接方式:
X3-2
X2-2的图,X3的图跟这个没有太大差别,只是X3以后没有KVM了,X4以后,少了一个Spine Switch(需要单独购买)。
其他没太大区别(X4的IB绑定有变化,后续会详细解释)。Sun的ILOM做的非常好,实际上很多管理功能,都可以通过ILOM来完成。
比如前面讲的使用ILOM来完成ISO image的Reimage功能,重启节点功能,还有收集信息功能,系统启动时troubleshooting等等。


计算节点上的对外服务部分有两种方式:
1,一种是NET0和NET1绑定作为client,接入到客户的核心网络,提供对外的数据库连接服务。
2,一种是不绑定,那么通常NET1连接到核心网络,提供数据库连接服务,NET2和NET3都作为其他用途,比如他们分别俩接到备份和灾备网络等等。
当然,大部分客户是绑定net0和net1作为bondeth0来对外提供数据库服务用。
X4-2的连接方式:
X4-2

在网连接上,X2-2和X3-2的连接方法基本没有太大区别。
但是从X4开始,IB不在安装时进行绑定了,而是分别连接到IB1和IB2两个IB交换机上,这是因为从X4开始提供Active-Active的方式,带宽从40Gb/s升级为80Gb/s。
但是如果Double-E级联(比如2个Exadata机柜,或者Exadata跟Exalogic级联),就不能使用这种Active-Active的方式。

除此以外,我们看到,其余部分的连接都基本相同。

从上面的图我们可以看到,exadata上的网络主要分为4大块:
第一部分,是位于最下面的绿色区域的Infiniband网络连接,也就是exadata的内网。
内网主要是数据库服务器和存储服务器通过两个Infiniband交换机连接,能够获得高带宽低延迟带来的高性能。


第二部分,就是蓝色部分的管理网络。
Exadata上所有的部件都有一根线连接到思科交换机上。然后从思科交换机上有一根线接入到客户的管理网络,这样就方便客户管理。
其实就像传统小机+存储的架构一样,小机也都要连接到客户的管理网段的交换机,然后远程维护(比如使用crt,xmanager等等字符或者图形的管理工具维护客户的小机)
exadata上的所有部件也都要让客户可维护和可管理,就是通过各部件连接到思科交换机,然后思科交换机接入到客户的管理网段。
连接到思科交换机的部件有:
(1)在X2上有KVM,因此KVM要连接到思科交换机
(2)然后两个PDU(PDUA , PDUB)分别连接线到思科交换机上,也是为了远程管理。
当然需要管理PDU的时候不多,但是如果安装一些监控软件,比如oracle 的grid control的时候就需要能够连接PDU,因此,我们一般也把PDU接入到思科交换机
(3)在每个数据库服务器和存储服务器上有一个类似于芯片的部件,我们称之为ILOM。
它是一个远程管理的接口,我们通过ILOM可以做所有数据库的维护工作,包括安装,升级,刷机,启动和关闭主机,监控主机启动,关闭过程。。。。。
这个ILOM也要连接到思科交换机,然后客户就通过浏览器的方式管理每一个部件
(4)每一个数据库服务器和存储服务器上的NET0口就是管理口,使用这个端口接入思科交换机
这些部件都通过思科交换机,接入到客户的管理网络,包括客户如果使用EM(即grid control)来管理的话,也是通过管理网段来做的


第三部分,就是红色的客户端获取网络也就是我们说的对外提供数据库服务的网络。
这个网络是每个数据库主机上有2个端口(缺省是千兆,但是可以买万兆模块来启用万兆连接模式),分别是NET1和NET2。
可以bond(大部分采用着各种架构,bond采用backup的方式进行failover,避免单点故障)的方式连接到客户的应用网络。
因此,每个数据库主机上有根线需要连接到客户的应用网络中。
我们可以看到,只有数据库服务器需要接入客户的应用访问网络,这个跟传统架构的小机+存储是没什么区别的


第四部分,是橘黄色的附加网络,这个网络也仅仅在数据库服务器上有,它使用NET3,比如做备份和灾备可以使用这个网络
在X3上,这些端口是都兼容100Mb,1000Mb,10Gb的,缺省标配都是千兆的,你可以根据需求买万兆模块,用在需要的端口上,从而提高连接带宽


这里我们提一下,Infiniband网络和万兆网络在TCPIP层面上没有太大的差别。
也就是说,如果Infiniband网络没有走数据库的rds协议,那么也不会被exadata充分利用的。
所以一般来讲,很多时候,客户提出要使用Exadata上的IB Switch来发挥其多大多大的能力……
其实,客户使用数据库服务器上的万兆模块就足够了,不需要从infiniband上接线到客户的网络
如果要使用Exadata内部的IB交换机,那么客户也配置了IB交换机,O(∩_∩)O哈哈~


客户经常问起的问题:
1,每个数据库上有几根线需要连接到客户的管理网络?

2,每个数据库服务器上有几根选需要连接到客户的应用服务网络?

3,以1/4配置为例,整个一体机上应该至少接触几根线到客户的管理网和应用网络?

下次,我们来说说,级联,Exadata和Exadata级联,或者Exadata和Exalogic级联,O(∩_∩)O哈哈~

发表在 体系架构 | 标签为 , | 6 条评论

Exadata 的4种刷机方法——Reimage

明天又要刷机器了,装机工很久没玩,快忘光了,温习一下,O(∩_∩)O哈哈~

1,刷机前先检查和保留当前系统关键部件的信息,例如:

/opt/oracle.SupportTools/CheckHWnFWProfile -s

/opt/oracle.SupportTools/CheckHWnFWProfile -c loose

/opt/oracle.SupportTools/CheckSWProfile.sh -I dm01sw-ib2,dm01sw-ib3

imageinfo

imagehistory

2,跟NOTES 888828.1的内容,找到相关的image,download后,解压,例如:
unzip ImageMaker.tar.zip
tar -pxvf ImageMaker.tar

DB的image解tar后,可以发现 dl360 目录
CELL的image解tar后,可以发现 dl180 目录
这是因为,Exadata早先跟HP合作推出的V1,用的都是HP的pcserver系列,计算节点的型号是 dl360,存储节点的型号是 dl180,后来也就一直都没有更改了。

我们有四种方式刷机:
1. 用U盘刷机,也就是 USB flash thumb drive
2. 制作ISO image,使用ILOM指定iso的方式(当然如果刻录成光盘,也可以使用DVD模式)
3. 制作一个紧急启动的iso文件(类似于紧急启动盘),然后把image放在NFS上,进行刷机
4. 使用PXE+NFS

上面的4种方法,对于1/4配置来说,哪个都不复杂,用U盘和ISO Image最简单,也最省心。
对于满配或者大量的reimage工作来说,显然U盘就太不可取了,会累死人的,可以使用PXE+NFS和ISO image。

无论哪种方式,制作Reimage的命令都是一个makeImageMedia.sh,语法如下:

./makeImageMedia.sh 
  [-preconf <prconf.csv file full pathname>]
  [
      <dvd iso file name>
    | [-pxe [-pxeout <pxe output filename> ]] 
    | [<nfs iso filename> -nfs nfs_share -dir nfs_dir [-nfs_ip <ip addr for nfs server>]
        [-dhcp] 
        [-logpath <[lognfs_ip:]/full path to writeable nfs share>]
      ]
  ]

Exadata出厂时带有双操作系统,一个是Linux,一个是solaris x86,通常,至少国内的客户绝大部分都会选择使用Linux,因此,在安装完成后,我们需要做reclaim操作。
如果是Reimage,那么我们也可以在制作U盘,image或者使用PXE时带上 -dualboot=no 选项,这样就节省了后面刷机后的reclaim的时间(reclaim我印象中都要1小时以上)

Exadata出厂时带有缺省IP,这些信息在随机附带的document中可以找到。
Exadata官方文档的位置
在文档中,给出了Exadata出厂时的所有缺省IP,你可以看到,IP的分布是对应到物理机器的(当然,X4没有最下面的一个Spine switch了,级联的时候,如果需要可以单独购买)。
比如如果你是1/4 Rack的,那么可以根据每个部件的位置,确定其管理IP或者ILOM IP等等。

刷机时可以附带上新的IP配置文件, 这样就可以刷机后直接使用全套新的你指定的IP。当然如果不带的话,刷完了,机器所有IP就是文档中的缺省IP的配置了。
例如下面的过程制作了一个U盘,我使用了预先配置的preconf.csv文件来制定新的IP:
1,使用U盘启动的方式

[root@dm01db01 dl360]# ./makeImageMedia.sh -preconf /tmp/preconf.csv
Done. Pre config verification OK
Please wait. Calculating md5 checksums for cellbits ...
Please wait. Making initrd ...
199367 blocks
Please wait. Calculating md5 checksums for boot ...

Choose listed USB devices to set up the Oracle CELL installer

sdd   Approximate capacity 15441 MB
Enter the comma separated (no spaces) list of devices or word 'ALL' for to select all: sdd
sdd will be used as the Oracle CELL installer

All data on sdd will be erased. Proceed [y/n]? y

The number of cylinders for this disk is set to 1922.
There is nothing wrong with that, but this is larger than 1024,
and could in certain setups cause problems with:
1) software that runs at boot time (e.g., old versions of LILO)
2) booting and partitioning software from other OSs
   (e.g., DOS FDISK, OS/2 FDISK)

Command (m for help): Building a new DOS disklabel. Changes will remain in memory only,
until you decide to write them. After that, of course, the previous
content won't be recoverable.


The number of cylinders for this disk is set to 1922.
There is nothing wrong with that, but this is larger than 1024,
and could in certain setups cause problems with:
1) software that runs at boot time (e.g., old versions of LILO)
2) booting and partitioning software from other OSs
   (e.g., DOS FDISK, OS/2 FDISK)
Warning: invalid flag 0x0000 of partition table 4 will be corrected by w(rite)

Command (m for help): Command action
   e   extended
   p   primary partition (1-4)
Partition number (1-4): First cylinder (1-1922, default 1): Last cylinder or +size or +sizeM or +sizeK (1-1922, default 1922):
Command (m for help): The partition table has been altered!

Calling ioctl() to re-read partition table.
Syncing disks.
umount2: Invalid argument
umount: /dev/sdd1: not mounted
mke2fs 1.39 (29-May-2006)
Filesystem label=
OS type: Linux
Block size=4096 (log=2)
Fragment size=4096 (log=2)
1929536 inodes, 3857600 blocks
192880 blocks (5.00%) reserved for the super user
First data block=0
Maximum filesystem blocks=3951034368
118 block groups
32768 blocks per group, 32768 fragments per group
16352 inodes per group
Superblock backups stored on blocks:
        32768, 98304, 163840, 229376, 294912, 819200, 884736, 1605632, 2654208

Writing inode tables: done
Creating journal (32768 blocks): done
Writing superblocks and filesystem accounting information: done

This filesystem will be automatically checked every 28 mounts or
180 days, whichever comes first.  Use tune2fs -c or -i to override.
Copying files... will take several minutes


    GNU GRUB  version 0.97  (640K lower / 3072K upper memory)

 [ Minimal BASH-like line editing is supported.  For the first word, TAB
   lists possible command completions.  Anywhere else TAB lists the possible
   completions of a device/filename.]
grub> root (hd0,0)
 Filesystem type is ext2fs, partition type 0x83
grub> setup (hd0)
 Checking if "/boot/grub/stage1" exists... no
 Checking if "/grub/stage1" exists... yes
 Checking if "/grub/stage2" exists... yes
 Checking if "/grub/e2fs_stage1_5" exists... yes
 Running "embed /grub/e2fs_stage1_5 (hd0)"...  16 sectors are embedded.
succeeded
 Running "install /grub/stage1 (hd0) (hd0)1+16 p (hd0,0)/grub/stage2 /grub/grub.conf"... succeeded
Done.
grub> Done creation of installation USB for DL360
[root@dm01db01 dl360]#

之后使用这个USB启动服务器,启动后确认重新两次(它会提示你的,怕你误操作,O(∩_∩)O哈哈~),之后就没你什么事情了,他自己就work了……
之间会重启几次,最后一次,会提示你拔出U盘,然后,重启一下,就ok了。

2,使用ISO image的方式
由于ILOM提供了远程映射ISO文件的重定向功能,因此,我们可以启动ILOM,选择使用CD-ROM image的方式,然后使用ILOM执行reset来重启
如果是X2,那么就可以去喝茶了,如果是X3,那么还要等启动时在Bios中确认使用CDROM方式启动,然后再去喝茶……

如果ISO image的方式,无论是否有 -dualboot=no 选项,重装完的计算节点上都不再是dualboot,可以使用 reclaimdisks.sh -check 进行确认,使用ISO方法如下:
[root@lunar dl360]# ./makeImageMedia.sh -preconf ../preconf_db.csv -stit -notests diskgroup -nodisktests db_img112330.iso

Done. Pre config verification OK
Please wait. Calculating md5 checksums for cellbits ...
Calculating md5 checksum for exaos.tbz ...
Calculating md5 checksum for dbboot.tbz ...
Calculating md5 checksum for dbfw.tbz ...
Calculating md5 checksum for kernel.tbz ...
Calculating md5 checksum for ofed.tbz ...
Calculating md5 checksum for sunutils.tbz ...
Calculating md5 checksum for hputils.tbz ...
Calculating md5 checksum for c7rpms.tbz ...
Calculating md5 checksum for commonos.tbz ...
Calculating md5 checksum for debugos.tbz ...
Calculating md5 checksum for dbrpms.tbz ...
Please wait. Making initrd ...
。。。。。。

使用ISO image的方式,不用拔U盘,O(∩_∩)O哈哈~,他自己重启几次(大概2~3次,忘记了),然后出现“Installation SUCCESSFUL”就ok了。

3,使用ISO image + NFS 方式
这个我没有尝试,但是根据readme,我看大约是制作了iso文件放在子目录中,当然,这个目录是放在NFS上的:
makeImageMedia.sh x.iso -nfs /exports/images -dir dl180/11132
readme上有详细的步骤,具体可以参考readme来完成。

4,使用PXE+NFS的方式
(1)首先要确认TITP功能,如果没有需要安装syslinux
yum install syslinux
(2)制作image
cd dl360/
./makeImageMedia.sh -pxe

检查image文件:

			cd /tftpboot/linux-install/dl360/PXE
			ls -l
					-rw-r--r-- 1 root root 38813575 Aug 19 10:39 initrd-11.2.3.2.1-130109-DL360.img
					-rw-r--r-- 1 root root 1325076480 Aug 19 10:39 nfsimg-11.2.3.2.1-130109-DL360.tar
					-rw-r--r-- 1 root root 69 Aug 19 10:39 nfsimg-11.2.3.2.1-130109-DL360.tar.md5
					-r-xr-xr-x 1 root root 3688864 Aug 19 10:39 vmlinux-11.2.3.2.1-130109-DL360

			cd /tftpboot/linux-install
			ls -l
				drwxrwxr-x 7 root root 4096 Aug 19 10:39 dl360
				-rw-r--r-- 1 root root 38813575 Aug 19 10:39 initrd-11.2.3.2.1-130109-DL360.img
				drwxr-xr-x 2 root root 4096 Aug 16 2012 msgs
				-rw-r--r-- 1 root root 1325076480 Aug 19 10:39 nfsimg-11.2.3.2.1-130109-DL360.tar
				-rw-r--r-- 1 root root 69 Aug 19 10:39 nfsimg-11.2.3.2.1-130109-DL360.tar.md5
				-rw-rw-r-- 1 root root 13100 Jul 25 2011 pxelinux.0
				drwxr-xr-x 2 root root 4096 Aug 19 09:15 pxelinux.cfg
				-r-xr-xr-x 1 root root 3688864 Aug 19 10:39 vmlinux-11.2.3.2.1-130109-DL360

(3)配置NFS Exports,并启动nfs server

				cat /etc/exports
				service nfs restart

(4)安装 TFTP SERVER

				yum install tftp-server
				chkconfig --level 345 tftp on

(5)修改 TFTP 配置文件:

			/tftpboot/linux-install/pxelinux.cfg/default
			注意,其中的 kernel vmlinux-11.2.3.2.1-130109-DL360 就是上面我们生成的

(6)配置DHCP

			yum install dhcp
			mv /etc/dhcpd.conf /etc/dhcpd.orig
			chkconfig --level 345 dhcpd on

检查 /etc/dhcpd.conf,例如:

					option ip-forwarding false; # No IP forwarding
					option mask-supplier false; # Don't respond to ICMP Mask req
					
						subnet 10.187.114.0 netmask 255.255.254.0 {
							option routers 10.187.114.1;
						}
						
						group {
							next-server 10.187.115.250;     ######这个是PXE SERVER
							filename "linux-install/pxelinux.0";
							option root-path "10.187.115.250:/tftpboot/linux-install";
							host exadbmel02 {
							hardware ethernet 00:21:28:A3:27:68;  ######eth0的MAC地址
							fixed-address 10.187.115.225;   ######这个是需要做reimage的节点的eth0
						}
					}

这里确认eth0的信息,也可以通过ILOM的方式: System Information -> Components -> /SYS/MB/NET0
或者ssh到ILOM,执行: show /SYS/MB/NET0

(7)重启一下所有网络相关服务:

		service dhcpd restart
		service xinetd restart
		service iptables stop

这样配置好了PXE,就可以使用PXE+NFS了,后面的过程类似于ISO image了。

上述4中reimage的方法和详细步骤,参见readme:


 Copyright (c) 2009, 2011, Oracle and/or its affiliates. All rights reserved. 


       ================================================================

       Imaging install media options and imaging procedures for Exadata

       ================================================================

DO EVERYTHING AS root USER

   |-------------------------------------------------------------------------|
   | NOTE:  FOR SUN Factory the process involves 2 rounds of PXE+NFS imaging |
   |        Scroll all the way to the end of the document to see the overall |
   |        steps in the process and sample pxe configuration files.         |
   |-------------------------------------------------------------------------|

Creation of the installation USB or ISO:

Download the production ImageMaker.tar.zip files on some machine
with Oracle Enterprise Linux 64bit or RHEL 64 bit that has
  grub 0.97 and has tar with bzip2 support
     - grub --version will show the grub version


As root user extract the ImageMaker.tar.zip file 
  unzip ImageMaker.tar.zip
  tar -pxvf ImageMaker.tar

Cell node image extracts to dl180
DB node image extracts to dl360

The makeImageMedia.sh script inside the above directories is used to
create the actual image installation media.

The installation media can be

1. USB flash thumb drive
2. ISO image that may be used on DVD or as remote virtual media using
   LightsOut remote virtual media capabilities.
3. ISO+NFS - where a small iso file is used to boot the system and the
   imaging payload is hosted on a NFS server.
4. PXE+NFS

     ---------------------------------------------------------------------
     | Run all commands AS root from inside the dl180 or dl360 directory |
     ---------------------------------------------------------------------

./makeImageMedia.sh 
  [-preconf <prconf.csv file full pathname>]
  [
      <dvd iso file name>
    | [-pxe [-pxeout <pxe output filename> ]] 
    | [<nfs iso filename> -nfs nfs_share -dir nfs_dir [-nfs_ip <ip addr for nfs server>]
        [-dhcp] 
        [-logpath <[lognfs_ip:]/full path to writeable nfs share>]
      ]
  ]


Install media preparation
-------------------------

  USB thumb drive - also known as the CELLINSTALL USB
  ---------------------------------------------------
  NOTE: It is best to have no other external USB storage
        devices connected to the machine on which you 
        prepare the installer USB s.
 
  Insert empty USB thumb drives of size between 2GB and 32GB, 
  and follow prompts after executing:
 
     ./makeImageMedia.sh

  ISO - That may be burnt on DVD and used for install
  ---------------------------------------------------

     ./makeImageMedia.sh <iso file name>
     Example: ./makeImageMedia cell.iso
 
  NFS+ISO:
  --------
      
     nfs iso is either created on the nfs server itself where the
     nfs export path is nfs_share e.g. /exports/images and nfs_dir is the
     subdirectory of nfs_share where image bits are copied by the iso creation
     command e.g. dl180/11132.
 
     OR
 
     The iso may be created anywhere using the nfsip option to supply the
     ip address of the nfs server and then the contents of nfs_share directory
     must be copied to nfs server at the EXACT same path as nfs_share
 
     NOTE: nfs iso MUST either be built on the nfs server as root user
           OR
           you must supply the ip address for nfs server with -nfsip 
 
     Example:
    
     nfs iso built on the nfs server:
  
       makeImageMedia.sh x.iso -nfs /exports/images -dir dl180/11132
 
       Will create x.iso and copy image bits to /exports/images/dl180/11132
       You can copy the preconf.csv file then to /exports/images/dl180/11132
 
       You can of course embed the preconf.csv file in the iso itself with
 
       makeImageMedia.sh x.iso -nfs /exports/images -dir dl180/11132 \
                               -preconf preconf.csv
     
     nfs iso NOT built on nfs server:
 
       makeImageMedia.sh x.iso -nfsip 123.123.123.123 -nfs /exports/images \
                               -dir dl180/11132
      
       Will create x.iso and copy image bits to /exports/images/dl180/11132
       You can copy the preconf.csv file then to /exports/images/dl180/11132
      
       You must now copy the entire contents of /exports/images/dl180/11132
       onto the real nfs server 123.123.123.123 exactly at path
       /exports/images/dl180/11132 and the nfs server must export
       /exports/images
 
      -logpath option now may be passed to makeImageMedia.sh to extract the logs
       from imaging and zero and first boot validations. See the logpath option
       syntax in PXE support
 
      -dhcp option now may be passed to makeImageMedia.sh to use dhcp to get
       initial ip address during imaging. 

      -multiprof option will create multiprofile images

  Optional command line options for USB / ISO / NFS+ISO installation media
  --------------------------------------------------------------------------

      -factory
         print special [FACTORY_...] messages for use by factory.

      -kerver <kernel_version>
         overwrite default kernel. By defaut installing kernel version depends
         on hardware type (system product name). List of kernels and hardware
         dependencies defined in the "kernel_ver" line at the very top of
         makeImageMedia.sh script.

      -dualboot <yes|no>
         overwtire default dual boot behaviour. It's only applicable for the
         db node. By default dual boot feature (installing Linux image and
         prereserving space for Solaris) depends on hardware type (system
         product name). By default X4170 M2 and X4800 (G5) servers have dual
         boot.
         
      -stit
         signals to force reimage even if installation exists on the machine

      -reboot-on-success
         Do not wait for operator to power off machine on successful image,
         just reboot. Useful for mass unattended imaging using preconf option.
         DO NOT use in factory process.

      -nodisktests
         do not run disktests at zero boot. They take 6-14 hours!

      -notests <group for validations to be skipped, e.g. diskgroup>
         skips all validations with given vldgroup name. For example, if
         diskgroup is given as the group name, then each validation with
         vldgroup set to diskgroup will be skipped. diskgroup today includes
         disktests, calibration and diskhealth. This is one more way to skip
         disktests in addition to the nodisktests option.

  PXE+NFS
  -------
      
      Do everything as root user
      
      0. tar -pxvf the ImageMaker.tar file resulting in dl180 or dl360
         directory. cd to the directory dl180 or dl360
      
      1. You make PXE build using
      
      ./makeImageMedia.sh -pxe [-pxeout <ImageName>]
      
      This will create 3 files in ./PXE directory
      
      kernel - vmlinux-<version>-ImageName-<DL180 or DL360 cell or db respectively>
      initrd - initrd-<version>-ImageName-<DL180 or DL360 cell or db respectively>.img
      image  - nfsimg-<version>-ImageName-<DL180 or DL360 cell or db respectively>.tar
      
      The kernel and initrd files are sent to the node being imaged by the PXE
      server.
      
      The image tar file should be extracted in the nfs_share directory by root
      user as shown in next step.
      
      Example:
      ./makeImageMedia.sh -pxe -pxeout dl180
      PXE nfs image: /dani/11132/dl180/./PXE/nfsimg-11.1.3.2.0-dl180-DL180.tar
      PXE initrd: /dani/11132/dl180/./PXE/initrd-11.1.3.2.0-dl180-DL180.img
      PXE kernel: /dani/11132/dl180/./PXE/vmlinux-11.1.3.2.0-dl180-DL180
      
      2. Prepare nfs share
     
      Copy the nfsimg tar and md5 files to nfs_share directory.

      Example:
      Using nfs_share from the following example, where the nfs server that holds
      the image content is 123.45.67.189 and the nfs_share on it is
      /vol/exadata/dl180, and assuming the image tar file was in /root.
      
      cp /root/nfsimg-11.1.3.2.0-dl180-DL180.* /vol/exadata/dl180

      Releases older than 11.2.1.3.0 should exptract the nfsimg files:
 
        Extract nfsimg-11.1.3.2.0-dl180-DL180.tar to the nfs_share
        "tar -x -p -v -C <nfs_share> -f nfsimg-11.1.3.2.0-dl180-DL180.tar"
      
        Example:
        Using nfs_share from the following example, where the nfs server that holds
        the image content is 123.45.67.189 and the nfs_share on it is
        /vol/exadata/dl180, and assuming the image tar file was in /root.
      
        "tar -x -p -v -C /vol/exadata/dl180 -f /root/nfsimg-11.1.3.2.0-dl180-DL180.tar"
      
      3. Configure the PXE server
      
      Assume PXE server has both DHCP and TFTP daemons started on it.
      
      Copy initrd and kernel into /tftpboot on the PXE server.
      
      Create DHCP configuration in /tftpboot/pxelinux.cfg/<hexadecimal_ip_address_of_the_imaging_machine>.
      You can also use the MAC address for the eth0 NIC for filename instead of
      hexadecimal ip address. 
      
      For ip address 123.123.123.123 the filename based on ip address will be
      7B7B7B7B. 
      If the MAC address is used, and it was 12:34:56:78:90:12, then the file will
      be 01-12-34-56-78-90-12.
      
      Please check your specific PXE server requirements, the above names are what
      were used in our testing and your PXE server may need slightly different names
      or settings.
      
      Examples of configuration file
      
      Example 1
      ---------
      # With dhcp and disktests 
      default linux
      prompt 1
      timeout 72
      label linux
      kernel vmlinux-11.1.3.2.0-dl180-DL180
      append initrd=initrd-11.1.3.2.0-dl180-DL180.img pxe stit updfrm dhcp sk=123.45.67.189:/vol/exadata/dl180 preconf=123.45.67.123:/vol/configs/exadata/allexadataservers.csv 

      Example 2
      ---------
      # With explicit ethX address instead of dhcp and no disktests or
      # calibration
      default linux
      prompt 1
      timeout 72
      label linux
      kernel vmlinux-11.1.3.2.0-dl180-DL180
      append initrd=initrd-11.1.3.2.0-dl180-DL180.img pxe stit updfrm reboot-on-success notests=diskgroup sk=123.45.67.189:/vol/exadata/dl180 eth0=123.123.123.123:255.255.254.0:123.123.123.1 preconf=123.45.67.123:/vol/configs/exadata/allexadataservers.csv
      
      
      Explanation of command line options:
      -----------------------------------
      
      pxe
       - signals this is pxe imaging
         mandatory parameter
      
      factory
       - print special [FACTORY_...] messages for use by factory. 
         optional parameter.
      
      stit
       - signals to force reimage even if installation exists on the machine
         optional parameter
      
      updfrm
       - check hardware and firmware versions. Update firmware where applicable.
         optional parameter.

      kerver=<kernel_version>
         overwrite default kernel. By defaut installing kernel version depends
         on hardware type (system product name). List of kernels and hardware
         dependencies defined in the "kernel_ver" line at the very top of
         makeImageMedia.sh script.

      dualboot=<yes|no>
         overwtire default dual boot behaviour. It's only applicable for the
         db node. By default dual boot feature (installing Linux image and
         prereserving space for Solaris) depends on hardware type (system
         product name). By default X4170 M2 and X4800 (G5) servers have dual
         boot.
      
      dhcp
       - dhcp is optional parameter and should NOT be given with eth0 option
         If given, dhcp is used to obtain the initial dhcp address instead of
         requiring to pass the eth0 information.
    
      ethX=<ip>:<netmask>:<gateway>
       - ethX is optional parameter. Do NOT give with dhcp above.
       - where X is one of 0,1,2,3 on Sun and 0 on HP machines
         If both dchp and ethX are absent imaging will enter
         interactive mode and ask for Ethernet ip, netmask and
         gateway information
      
      sk=<nfsip>:<nfs_share>
       - sk is mandatory parameter for the PXE boot. MUST
         use IP address not the hostname for NFS server.
         nfs_share is the full path to directory where the 3 files from
         PXE directory are available
      
      logpath=[nfsip:]<full path to writeable nfs share>
       - logpath is optional parameter
         If given it will copy the imaging, zero and first boots logs to the
         writable nfs share location in single tar bzip2 file <serial_num>.tbz.
         The serial_num is the serial number of the system obtained as
           dmidecode -s system-serial-number
     
      ----------------------------------------------- 
      Development ONLY options NOT for use in Factory
      -----------------------------------------------
      
      reboot-on-success
       - Do not wait for operator to power off machine on successful image, just
         reboot. Useful for mass unattended imaging using preconf option.
         DO NOT use in factory process.
         optional parameter
      
      multiprof
       - Image the node as multi profile enabled
         This parameter is optional
         NOTE: Do NOT build the images with -multiprof to makeImageMedia.sh
               If you do that image can only be used to do multi profile nodes.
      
      nodisktests
       - do not run disktests at zero boot. They take 6-14 hours!
         This parameter is optional
      
      notests=<group for validations to be skipped, e.g. diskgroup>
       - Skips all validations with given vldgroup name. For example, if
         diskgroup is given as the group name, then each validation with
         vldgroup set to diskgroup will be skipped. diskgroup today includes
         disktests, calibration and diskhealth. This is one more way to skip
         disktests in addition to the nodisktests option.
         This parameter is optional
      
      preconf=[<preconf_nfsip>:]<full path name of preconf_file on nfs server>
       - preconf is optional parameter
         The nfsip MUST be IP address of the NFS server not its hostname
         The preconf_nfsip can be same or different than the nfsip in sk 
         option, allowing the preloaded configuration file to reside on different
         subtree or entirely different nfs server from that of the imaging bits
         on the nfsip nfs server.
      
 
Installation process
--------------------

  Preinstall steps for HP DL180
  -----------------------------

     Imaging will stop and require you to confirm to continue if:
      a) P400 Smart Array disk controller is not in PCIe x8 slot
      b) There are additional USB s besides the CELLINSALL USB and the blank
         USB for use as CELL boot USB
      c) All drives are not identical model and make

      On the target machine set up the BIOS boot sequence such that
      - Hard disk drives is the first in the boot sequence
      - Within the hard disk drives option the USB flash disk(s) are before the P400
        disk controller
      - Disable removable drives
      Use the screen shots in the doc directory as guide.

  Preinstall steps for HP DL360
  -----------------------------

     Imaging will FAIL if following are true:
      a) Infiniband card is not in PCIe x8 slot

      On the target machine set up the BIOS boot sequence such that
      - USB flash is first in the boot sequence
      Use the screen shots in the doc directory as guide.

  Preinstall steps for SUN X4275
  ------------------------------

     Imaging will stop and require you to confirm to continue if:
      a) LSI 9261-8i disk controller is not in PCIe x8 slot
      b) There are additional USB s besides the CELLINSALL USB and the blank
         USB for use as CELL boot USB
      c) All drives are not identical model and make

      On the target machine set up the BIOS boot sequence such that
      - The CELLINSTALL USB is first in boot order
      - The internal CELLBOOT USB (UNIGEN) is the second after the CELLINSTALL
        USB
      - The LSI disk controller is next
      Use the screen shots in the doc directory as guide.

  Preinstall steps for SUN X4170
  ------------------------------
 
    Same as SUN X4275


      - Ignore any messages as stated in the Things to ignore section
        above
      - If BIOS, Disk controller or disk firmware needs update the imaging
        process will update the firmware and try to power cycle the machine
        using ipmi.
      -----
      ALERT: It is possible that the machine may not boot back after such power
      -----  cycle due to issues with BIOS boot order being reset or the ipmi
             power cycle not properly able to complete. Please manually power
             cycle the machine to continue imaging.

      - After imaging and automatic creation of the internal CELL boot USB machine
        will launch several health checks and long disk tests. 
          SAS 600GB drive disk tests will take up to 9 hours
          SATA 2TB drive disk tests will take up to 14 hours
          SAS 450GB drive disk tests will take up to 12 hours
          MDL SAS 1TB (SATA 7200RPM 1TB drives) drive disk tests will take up to 48 hours

      (A) When Success of validation tests
           When all tests pass the machine will indicate the success of installation
           on the console and wait for you to power off the machine.

           In case of a reimage the machine may come to "localhost login:"
           prompt. Login as root/welcome1 and reboot the machine.

      (B) When failure of validation tests
            When a validation fails the machine will prompt you to choose to rerun
            the validations on reboot. You must choose to re-run the tests.
            After you finish making the choice the machine will either present 
            "localhost login:" prompt or exit to a shell. You can logon as root and
            password welcome1 if login prompt is presented. Please
             1. Examine the log files in /var/log/cellos/validations/
                to identify the cause of failure. Correct the problem and
                reboot the machine. The machine will rerun the tests unless
                you had chosen not to re-run them.
             2. If you can not easily identify the cause, please reboot the machine
                to see if the checks pass. If you get prompted for hostname and other
                configuration information, you should poweroff the machine.
     
Install steps
-------------

  Using CELLINSTALL USB:
  ----------------------
     Insert the CELLINSTALL usb in any USB slot on target machine and boot the machine
      - Assuming the machine is bare metal it will automatically boot from the USB and
        the imaging process will start automatically

  Using ISO:
  ---------
     Boot the system using the ISO and follow prompts. For bare metal imaging
     will start automatically

  Using ISO+NFS:
  -------------
     Boot the system with the iso and follow prompts. For bare metal imaging
     will start automatically

  Using PXE+NFS:
  -------------
     Boot the system using PXE by pressing F12 after during BIOS
     initialization splash screens. For bare metal imaging
     will start automatically.

     You can also use "ipmitool chassis bootdev pxe" from already imaged
     system, to force the system to boot one time on next reboot.
     This is useful for mass re-imaging of systems.

      
Unattended first boot configuration:
-----------------------------------
        
    There is now support for unattended first boot configuration as
    long as you build it in the image.
 
    The steps to use unattended first boot configuration need you
    to build the image media with new option to makeImageMedia.sh
 
    See the sample_preconf.csv file for example preconfiguration file.
    This file can be
     (A) passed to the makeImageMedia.sh, and/or
     (B) it can be copied to the nfs_share location when using PXE and/or
     (C) it can be copied to the nfs_share/nfs_dir location if using nfs iso.
     (D) it can be copied to the / directory of the install USB
 
    If the file is inserted in the install media using (A), and if it
    is also passed with methods (B) to (D), then the file from (B) to
    (D) takes precedence over the file passed using (A).
 
    This allows you to update the file after creating the installer media
    - USB or the iso+nfs or the pxe+nfs, so that you can image more
    machines using the same media.
 
    Preparing the preconf.csv file:
    -------------------------------
 
     1. First line with "Cell Preconfig version" is mandatory
    
     2. Title line starting with "Hostname, Domain, ...." is mandatory 
        and format is fixed
    
     3. You MUST NOT change these two lines.
    
     4. The line started with "common" keyword in Hostname column is 
        optional, and provides a way of supplying common values.
  
       4.1. The "common" line MUST not contain these
            a. "eth0 mac address"
            b. "eth0 ip"
            c. "bond0 ip"
            d. "hostname"
 
       4.2. Multiple "common" lines are allowed. Each next common
            line overwrites all previous common settings.
    
     5. Any individual line for the host MUST have unique hostname, eth0 
        mac address, eth0 ip and bond0 ip values.
 
        5.1. If individual column is empty the value from the common
             column is used
        5.2. All values are mandatory except nameservers and NTP servers
        5.3. The full hostname is result of "$HOSTNAME.$DOMAIN"
        5.4. Nameservers and NTP servers have to be separated by space.
 
     6. Any line starting with # is treated as comment line.
 
 NOTE: It's a good practice to validate syntax of .csv file. You can do it using
 
 <dl180 or dl360>/initrd/opt/oracle.cellos/ipconf -verify -preconf <path_to_csv_file>
 
 dl180 or dl360 are top level directories when you extract the ImageMaker
 tar.zip files.
      
--------------------------------------------------------------------------------
SAMPLE of preconf.csv file - See csv files in /opt/oracle.SupportTools/firstconf
--------------------------------------------------------------------------------

Things to ignore safely during install:
--------------------------------------

 HP:
 --
   1) "cciss/cXdYpZ Invalid partition table"
       The above message will repeat several times with X,Y, and Z are some integers
          - X is the P400 smart array disk controller slot number
          - Y is the disk number starting with 0 for the slot
          - Z is the partition number on the disk 
       Reason for this is unknown and the message is harmless

 SUN+HP:
 ------
   1) "RAID1 conf printout:..."
       This is the software RAID printout we are not yet able to find a way to suppress
   2) tar: <file>: <date stamp> is X s in future

Known Issues and work around:
-----------------------------

 1) ONLY on HP DL180: With the install USB and a blank USB in the machine, you may get "Disk
     error. Invalid disk press any key to continue..."
     Please fix the BIOS boot sequence as indicated in various screen shots
     (.gif files in ScreenShots directory)
 2) Installer USB does not work from some USB slots:
     Solution: Try different slots - if all else fails create fresh usb and try if that also
               fails get a new machine.

Miscellaneous tips:
-------------------

NOTE: 1) The disk controller on the Exadata cell nodes  must be in PCIe x8 slot for optimal
         performance (performance can degrade 50% if this is not the case).
      2) The Infiniband card must be in PCIe x8 slot on compute aka database nodes

       You can confirm the speed of the slot as follows: 
       as root run command lspci -vvv on freshly imaged box and check for the Link speed for disk
       controller, the Infiniband cards.
       Look at line marked ===> in the sample outputs of the lspci -vvv command below.
       You should have matching lines for the disk controller and Infiniband
       cards on your machines - If NOT then you will need to open the machine
       and relocate the corresponding cards to correct slots

For DL180 - the Exadata cell nodes:
----------------------------------

03:00.0 RAID bus controller: Hewlett-Packard Company Smart Array Controller (rev 03)
	Subsystem: Hewlett-Packard Company P400 SAS Controller
	Control: I/O+ Mem+ BusMaster+ SpecCycle- MemWINV- VGASnoop- ParErr- Stepping- SERR- FastB2B-
	Status: Cap+ 66MHz- UDF- FastB2B- ParErr- DEVSEL=fast >TAbort- <TAbort- <MAbort- >SERR- <PERR-
	Latency: 0, Cache Line Size: 64 bytes
	Interrupt: pin A routed to IRQ 169
	Region 0: Memory at fcc00000 (64-bit, non-prefetchable) [size=1M]
	Region 2: I/O ports at e800 [size=256]
	Region 3: Memory at fcbff000 (64-bit, non-prefetchable) [size=4K]
	Expansion ROM at fcb80000 [disabled] [size=256K]
	Capabilities: [b0] Express Endpoint IRQ 0
		Device: Supported: MaxPayload 512 bytes, PhantFunc 0, ExtTag-
		Device: Latency L0s unlimited, L1 unlimited
		Device: AtnBtn- AtnInd- PwrInd-
		Device: Errors: Correctable- Non-Fatal- Fatal- Unsupported-
		Device: RlxdOrd+ ExtTag- PhantFunc- AuxPwr- NoSnoop+
		Device: MaxPayload 128 bytes, MaxReadReq 2048 bytes
		Link: Supported Speed 2.5Gb/s, Width x8, ASPM L0s, Port 0
		Link: Latency L0s <2us, L1 unlimited
		Link: ASPM Disabled RCB 64 bytes CommClk- ExtSynch-
====>		Link: Speed 2.5Gb/s, Width x8
	Capabilities: [d4] MSI-X: Enable+ Mask- TabSize=4
		Vector table: BAR=0 offset=000fe000
		PBA: BAR=0 offset=000ff000
	Capabilities: [e0] Power Management version 2
		Flags: PMEClk- DSI- D1+ D2- AuxCurrent=0mA PME(D0-,D1-,D2-,D3hot-,D3cold-)
		Status: D0 PME-Enable- DSel=0 DScale=0 PME-
	Capabilities: [ec] Vital Product Data
	Capabilities: [100] Power Budgeting

05:00.0 InfiniBand: Mellanox Technologies MT25418 [ConnectX IB DDR] (rev a0)
	Subsystem: Mellanox Technologies MT25418 [ConnectX IB DDR]
	Control: I/O- Mem+ BusMaster+ SpecCycle- MemWINV- VGASnoop- ParErr- Stepping- SERR- FastB2B-
	Status: Cap+ 66MHz- UDF- FastB2B- ParErr- DEVSEL=fast >TAbort- <TAbort- <MAbort- >SERR- <PERR-
	Latency: 0, Cache Line Size: 64 bytes
	Interrupt: pin A routed to IRQ 169
	Region 0: Memory at fce00000 (64-bit, non-prefetchable) [size=1M]
	Region 2: Memory at fa800000 (64-bit, prefetchable) [size=8M]
	Region 4: Memory at fcdfe000 (64-bit, non-prefetchable) [size=8K]
	Capabilities: [40] Power Management version 3
		Flags: PMEClk- DSI- D1- D2- AuxCurrent=0mA PME(D0-,D1-,D2-,D3hot-,D3cold-)
		Status: D0 PME-Enable- DSel=0 DScale=0 PME-
	Capabilities: [48] Vital Product Data
	Capabilities: [9c] MSI-X: Enable+ Mask- TabSize=256
		Vector table: BAR=4 offset=00000000
		PBA: BAR=4 offset=00001000
	Capabilities: [60] Express Endpoint IRQ 0
		Device: Supported: MaxPayload 256 bytes, PhantFunc 0, ExtTag+
		Device: Latency L0s <64ns, L1 unlimited
		Device: AtnBtn- AtnInd- PwrInd-
		Device: Errors: Correctable- Non-Fatal- Fatal- Unsupported-
		Device: RlxdOrd- ExtTag- PhantFunc- AuxPwr- NoSnoop-
		Device: MaxPayload 128 bytes, MaxReadReq 512 bytes
		Link: Supported Speed 2.5Gb/s, Width x8, ASPM L0s, Port 8
		Link: Latency L0s unlimited, L1 unlimited
		Link: ASPM Disabled RCB 64 bytes CommClk- ExtSynch-
====>		Link: Speed 2.5Gb/s, Width x4


For DL360 - the database aka compute nodes:
------------------------------------------

13:00.0 InfiniBand: Mellanox Technologies MT25208 InfiniHost III Ex (Tavor compatibility mode) (rev 20)
	Subsystem: Mellanox Technologies MT25208 InfiniHost III Ex (Tavor compatibility mode)
	Control: I/O- Mem+ BusMaster+ SpecCycle- MemWINV- VGASnoop- ParErr+ Stepping- SERR- FastB2B-
	Status: Cap+ 66MHz- UDF- FastB2B- ParErr- DEVSEL=fast >TAbort- <TAbort- <MAbort- >SERR- <PERR-
	Latency: 0, Cache Line Size: 64 bytes
	Interrupt: pin A routed to IRQ 177
	Region 0: Memory at fdf00000 (64-bit, non-prefetchable) [size=1M]
	Region 2: Memory at df800000 (64-bit, prefetchable) [size=8M]
	Region 4: Memory at d0000000 (64-bit, prefetchable) [size=128M]
	Capabilities: [40] Power Management version 2
		Flags: PMEClk- DSI- D1- D2- AuxCurrent=0mA PME(D0-,D1-,D2-,D3hot-,D3cold-)
		Status: D0 PME-Enable- DSel=0 DScale=0 PME-
	Capabilities: [48] Vital Product Data
	Capabilities: [90] Mescell Signalled Interrupts: 64bit+ Queue=0/5 Enable-
		Address: 0000000000000000  Data: 0000
	Capabilities: [84] MSI-X: Enable- Mask- TabSize=32
		Vector table: BAR=0 offset=00082000
		PBA: BAR=0 offset=00082200
	Capabilities: [60] Express Endpoint IRQ 0
		Device: Supported: MaxPayload 128 bytes, PhantFunc 0, ExtTag-
		Device: Latency L0s <64ns, L1 unlimited
		Device: AtnBtn- AtnInd- PwrInd-
		Device: Errors: Correctable- Non-Fatal+ Fatal+ Unsupported-
		Device: RlxdOrd- ExtTag- PhantFunc- AuxPwr- NoSnoop-
		Device: MaxPayload 128 bytes, MaxReadReq 4096 bytes
		Link: Supported Speed 2.5Gb/s, Width x8, ASPM L0s, Port 8
		Link: Latency L0s unlimited, L1 unlimited
		Link: ASPM Disabled RCB 64 bytes CommClk- ExtSynch-
====>		Link: Speed 2.5Gb/s, Width x8

###########################  SUN FACTORY OVERALL PROCESS #################################################

 As of Sep 27, 2009:

  NOTE: ----------------------------
    ALL steps below assume at most single DBM i.e. one full rack.
    If more than one DBM are to be interconnected, then the below scheme needs
    to be modified accordingly to avoid ip address conflicts.
  NOTE: ----------------------------

  The factory process at SUN will make 2 imaging passes using PXE+NFS.
  The first successful imaging pass will leave the systems (X4170 and X4275)
  configured with all the basic network information such as the hostname, ip
  address, etc. Factory will do this using the preconf option to imaging to
  feed the configuration information. The exact mandatory PXE options are
  listed below. Once the nodes are fully up, factory can run various tests
  on them. The mandatory tests are listed below.

  Assuming all tests pass in the first round, the second round of imaging
  will wipe out the first image and re-image the nodes. This round will use
  different options to PXE. The list of options to use is listed below.

  This second round will leave the systems configured with fixed private
  hostnames, ip addresses as oulined in following sections.

  To do this Factory will need to ensure that the MAC addresses for eth0
  interfaces used in the first round are plugged in to the template preconf
  file for second round in exact order as documented in the template file.

  Factory will need to confirm at end of round 2 that the systems can come up
  and carry the private ip addresses and hostnames.

  Note that "pxe" and "sk" options are mandatory for PXE.
  Out of optional parameters:

  Round 1 image PXE options:
  --------------------------
   Must use:
    1. stit
    2. updfrm
    3. factory
    4. reboot-on-success
    5. preconf
   Must NOT use:
    1. notests=diskgroup
    2. multiprof

  Round 2 image PXE options:
  --------------------------
   Must use:
    1. stit
    2. updfrm
    3. factory
    4. notests=diskgroup
    5. preconf - based on second round template
    6. reboot-on-success
   Must NOT use:
    1. multiprof

  Distributed/Rack-wide tests to be run after successful image at Round 1:
  -----------------------------------------------------------------------

  Login to any one node as root/welcome1. Let us call this the master
  test node (MTN).

   0. Examine the validations success
      a. cd /var/log/cellos
      b. Examine the file vldrun.xx.log for any failures. If there are
         failures, then examine for each failed validation the, suggested
         remedy file "<validation name>.SuggestedRemedy" in the validations
         subdirectory.
         If no remedy file exists look for the corresponding log files to
         track down the failure cause and correct it.
      
   1. Check Infiniband Switch software and firmware versions
      a. cd /opt/oracle.SupportTools
      b. ./CheckSWProfile.sh -I <comma separated list of switch ips no spaces>
      Follow prompts

   2. Establish root user ssh equivalence between MTN and any other node:
      a. ssh-keygen -t dsa
      b. ssh-keygen -t rsa
         Accept defaults so the ssh keys are created for root user
      c. create a file called "nodes" listing one hostname (short hostname -
         i.e. hostname -s output) per line for all nodes in the rack.
      d. cd /opt/oracle.SupportTools
      e. ./setup_ssh_eq.sh "full pathname to the nodes file" root welcome1
      This pushes the ssh keys to all nodes establishing the ssh trust for root
      user to all nodes from MTN.
 
   3. Verify the Infiniband connectivity and topology:
      a. cd /opt/oracle.SupportTools/ibdiagtools
      b. ./verify-topology -factory [-t quarterrack]

      Sample output of this for successful runs is in SampleOutputs.txt file in
      same directory for a full rack.

   4. Check that the Infiniband performance is acceptable. Failures indicate
      problems with links, badly seated HCA s, wrong configuration on switch,
      etc.
      a. cd /opt/oracle.SupportTools/ibdiagtools
      b. Create a file of DB nodes (Sun X4170 or HP DL360) one Infiniband IP
         address per line. If there are less than 8 nodes in full DBM and less
         than 4 in half DBM there is some problem in IB connectivity
           ibhosts | awk '/S [0-9.]* / {print $8}' | tee dbips.ora
      c. Create a file of Cell nodes (Sun X4275 or HP DL180) one Infiniband IP
         address per line. If there are less than 8 nodes in full DBM and less
         than 4 in half DBM there is some problem in IB connectivity
           ibhosts | awk '/C [0-9.]* / {print $8}' | tee cellip.ora

      d. Setup all to all root user ssh equivalence
      d.1. Create a file allip.ora with one ip address per node
           ibhosts | awk '/[SC] [0-9.]* HCA\-1/ {print $8}' | tee allip.ora
           Now use the setup_ssh_eq.sh script to setup user equivalence from
           current node to all other nodes without a password
           ../setup_ssh_eq.sh allip.ora root <root_password>
       d.2 Now to setup user equivalence between all other nodes in the rack..
           ./infinicheck -b -g dbips.ora -c cellip.ora -u root -s
         Respond to prompts or you can expect script this part and automate
         it.

      e. Create a smaller file dbip.ora out of dbips.ora with just one ip per
         compute node. So if there are 2 compute nodes with 4 HCAs, 
         then dbip.ora should just have 2 ip address from each node.
          ibhosts | awk '/S [0-9.]* HCA\-1/ {print $8}' | tee dbip.ora

      f. Run the check. Option -b for bare metal will suppress the warnings
         about cellinit.ora and cellip.ora files not found.
           ./infinicheck -b -g dbip.ora -c cellip.ora
      g. To view only performance run results 
           ./infinicheck -d -p
      h. To clean up after a run
           ./infinicheck -z
     
  Details for Round 2:
  -----------------------------------------------------------------------

  1. Before starting reimage for round 2, copy the file somewhere
      /opt/oracle.SupportTools/firstconf/factory_use_only.csv

  2. Edit the copied file to add the MAC addresses for nodes. Pay
     close attention to the order in which addresses are entered.
     The nodes are organized in top to bottom ordering in the rack.

     The existing MAC addresses are sample only and should be written
     over with real MAC addresses.

     Populate these only for the type of Database Machine (DBM) in
     build. For example only fill up the half rack section for half
     rack. Leave the rest alone.

     Verify basic form and content of the file by
      /opt/oracle.cellos/ipconf -preconf <the csv file> -verify

  3. The above edited file should be used as the preconf.csv file
     to reimage the nodes for Round 2.

  4. Once the nodes are up, login to the console (root/welcome1) of
     the bottommost DB node (X4170) in the rack. This should have
     come up with hostname fdata01 or hdata01 or qdata01 or bdata01
     corresponding to full, half or quarter DBM.

  5. cd /opt/oracle.SupportTools

  6. ./setup_ssh_eq.sh \
      /opt/oracle.SupportTools/firstconf/<full | half | quarter> \
      root \
      welcome1

  7. Check that root ssh equivalence was set up correctly in above step
     by simply executing some simple ssh command:
      /usr/local/bin/dcli \
      -g /opt/oracle.SupportTools/firstconf/<full | half | quarter> \
      -l root \
      "hostname -i"

  8. Set the ILOM ip addresses as specified in
     /opt/oracle.SupportTools/firstconf/factory_use_only.csv

  9. Set the NM2 InfiniBand switch ip addresses as specified in
     /opt/oracle.SupportTools/firstconf/factory_use_only.csv

  10. Set the CISCO Ethernet switch ip addresses as specified in
     /opt/oracle.SupportTools/firstconf/factory_use_only.csv

  11. When the above step passed, power off the nodes. They are ready to ship.

  Round 2 variation if Round 2 above does not work and there is time  pressure
  ----------------------------------------------------------------------------

  This is the case where you ship the rack without setting up private IP
  addresses.
 
  Simply reimage the rack but this time use the options:

   Must use:
    1. stit
    2. updfrm
    3. factory
    4. notests=diskgroup
   Must NOT use:
    1. preconf - based on second round template
    2. multiprof
    3. reboot-on-success
 
  What happens at customer site when machine ships with private ips
  -----------------------------------------------------------------

   At customer site, to apply real configuration the customer prepares the
   preconf.csv file that has all the correct content.

   Then,
   0. Log in to the bottommost DB node as root/welcome1
   1. cd /opt/oracle.SupportTools/firstconf
   2. copy the customer preconf
   3. ./applyconfig.sh \
       <full | half | quarter> \
       <full path to preconf.csv file e.g. /root/preconf.csv>
   4. This will push the configuration to all nodes and reboot them.
       
  Solaris installation 
  --------------------------------------------------------------------------

   To install Solaris you have to install or reinstall Linux with dualboot option
   first and make sure that the Linux installation succeed. You should use 
   ForFactorySolaris zip file to deploy PXE server. The README file in the factory
   zip explains the details. 

   You also have the option to use the iso for Solaris installtion. ISO based
   installation is completely unattended, thus you need only boot from the disk
   and wait till the machine reboots after the sucessful installation. It may take
   up to several hours. You can check status of the process:

   0. Log in to the DB node as root/welcome 
   1. tail -f /tmp/install_log 

   
发表在 安装和升级 | 标签为 , , | 2 条评论

研究数据字典和基表,发现处理手工删除fs$或者file$等问题的新思路

在测试环境玩什么东西忘记了,反正是忽然发现有个没用的表空间“UNDOTBS1”删除不掉,以前写过一篇,如何查找某个对象的定义(V$_X$_DBA)
这里重温一下数据字典和动态性能视图:
UNDOTBS1在v$tablespace中可见,但是不能drop,在dba_tablespaces中不可见,说明数据字典和动态性能视图不匹配了(手工删除了基表导致的,忘记是删除了ts$还是file$内容了):

不得不说Oracle 11.2.0.3以后的版本,对于数据库的一致性校验进行了很人性化的改动,以前这种情况是crash的,现在还open着,带病工作,O(∩_∩)O哈哈~
类似的带病工作的情况,还涉及到很多数据字典的不一致情况,比如以前的i_dependency1, i_dependency2等等。
从这个研究,也证实了如下结论:
V$TABLESPACE的信息是来源于GV$TABLESPACE,GV$TABLESPACE来源于基表 X$KCCTS
而DBA_TABLESPACES是来源于 SYS.TS$ TS 和 SYS.X$KCFISTSA。也就是说,V$TABLESPACE的信息来源于控制文件,而DBA_TABLESPACES的信息是来源于其他基表,手工删除基表信息时,其信息不和控制文件信息同步。

下面有具体看看:

[oracle@lunar ~]$ ss

SQL*Plus: Release 11.2.0.3.0 Production on Fri Nov 29 10:36:55 2013

Copyright (c) 1982, 2011, Oracle.  All rights reserved.


Connected to:
Oracle Database 11g Enterprise Edition Release 11.2.0.3.0 - 64bit Production
With the Partitioning and Real Application Testing options

SYS@bb>select name from v$tablespace;

NAME
------------------------------------------------------------
SYSTEM
SYSAUX
UNDOTBS1
TEMP
USERS
DBTK
LUNAR
UNDOTBS2

8 rows selected.

SYS@bb>drop tablespace undotbs1;
drop tablespace undotbs1
*
ERROR at line 1:
ORA-00959: tablespace 'UNDOTBS1' does not exist


SYS@bb>
SYS@bb>select tablespace_name from dba_tablespaces;     

TABLESPACE_NAME
------------------------------------------------------------
SYSTEM
SYSAUX
TEMP
USERS
DBTK
LUNAR
UNDOTBS2

7 rows selected.

SYS@bb>       

看下创建动态性能视图的语句:

[oracle@lunar ~]$ cat /u01/app/oracle/product/11.2.0.3/dbhome_1/rdbms/admin/catalog.sql |grep -v Rem|grep fixed
@@cdfixed.sql
[oracle@lunar ~]$ 
[oracle@lunar ~]$ cat /u01/app/oracle/product/11.2.0.3/dbhome_1/rdbms/admin/cdfixed.sql |grep -v Rem|grep fixed
create or replace view v_$fixed_table as select * from v$fixed_table;   --- v_$fixed_table  实际上是 v$fixed_table 的view
create or replace public synonym v$fixed_table for v_$fixed_table;	--- v$fixed_table   是  v_$fixed_table 的同义词
grant select on v_$fixed_table to select_catalog_role;
create or replace view v_$fixed_view_definition as			--- v_$fixed_view_definition  实际上是 v$fixed_view_definitiond view
   select * from v$fixed_view_definition;
create or replace public synonym v$fixed_view_definition		--- v$fixed_view_definition 是 v_$fixed_view_definition 的同义词
   for v_$fixed_view_definition;
grant select on v_$fixed_view_definition to select_catalog_role;
create or replace view v_$indexed_fixed_column as			--- v_$indexed_fixed_column  实际上是 v$indexed_fixed_column 的view
  select * from v$indexed_fixed_column;
create or replace public synonym v$indexed_fixed_column			--- v$indexed_fixed_column   是  v_$indexed_fixed_column 的同义词
   for v_$indexed_fixed_column;
grant select on v_$indexed_fixed_column to select_catalog_role;
-- Add SQL Performance Analyzer (SPA) fixed views
remark Create synonyms for the global fixed views			-- global fixed view实际上是从Oracle 8引入的,因为这个版本,Oracle对OPS进行了增强,																																		--- 添加GV$视图就是为了方便全局管理,V$跟GV$的区别就在这里“where inst_id = USERENV('Instance')”
--- 也就是V$是本实例的视图,而GV$是全局视图																																						
create or replace view gv_$fixed_table as select * from gv$fixed_table;	 --- gv_$fixed_table  实际上是 gv$fixed_table 的view
create or replace public synonym gv$fixed_table for gv_$fixed_table;	--- gv$fixed_table   是  gv_$fixed_table 的同义词
grant select on gv_$fixed_table to select_catalog_role;		
create or replace view gv_$fixed_view_definition as			--- gv_$fixed_view_definition  实际上是 gv$fixed_view_definition 的view
   select * from gv$fixed_view_definition;
create or replace public synonym gv$fixed_view_definition											
   for gv_$fixed_view_definition;
grant select on gv_$fixed_view_definition to select_catalog_role;
create or replace view gv_$indexed_fixed_column as			--- gv_$indexed_fixed_column  实际上是 gv$indexed_fixed_column 的view
  select * from gv$indexed_fixed_column;
create or replace public synonym gv$indexed_fixed_column											
   for gv_$indexed_fixed_column;
grant select on gv_$indexed_fixed_column to select_catalog_role;
[oracle@lunar ~]$ 

通过上面建库脚本也可以清晰的看到,得到授权的普通用户仍然只能访问V$开头的视图,而不能直接访问V_$开头的视图,因为实际上V$视图是V_$视图的公有同义词(PUBLIC SYNONYM)要想访问V_$必须带上SYS.V_$,例如

set heading off echo off long 100000 pages 10000
select * from v$fixed_view_definition where view_name='V$TABLESPACE';

SYS@bb>select * from v$fixed_view_definition where view_name='V$TABLESPACE';

V$TABLESPACE
select  TS# , NAME, INCLUDED_IN_DATABASE_BACKUP, BIGFILE, FLASHBACK_ON, ENCRYPT_IN_BACKUP from GV$TABLESPACE where inst_id = USERENV('Instance')


SYS@bb>select * from v$fixed_view_definition where view_name='GV$TABLESPACE';

GV$TABLESPACE
select inst_id,tstsn,tsnam,       decode(bitand(tsflg, 1+2), 1, 'NO', 2,'NO','YES'),  decode(bitand(tsflg, 4), 4,'YES','NO'),  decode(bitand(tsflg,
8), 8,'NO','YES'),  decode(bitand(tsflg, 16+32), 16, 'ON', 32, 'OFF', to_char(null)) from x$kccts where tstsn != -1


SYS@bb>

而查看普通的DBA_ ALL_ USER_ 等视图,可以查看数据字典 dba_views(这个视图从8i开始引入的)
例如:

set heading off echo off long 1000000000 pages 10000
select text from dba_views where view_name ='DBA_TABLESPACES';

SYS@bb>select text from dba_views where view_name ='DBA_TABLESPACES';

select ts.name, ts.blocksize, ts.blocksize * ts.dflinit,
          decode(bitand(ts.flags, 3), 1, to_number(NULL),
                 ts.blocksize * ts.dflincr),
          ts.dflminext,
          decode(ts.contents$, 1, to_number(NULL), ts.dflmaxext),
          decode(bitand(ts.flags, 4096), 4096, ts.affstrength, NULL),
          decode(bitand(ts.flags, 3), 1, to_number(NULL), ts.dflextpct),
          ts.blocksize * ts.dflminlen,
          decode(ts.online$, 1, 'ONLINE', 2, 'OFFLINE',
                 4, 'READ ONLY', 'UNDEFINED'),
          decode(ts.contents$, 0, (decode(bitand(ts.flags, 16), 16, 'UNDO',
                 'PERMANENT')), 1, 'TEMPORARY'),
          decode(bitand(ts.dflogging, 1), 0, 'NOLOGGING', 1, 'LOGGING'),
          decode(bitand(ts.dflogging, 2), 0, 'NO', 2, 'YES'),
          decode(ts.bitmapped, 0, 'DICTIONARY', 'LOCAL'),
          decode(bitand(ts.flags, 3), 0, 'USER', 1, 'SYSTEM', 2, 'UNIFORM',
                 'UNDEFINED'),
          decode(ts.plugged, 0, 'NO', 'YES'),
          decode(bitand(ts.flags,32), 32,'AUTO', 'MANUAL'),
          decode(bitand(ts.flags,64), 64,'ENABLED', 'DISABLED'),
          decode(bitand(ts.flags,16), 16, (decode(bitand(ts.flags, 512), 512,
                 'GUARANTEE', 'NOGUARANTEE')), 'NOT APPLY'),
          decode(bitand(ts.flags,256), 256, 'YES', 'NO'),
          decode(tsattr.storattr, 1, 'STORAGE', 'HOST'),
          decode(bitand(ts.flags,16384), 16384, 'YES', 'NO'),
          decode(bitand(ts.flags,64), 0, null,
            (case when bitand(ts.flags,  65536) = 65536
                    then 'OLTP'
                  when bitand(ts.flags, (131072+262144)) = 131072
                    then 'QUERY LOW'
                  when bitand(ts.flags, (131072+262144)) = 262144
                    then 'QUERY HIGH'
                  when bitand(ts.flags, (131072+262144)) = (131072+262144)
                    then 'ARCHIVE LOW'
                  when bitand(ts.flags, 524288) = 524288
                    then 'ARCHIVE HIGH'
                  else 'BASIC' end))
from sys.ts$ ts, sys.x$kcfistsa tsattr
where ts.online$ != 3
and bitand(flags,2048) != 2048
and ts.ts# = tsattr.tsid


SYS@bb>

X$ 是 Oracle 数据库 的核心部分,这些表用于跟踪内部数据库信息,维护数据库的正常运行。 X$ 表是加密的(除了MOS和直接看源代码以外,我不知道还有什么方法可以查看X$视图)
Oracle 通过 X$和一些基表(TS$, OBJ$, SEG$等)建立起其他大量视图,提供用户查询和管理数据库。
在9i以前
另外,还可以通过X$KQFTA来查看X$表的相关信息:

X$KQFTA
   [K]ernel [Q]uery [F]ixed Tables/views Management
    [TA]bles

 Column          Type               Description
 --------        ----               --------
 ADDR            RAW(4)             address of this row/entry in the array or SGA
 INDX            NUMBER             index number of this row in the fixed table array
 INST_ID         NUMBER       8.x   oracle instance number
 KQFTAOBJ        NUMBER             object ID number - hardcoded in kernel
 KQFTAVER        NUMBER             version number
 KQFTANAM        VARCHAR2(30)       table name

 KQFTATYP        NUMBER             type of table
     KQFTVTTB  1      declared using KQFTABL
     KQFTVTTP  2      declared using KQFTABP
     KQFTVTVI  3      declared using KQFVIEW
     KQFTVTCB  4      declared using KQFTABC
     KQFTVTIC  5      declared using KQFTABIC
     KQFTVTTS  6      declared using KQFTABS

 KQFTAFLG        NUMBER             flag
     KQFTVFONE  1      the INDX column of the table is one based 

 KQFTARSZ        NUMBER             array element size
 KQFTACOC        NUMBER             column count
 
SYS@bb>select  KQFTAOBJ, KQFTANAM, KQFTATYP from X$KQFTA where KQFTANAM='X$KCFISTSA';

  KQFTAOBJ KQFTANAM                                                       KQFTATYP
---------- ------------------------------------------------------------ ----------
4294952982 X$KCFISTSA                                                            5   

SYS@bb>

类似,就是11.2中新引入的X$表:
[oracle@lunar bin]$ strings oracle|grep KCFISTSA
X$KCFISTSA
[oracle@lunar bin]$

在10g和10g以前是没有的:

[oracle@lunar ~]$ . ora102.env 
[oracle@lunar ~]$ cd $ORACLE_HOME
[oracle@lunar db_1]$ cd bin
[oracle@lunar bin]$ strings oracle|grep KCFISTSA
[oracle@lunar bin]$ 

实际上,在10g以前的数据库中,
set heading off echo off long 1000000000 pages 10000
select text from dba_views where view_name =’X$KCFISTSA’;

基表数据字典是根据sql.bsq创建的:

[oracle@lunar ~]$ cat /u01/app/oracle/product/11.2.0.3/dbhome_1/rdbms/admin/sql.bsq |grep -v rem|grep -v Rem
dcore.bsq
dsqlddl.bsq
dmanage.bsq
dplsql.bsq
dtxnspc.bsq
dfmap.bsq
denv.bsq
drac.bsq
dsec.bsq
doptim.bsq
dobj.bsq
djava.bsq
dpart.bsq
drep.bsq
daw.bsq
dsummgt.bsq
dtools.bsq
dexttab.bsq
ddm.bsq
dlmnr.bsq
ddst.bsq
[oracle@lunar ~]$ 

回到我们的正题,通过上面查询可以看到,V$TABLESPACE的信息是来源于GV$TABLESPACE,GV$TABLESPACE来源于基表 X$KCCTS
而DBA_TABLESPACES是来源于 SYS.TS$ TS 和 SYS.X$KCFISTSA。也就是说,V$TABLESPACE的信息来源于控制文件,而DBA_TABLESPACES的信息是来源于其他基表,手工删除基表信息时,其信息不和控制文件信息同步,X$KCCTS定义如下

[K]ernel [C]ache [C]ontrolfile management [T]able[S]pace record

 Column          Type               Description
 --------        ----               -----------
 ADDR            RAW(4)             address of this row/entry in the SGA
 INDX            NUMBER             index number of this row in the fixed table array
 INST_ID         NUMBER             oracle instance number
 TSRNO           NUMBER             rec#
 TSTSN           NUMBER             TableSpace Number (same as ts# in data dict.)    =================关联TS$.TS#
 TSNAM           VARCHAR2(30)       tablespace NAMe																	 =================表空间名称
 TSNRB           NUMBER        8.0  Number of Rollback Segments in the tablespace

 TSFLG           NUMBER        8.1  (rollback segments) Flags defining tablespace
     KCCTSFTM  0x0001      Tablespace is temporary - Has only tempfiles

 TSDFP           NUMBER             tablespace's 1st DataFile Pointer (DataFile rec#)
 TSPSS           VARCHAR2(16)       ts Point-in-time recovery mode Start Scn
 TSPST           VARCHAR2(20)       ts Point-in-time recov mode Start Timestamp
 TSPCS           VARCHAR2(16)       last ts Point-in-time recovery Completion Scn
 TSPCT           VARCHAR2(20)       last ts Point-in-time recov Completion Timestp

Bug 13832069 : QUERY USING DBA_TABLESPACES (X$KCFISTSA) CAN LEAK CURSORS AND GIVE WRONG RESULTS

而X$KCFISTSA是定义在kcfis2.h中的,其结构定义如下:

SYS@bb>desc sys.X$KCFISTSA
 Name                                                                               Null?    Type
 ---------------------------------------------------------------------------------- -------- -------------------------------------------------------
 ADDR                                                                                        RAW(8)
 INDX                                                                                        NUMBER
 INST_ID                                                                                     NUMBER
 TSID                                                                                        NUMBER
 STORATTR                                                                                    NUMBER

SYS@bb>

ADDR RAW
		Address of buffer used to store row.
INDX NUMBER
		Index number (used to uniquely differentiate rows).
INST_ID NUMBER
		Instance number.
TSID NUMBER
		Based on struct element tsid_kcfistsa.
		tsid_kcfistsa was found in file kcfis2.h, line 377 and is described as :
Tablespace ID
STORATTR NUMBER
		Based on struct element storattr_kcfistsa.
		storattr_kcfistsa was found in file kcfis2.h, line 378 and is described as :
		Tablespace storage attributes

具体请参考大师的说明:
http://www.juliandyke.com/Internals/FixedTables/X_KCFISTSA.html

再来看看ts$的定义:

SYS@bb>desc sys.TS$;
 Name                                                                               Null?    Type
 ---------------------------------------------------------------------------------- -------- -------------------------------------------------------
 TS#                                                                                NOT NULL NUMBER
 NAME                                                                               NOT NULL VARCHAR2(30)
 OWNER#                                                                             NOT NULL NUMBER
 ONLINE$                                                                            NOT NULL NUMBER
 CONTENTS$                                                                          NOT NULL NUMBER
 UNDOFILE#                                                                                   NUMBER
 UNDOBLOCK#                                                                                  NUMBER
 BLOCKSIZE                                                                          NOT NULL NUMBER
 INC#                                                                               NOT NULL NUMBER
 SCNWRP                                                                                      NUMBER
 SCNBAS                                                                                      NUMBER
 DFLMINEXT                                                                          NOT NULL NUMBER
 DFLMAXEXT                                                                          NOT NULL NUMBER
 DFLINIT                                                                            NOT NULL NUMBER
 DFLINCR                                                                            NOT NULL NUMBER
 DFLMINLEN                                                                          NOT NULL NUMBER
 DFLEXTPCT                                                                          NOT NULL NUMBER
 DFLOGGING                                                                          NOT NULL NUMBER
 AFFSTRENGTH                                                                        NOT NULL NUMBER
 BITMAPPED                                                                          NOT NULL NUMBER
 PLUGGED                                                                            NOT NULL NUMBER
 DIRECTALLOWED                                                                      NOT NULL NUMBER
 FLAGS                                                                              NOT NULL NUMBER
 PITRSCNWRP                                                                                  NUMBER
 PITRSCNBAS                                                                                  NUMBER
 OWNERINSTANCE                                                                               VARCHAR2(30)
 BACKUPOWNER                                                                                 VARCHAR2(30)
 GROUPNAME                                                                                   VARCHAR2(30)
 SPARE1                                                                                      NUMBER
 SPARE2                                                                                      NUMBER
 SPARE3                                                                                      VARCHAR2(1000)
 SPARE4                                                                                      DATE

SYS@bb>

在TS$中,我昨天手工清理了一条NAME=UNDOTBS1的记录,这就是V$TABLESPACE和DBA_TABLESPACES中表空间名称不一致的原因

SYS@bb>select ts#, name, online$ from ts$;

       TS# NAME                                                            ONLINE$
---------- ------------------------------------------------------------ ----------
         0 SYSTEM                                                                1
         1 SYSAUX                                                                1
         3 TEMP                                                                  1
         4 USERS                                                                 1
         5 LMTBSB                                                                3
         6 DBTK                                                                  1
         7 YKDBAWRTS1                                                            3
         8 LUNAR                                                                 1
         9 UNDOTBS                                                               3
        10 UNDOTBS2                                                              1

10 rows selected.

SYS@bb>

可以看到,除了我手工删除的一条记录(UNDOTBS1)以外,所有数据库创建以来的表空间名称等信息都保留在TS$中,这样的设计,我猜是为了能够重用表空间名称,减少基表更新等操作(性能考虑吧? 我也不知道,O(∩_∩)O哈哈~)
比如,这里的UNDOTBS和YKDBAWRTS1等都已经是被删除的表空间。

再看看还有那些依赖于X$KCFISTSA的数据字典:
通过查询dependency$,我们可以发现有3个对象依赖于 X$KCFISTSA基表:

SYS@bb>select * from dependency$ where P_OBJ#=4294952982;

    D_OBJ# D_TIMESTAMP             ORDER#     P_OBJ# P_TIMESTAMP           D_OWNER#   PROPERTY D_ATTRS         D_REASON
---------- ------------------- ---------- ---------- ------------------- ---------- ---------- --------------- ---------------
      4943 2013-06-23 09:37:34          0 4294952982 1991-01-02 00:00:00                     5 0003000030
      4945 2013-06-23 09:37:34          0 4294952982 1991-01-02 00:00:00                     5 0003000030
     12409 2013-06-23 09:45:16         30 4294952982 1991-01-02 00:00:00                     5 0003000030

SYS@bb>
SYS@bb>desc dependency$
 Name                                                                               Null?    Type
 ---------------------------------------------------------------------------------- -------- -------------------------------------------------------
 D_OBJ#                                                                              NOT NULL NUMBER
 D_TIMESTAMP                                                                        NOT NULL DATE
 ORDER#                                                                             NOT NULL NUMBER
 P_OBJ#                                                                             NOT NULL NUMBER
 P_TIMESTAMP                                                                        NOT NULL DATE
 D_OWNER#                                                                                    NUMBER
 PROPERTY                                                                           NOT NULL NUMBER
 D_ATTRS                                                                                     RAW(2000)
 D_REASON                                                                                    RAW(2000)

SYS@bb>
1

知道了这个就很清晰了,处理思路:
1,针对file$的不一致信息,需要手工清除:

SYS@bb>select file#,status$,ts# from file$ where ts#=2;

     FILE#    STATUS$        TS#
---------- ---------- ----------
         3          2          2

SYS@bb>

2,可以根据11g的新特性Health Manager的检查结果来判断,还有哪些相关对象不一致的,是否需要手工清理:

SYS@bb>select obj#,ts#,file# from tab$ where ts#=2;

no rows selected

SYS@bb>select obj#,ts#,file# from ind$ where ts#=2;

no rows selected

SYS@bb>

3,当其他信息都一致后,针对X$KCCTS的不一致信息,由于其来源于控制文件,那么重建控制文件解决

			SYS@bb>select TSTSN,TSNAM from X$KCCTS where TSNAM='UNDOTBS1';
			
			     TSTSN TSNAM
			---------- ------------------------------------------------------------
			         2 UNDOTBS1
			
			SYS@bb>

之前就是这个思路错误了,导致了一堆的其他问题,当然,也知道和跟多其他好玩东西,比如用gdb跳过数据库启动时的数据字典检查项,知道了重建控制文件的风险其实很大(在不了解现场情况和重建控制文件的细节时)……

发表在 FAQ, Internal | 标签为 , , , , | 留下评论

看图说话——ASM实例和ASMB进程

先看一下ASM实例的大体部署:
1881184

我们都知道,ASM实例管理着元数据,普通数据库实例通过查询元数据的信息来访问相应的ASM文件。
ASM实例和数据库实例都可以访问一组普通的磁盘,这套磁盘被称为磁盘组。
然后,数据库实例直接访问ASM文件的内容,并在与ASM实例通信时获取有关这些文件的分布信息。

Group Services用于注册数据库实例查找ASM实例时所需要的连接信息:
Group Services用于注册数据库实例查找ASM实例所需要的连接信息。
当ASM实例mount一个磁盘组时,它就将磁盘组的信息和连接串注册到Group Services。
数据库实例知道了磁盘组的名称,就可以找到应该连接到哪个ASM实例。

ASM实例有哪些独特地方:
1,INSTANCE_TYPE = ASM
2,startup = startup mount(11.2以后,可以直接对ASM实例 startup,但是本质还是startup mount),对于ASM实例,mount选项不会去mount数据文件,而是mount在参数文件中ASM_DISKGROUPS指定的磁盘组
3,connect / as sysdba(10g) 和 connect / as sysasm(11.2)

ASM的后台进程有很多,具体可以参考reference中的描述,这里只想研究一下数据库和ASM之间负责心跳机制的ASMB进程。

[grid@dm01db01 oraagent_grid]$ ps -ef|grep ASM1
grid      2714  2711  0 12:21 ?        00:00:00 oracle+ASM1 (DESCRIPTION=(LOCAL=YES)(ADDRESS=(PROTOCOL=beq)))
grid      3467     1  0 09:24 ?        00:00:00 asm_pmon_+ASM1
grid      3471     1  0 09:24 ?        00:00:00 asm_psp0_+ASM1
grid      3475     1  0 09:24 ?        00:00:05 asm_vktm_+ASM1
grid      3481     1  0 09:24 ?        00:00:00 asm_gen0_+ASM1
grid      3485     1  0 09:24 ?        00:00:00 asm_diag_+ASM1
grid      3489     1  0 09:24 ?        00:00:00 asm_ping_+ASM1
grid      3493     1  0 09:24 ?        00:00:00 asm_dskm_+ASM1
grid      3497     1  0 09:24 ?        00:00:03 asm_dia0_+ASM1
grid      3501     1  0 09:24 ?        00:00:01 asm_lmon_+ASM1
grid      3505     1  0 09:24 ?        00:00:00 asm_lmd0_+ASM1
grid      3512     1  0 09:24 ?        00:00:01 asm_lms0_+ASM1
grid      3518     1  0 09:24 ?        00:00:00 asm_lmhb_+ASM1
grid      3522     1  0 09:24 ?        00:00:00 asm_mman_+ASM1
grid      3526     1  0 09:24 ?        00:00:00 asm_dbw0_+ASM1
grid      3530     1  0 09:24 ?        00:00:00 asm_lgwr_+ASM1
grid      3534     1  0 09:24 ?        00:00:00 asm_ckpt_+ASM1
grid      3538     1  0 09:24 ?        00:00:00 asm_smon_+ASM1
grid      3542     1  0 09:24 ?        00:00:00 asm_rbal_+ASM1
grid      3546     1  0 09:24 ?        00:00:00 asm_gmon_+ASM1
grid      3550     1  0 09:24 ?        00:00:00 asm_mmon_+ASM1
grid      3554     1  0 09:24 ?        00:00:00 asm_mmnl_+ASM1
grid      3558     1  0 09:24 ?        00:00:00 asm_xdmg_+ASM1
grid      3562     1  0 09:24 ?        00:00:00 asm_lck0_+ASM1
grid      3580     1  0 09:24 ?        00:00:00 oracle+ASM1 (DESCRIPTION=(LOCAL=YES)(ADDRESS=(PROTOCOL=beq)))
grid      3628     1  0 09:24 ?        00:00:00 oracle+ASM1_ocr (DESCRIPTION=(LOCAL=YES)(ADDRESS=(PROTOCOL=beq)))
grid      3637     1  0 09:24 ?        00:00:00 asm_asmb_+ASM1        
--------------ASM的ASMB进程
grid      3641     1  0 09:24 ?        00:00:00 oracle+ASM1_asmb_+asm1 (DESCRIPTION=(LOCAL=YES)(ADDRESS=(PROTOCOL=beq)))   -----ASMB进程连接到+ASM1,并把存储的统计信息同步到CSS
grid      3847     1  0 09:24 ?        00:00:00 oracle+ASM1 (DESCRIPTION=(LOCAL=YES)(ADDRESS=(PROTOCOL=beq)))  
-----oracleagent进程
grid      4296     1  0 09:25 ?        00:00:00 oracle+ASM1_asmb_bbff1 (DESCRIPTION=(LOCAL=YES)(ADDRESS=(PROTOCOL=beq)))   
-----ASMB进程连接到数据库实例,并把存储相关的统计信息同步到CSS(比如增加磁盘组等等)
grid      6596 30872  0 13:11 pts/4    00:00:00 grep ASM1
grid      8872     1  0 10:25 ?        00:00:00 oracle+ASM1_o000_bbff1 (DESCRIPTION=(LOCAL=YES)(ADDRESS=(PROTOCOL=beq)))
[grid@dm01db01 oraagent_grid]$ 

我们知道ASMB进程实际上是提供了一个数据库实例和ASM实例之间通信的桥梁,比如在数据库中创建、删除文件,或者修改文件等等的跟存储物理变化相关的操作。首先,我们观察下,他们在CRS,ASM和数据库启动过程中的启动顺序和先后关系
ASM的alert

。。。。。
Sun Mar 09 09:24:47 2014
NOTE: [crsd.bin@dm01db01 (TNS V1-V3) 3615] opening OCR file
Starting background process ASMB
Sun Mar 09 09:24:47 2014
ASMB started with pid=27, OS id=3637 
Sun Mar 09 09:24:47 2014
NOTE: client +ASM1:+ASM registered, osid 3641, mbr 0x0
Sun Mar 09 09:26:06 2014
NOTE: client bbff1:bbff registered, osid 4296, mbr 0x1
。。。。。

DB的alert:

。。。。。
Sun Mar 09 09:25:49 2014
SMON started with pid=21, OS id=4272 
Sun Mar 09 09:25:50 2014
RECO started with pid=22, OS id=4276 
Sun Mar 09 09:25:50 2014
RBAL started with pid=23, OS id=4280 
Sun Mar 09 09:25:50 2014
ASMB started with pid=24, OS id=4284 
。。。。。

ASM和数据库实例的ASMB进程都分别将信息注册到css中,参看ocssd.log:

。。。。。
2014-03-09 09:24:47.069: [    CSSD][1081276736]clssgmDestroyProc: cleaning up proc(0x1f7cba50) con(0x2518) skgpid 3628 ospid 3628 with 0 clients, refcount 0  -------3628是ocr进程:oracle+ASM1_ocr (DESCRIPTION=(LOCAL=YES)(ADDRESS=(PROTOCOL=beq))
2014-03-09 09:24:47.069: [    CSSD][1081276736]clssgmDiscEndpcl: gipcDestroy 0x2518
2014-03-09 09:24:47.089: [    CSSD][1081276736]clssscSelect: cookie accept request 0x1ef1ef60
2014-03-09 09:24:47.089: [    CSSD][1081276736]clssgmAllocProc: (0x1f7cba50) allocated
2014-03-09 09:24:47.089: [    CSSD][1081276736]clssgmClientConnectMsg: properties of cmProc 0x1f7cba50 - 1,2,3,4,5
2014-03-09 09:24:47.089: [    CSSD][1081276736]clssgmClientConnectMsg: Connect from con(0x2579) proc(0x1f7cba50) pid(3628/3628) version 11:2:1:4, properties: 1,2,3,4,5
2014-03-09 09:24:47.089: [    CSSD][1081276736]clssgmClientConnectMsg: msg flags 0x0000
2014-03-09 09:24:47.487: [    CSSD][1081276736]clssscSelect: cookie accept request 0x1ef1ef60
2014-03-09 09:24:47.487: [    CSSD][1081276736]clssgmAllocProc: (0x1f7ddbd0) allocated
2014-03-09 09:24:47.487: [    CSSD][1081276736]clssgmClientConnectMsg: properties of cmProc 0x1f7ddbd0 - 1,2,3,4,5
2014-03-09 09:24:47.487: [    CSSD][1081276736]clssgmClientConnectMsg: Connect from con(0x25f5) proc(0x1f7ddbd0) pid(3641/3641) version 11:2:1:4, properties: 1,2,3,4,5 ---3641是ASMB进程,oracle+ASM1_asmb_+asm1 (DESCRIPTION=(LOCAL=YES)(ADDRESS=(PROTOCOL=beq)))
。。。。。。。。。。。
2014-03-09 09:25:50.663: [    CSSD][1081276736]clssgmAllocProc: (0x1f8b6290) allocated
2014-03-09 09:25:50.663: [    CSSD][1081276736]clssgmClientConnectMsg: properties of cmProc 0x1f8b6290 - 1,2,3,4,5
2014-03-09 09:25:50.663: [    CSSD][1081276736]clssgmClientConnectMsg: Connect from con(0x35fc) proc(0x1f8b6290) pid(4284/4284) version 11:2:1:4, properties: 1,2,3,4,5----4284是数据库的ASMB进程
2014-03-09 09:25:50.663: [    CSSD][1081276736]clssgmClientConnectMsg: msg flags 0x0000
2014-03-09 09:25:50.921: [    CSSD][1081276736]clssgmDeadProc: proc 0x1f8b6290
2014-03-09 09:25:50.921: [    CSSD][1081276736]clssgmDestroyProc: cleaning up proc(0x1f8b6290) con(0x35fc) skgpid 4284 ospid 4284 with 0 clients, refcount 0
2014-03-09 09:25:50.921: [    CSSD][1081276736]clssgmDiscEndpcl: gipcDestroy 0x35fc
2014-03-09 09:25:51.195: [    CSSD][1081276736]clssscSelect: cookie accept request 0x1ef1ef60
2014-03-09 09:25:51.195: [    CSSD][1081276736]clssgmAllocProc: (0x1f8b6290) allocated
2014-03-09 09:25:51.196: [    CSSD][1081276736]clssgmClientConnectMsg: properties of cmProc 0x1f8b6290 - 1,2,3,4,5
2014-03-09 09:25:51.196: [    CSSD][1081276736]clssgmClientConnectMsg: Connect from con(0x3663) proc(0x1f8b6290) pid(4284/4284) version 11:2:1:4, properties: 1,2,3,4,5
2014-03-09 09:25:51.196: [    CSSD][1081276736]clssgmClientConnectMsg: msg flags 0x0000
2014-03-09 09:25:51.216: [    CSSD][1081276736]clssscSelect: cookie accept request 0x1ef1ef60
2014-03-09 09:25:51.216: [    CSSD][1081276736]clssgmAllocProc: (0x1f8cdb50) allocated
2014-03-09 09:25:51.218: [    CSSD][1081276736]clssgmClientConnectMsg: properties of cmProc 0x1f8cdb50 - 1,2,3,4,5
2014-03-09 09:25:51.218: [    CSSD][1081276736]clssgmClientConnectMsg: Connect from con(0x36dd) proc(0x1f8cdb50) pid(4231/4231) version 11:2:1:4, properties: 1,2,3,4,5----4231是数据库的lmon进程
。。。。。。。
2014-03-09 09:26:06.534: [    CSSD][1109334336]clssnmSendingThread: sending status msg to all nodes
2014-03-09 09:26:06.534: [    CSSD][1109334336]clssnmSendingThread: sent 4 status msgs to all nodes
2014-03-09 09:26:06.885: [    CSSD][1081276736]clssscSelect: cookie accept request 0x1ef1ef60
2014-03-09 09:26:06.885: [    CSSD][1081276736]clssgmAllocProc: (0x1f91e650) allocated
2014-03-09 09:26:06.886: [    CSSD][1081276736]clssgmClientConnectMsg: properties of cmProc 0x1f91e650 - 1,2,3,4,5
2014-03-09 09:26:06.886: [    CSSD][1081276736]clssgmClientConnectMsg: Connect from con(0x397e) proc(0x1f91e650) pid(4296/4296) version 11:2:1:4, properties: 1,2,3,4,5----oracle+ASM1_asmb_bbff1 (DESCRIPTION=(LOCAL=YES)(ADDRESS=(PROTOCOL=beq
2014-03-09 09:26:06.886: [    CSSD][1081276736]clssgmClientConnectMsg: msg flags 0x0000
2014-03-09 09:26:06.912: [    CSSD][1081276736]clssscSelect: cookie accept request 0x1f91e650
2014-03-09 09:26:06.912: [    CSSD][1081276736]clssscevtypSHRCON: getting client with cmproc 0x1f91e650
2014-03-09 09:26:06.912: [    CSSD][1081276736]clssgmRegisterClient: proc(33/0x1f91e650), client(1/0x1f7baaf0)
2014-03-09 09:26:06.912: [    CSSD][1081276736]clssgmJoinGrock: local grock UFG_+ASM1 new client 0x1f7baaf0 with con 0x39b6, requested num 1, flags 0x10100
2014-03-09 09:26:06.912: [    CSSD][1081276736]clssgmAddGrockMember: adding member to grock UFG_+ASM1
2014-03-09 09:26:06.912: [    CSSD][1081276736]clssgmAddMember: Adding fencing for member 1, group UFG_+ASM1, death 1, SAGE 0
2014-03-09 09:26:06.912: [    CSSD][1081276736]clssgmAddMember: member (1/0x1f332350) added. pbsz(108) prsz(108) flags 0x0 to grock (0x1f805240/UFG_+ASM1)
2014-03-09 09:26:06.912: [    CSSD][1081276736]clssgmCommonAddMember: local group grock UFG_+ASM1 member(1/Local) node(1) flags 0x0 0x30 
。。。。。

这里,数据库启动时,ASMB的活动过程:
1,ASM实例的ASMB进程启动(spid: 3637,asm_asmb_+ASM1)
2,ASM实例的ASMB进程启动了一个连接到ASM实例的进程(spid:3641,oracle+ASM1_asmb_+asm1 (DESCRIPTION=(LOCAL=YES)(ADDRESS=(PROTOCOL=beq))))
3,ASM实例的ASMB进程将连接进程(oracle+ASM1_asmb_+asm1)的信息注册到css中
4,数据库启动时,启动数据库的ASMB进程(spid:4284,ora_asmb_bbff1)
5,数据库的ASMB进程将数据库的ASMB进程注册到CSS中
6,ASM实例的ASMB进程启动一个进程连接到数据库实例的进程:20140309-09:26:05,oracle+ASM1_asmb_bbff1 (DESCRIPTION=(LOCAL=YES)(ADDRESS=(PROTOCOL=beq)))
7,ASM实例的ASMB进程将这个连接到数据库实例的进程(oracle+ASM1_asmb_bbff1)的信息注册到CSS中

当然,通常情况下,连接到数据库的ASMB如果出现异常,那么会很快创建一个新的连接,并注册到css中,这一点可以从css的日志中发现。

我目前的测试环境时EXADATA 11.2.3.2.1的VM,经过跟踪,可以发现,数据库进程在做类似添加、删除表空间等等所有跟存储相关的操作的时候,实际上是通过pipe来完成的(通常每个相关进程2个pipe,一个用于读,一个用于写)。不知道其他的ASM环境,是否也是这个结论,回头找个普通的ASM环境测试下,O(∩_∩)O哈哈~

下面我们删除一个表空间,并跟踪一下,看看ASMB是如何操作的:

[root@dm01db01 ~]# ps -ef|grep LOCAL=YES
grid      3580     1  0 09:24 ?        00:00:00 oracle+ASM1 (DESCRIPTION=(LOCAL=YES)(ADDRESS=(PROTOCOL=beq)))
grid      3628     1  0 09:24 ?        00:00:00 oracle+ASM1_ocr (DESCRIPTION=(LOCAL=YES)(ADDRESS=(PROTOCOL=beq)))
grid      3641     1  0 09:24 ?        00:00:00 oracle+ASM1_asmb_+asm1 (DESCRIPTION=(LOCAL=YES)(ADDRESS=(PROTOCOL=beq)))
grid      3847     1  0 09:24 ?        00:00:00 oracle+ASM1 (DESCRIPTION=(LOCAL=YES)(ADDRESS=(PROTOCOL=beq)))
grid     11438     1  0 14:20 ?        00:00:00 oracle+ASM1_asmb_bbff1 (DESCRIPTION=(LOCAL=YES)(ADDRESS=(PROTOCOL=beq)))  ----ASM实例的ASMB进程连接到数据库进程
oracle   11465     1  0 14:20 ?        00:00:01 oraclebbff1 (DESCRIPTION=(LOCAL=YES)(ADDRESS=(PROTOCOL=beq)))       ------oracleagent进程
oracle   11650     1  0 14:22 ?        00:00:00 oraclebbff1 (DESCRIPTION=(LOCAL=YES)(ADDRESS=(PROTOCOL=beq)))       ------oracleagent进程
oracle   11666     1  0 14:22 ?        00:00:00 oraclebbff1 (DESCRIPTION=(LOCAL=YES)(ADDRESS=(PROTOCOL=beq)))       ------oracleagent进程
oracle   13959 13956  0 14:54 ?        00:00:00 oraclebbff1 (DESCRIPTION=(LOCAL=YES)(ADDRESS=(PROTOCOL=beq)))       ------我的进程
root     14019 13831  0 14:55 pts/1    00:00:00 grep LOCAL=YES
[root@dm01db01 ~]# 
[root@dm01db01 ~]# ps -ef|grep ocss
grid      2881     1  0 09:22 ?        00:00:25 /u01/app/11.2.0.3/grid/bin/ocssd.bin 
root     14465 13831  0 15:01 pts/1    00:00:00 grep ocss
[root@dm01db01 ~]#
[root@dm01db01 ~]# ps -ef|grep asmb
grid      3637     1  0 09:24 ?        00:00:00 asm_asmb_+ASM1
grid      3641     1  0 09:24 ?        00:00:00 oracle+ASM1_asmb_+asm1 (DESCRIPTION=(LOCAL=YES)(ADDRESS=(PROTOCOL=beq)))
oracle   11433     1  0 14:20 ?        00:00:00 ora_asmb_bbff1
grid     11438     1  0 14:20 ?        00:00:00 oracle+ASM1_asmb_bbff1 (DESCRIPTION=(LOCAL=YES)(ADDRESS=(PROTOCOL=beq)))
root     12228 30240  0 14:29 pts/4    00:00:00 grep asmb
[root@dm01db01 ~]#

可以看到,spid 13959是我当前的进程,删除表空间之前使用strace进行跟踪:

strace -fr -o /tmp/11438.log -p 11438
strace -fr -o /tmp/13956.log -p 13956
strace -fr -o /tmp/2881.log -p 2881

SYS@bbff1>drop tablespace lunartest  include contents and datafiles;
drop tablespace lunartest  include contents and datafiles
                           *
ERROR at line 1:
ORA-02173: invalid option for DROP TABLESPACE


Elapsed: 00:00:00.08
SYS@bbff1>>drop tablespace lunartest including contents and datafiles;
SP2-0734: unknown command beginning ">drop tabl..." - rest of line ignored.
SYS@bbff1>
SYS@bbff1>drop tablespace lunartest including contents and datafiles;

Tablespace dropped.

Elapsed: 00:00:07.15
SYS@bbff1>

删除表空间后,结束跟踪,并进行观察:

[root@dm01db01 ~]# strace -fr -o /tmp/11438.log -p 11438
Process 11438 attached - interrupt to quit
Process 11438 detached
[root@dm01db01 ~]# 

[root@dm01db01 ~]# strace -fr -o /tmp/13956.log -p 13956
Process 13956 attached - interrupt to quit
Process 13956 detached
[root@dm01db01 ~]# 

[root@dm01db01 ~]# strace -fr -o /tmp/2881.log -p 2881
Process 2881 attached with 20 threads - interrupt to quit
Process 2881 detached
Process 2885 detached
Process 2888 detached
Process 2889 detached
Process 2890 detached
Process 2891 detached
Process 2902 detached
Process 2903 detached
Process 2924 detached
Process 2925 detached
Process 2926 detached
Process 2927 detached
Process 2930 detached
Process 2934 detached
Process 2940 detached
Process 2941 detached
Process 2942 detached
Process 2944 detached
Process 2948 detached
Process 2949 detached
[root@dm01db01 ~]# 

我们看到,数据库的server process接收到“drop tablespace lunartest includ……”命令后,将信息写入了设备/proc/13956/fd下面的10号文件,并从11号文件读取了反馈信息:

13956      0.000203 read(0, "drop tablespace lunartest includ"..., 1024) = 60
13956      8.392710 gettimeofday({1394348248, 583001}, NULL) = 0
13956      0.000332 write(10, "\1S\0\0\6\0\0\0\0\0\21i\t\376\377\377\377\377\377\377\377\1\0\0\0\0\0\0\0\1\0\0"..., 339) = 339
13956      0.002337 read(11, "\0\313\0\0\6\0\0\0\0\0\10\6\0(\37\6\0\0\0\0\0\1\0\0\0\0\0\0\0\0\0\0"..., 8208) = 203
13956      7.140464 write(1, "\n", 1)   = 1
13956      0.000291 lseek(3, 3072, SEEK_SET) = 3072
13956      0.000089 read(3, "\22\0A\0\0\0t\0B\0\0\0\212\0C\0\0\0\240\0D\0\0\0\261\0E\0\0\0\302\0"..., 512) = 512
13956      0.000962 write(1, "Tablespace dropped.", 19) = 19
13956      0.000855 write(1, "\n", 1)   = 1
13956      0.000333 write(1, "\n", 1)   = 1
13956      0.005740 gettimeofday({1394348255, 734445}, NULL) = 0
13956      0.000224 write(1, "Elapsed: 00:00:07.15\n", 21) = 21
13956      0.000403 write(1, "SYS@bbff1>", 10) = 10

再看下进程的fd(file description)信息,我们看到,10号和11号文件分别是两个pipe:

[root@dm01db01 fd]# pwd
/proc/13956/fd
[root@dm01db01 fd]# ls -lrt
total 0
lrwx------ 1 oracle oinstall 64 Mar  9 15:01 2 -> /dev/pts/2
lrwx------ 1 oracle oinstall 64 Mar  9 15:02 0 -> /dev/pts/2
lr-x------ 1 oracle oinstall 64 Mar  9 15:02 8 -> /u01/app/oracle/product/11.2.0.3/dbhome_1/rdbms/mesg/ocius.msb
lr-x------ 1 oracle oinstall 64 Mar  9 15:02 7 -> /proc/13956/fd
lr-x------ 1 oracle oinstall 64 Mar  9 15:02 6 -> /u01/app/oracle/product/11.2.0.3/dbhome_1/rdbms/mesg/diaus.msb
lr-x------ 1 oracle oinstall 64 Mar  9 15:02 5 -> /u01/app/oracle/product/11.2.0.3/dbhome_1/sqlplus/mesg/cpyus.msb
lr-x------ 1 oracle oinstall 64 Mar  9 15:02 4 -> /u01/app/oracle/product/11.2.0.3/dbhome_1/sqlplus/mesg/sp2us.msb
lr-x------ 1 oracle oinstall 64 Mar  9 15:02 3 -> /u01/app/oracle/product/11.2.0.3/dbhome_1/sqlplus/mesg/sp1us.msb
lr-x------ 1 oracle oinstall 64 Mar  9 15:02 11 -> pipe:[8035210]
l-wx------ 1 oracle oinstall 64 Mar  9 15:02 10 -> pipe:[8035209]
lrwx------ 1 oracle oinstall 64 Mar  9 15:02 1 -> /dev/pts/2
[root@dm01db01 fd]# 

也就是说出了写到终端的反馈信息外,服务器进程将删除表空间的信息写入一个pipe(10),并从另一个pipe(11)读取反馈信息

发表在 ASM, Exadata | 标签为 , , | 留下评论

expdp中跟踪每一个步骤的时间——metrics=y

在12c中,我们知道expdp和impdp可以看到每一步的时间,其实这个功能在11.2中就可以了,需要加一个未公开的参数 metrics=y,例如:

[oracle@lunar datapump]$ expdp lunar/lunar DIRECTORY=lunar_dir DUMPFILE=lunar_expdp_f%U.dmp LOGFILE=lunar_expdp_f.log FULL=y PARALLEL=2 metrics=y 

Export: Release 11.2.0.3.0 - Production on Tue Mar 4 06:01:40 2014

Copyright (c) 1982, 2011, Oracle and/or its affiliates.  All rights reserved.

Connected to: Oracle Database 11g Enterprise Edition Release 11.2.0.3.0 - 64bit Production
With the Partitioning and Real Application Testing options
Starting "LUNAR"."SYS_EXPORT_FULL_01":  lunar/******** DIRECTORY=lunar_dir DUMPFILE=lunar_expdp_f%U.dmp LOGFILE=lunar_expdp_f.log FULL=y PARALLEL=2 metrics=y 
Estimate in progress using BLOCKS method...
Processing object type DATABASE_EXPORT/SCHEMA/TABLE/TABLE_DATA
Total estimation using BLOCKS method: 49.93 MB
Processing object type DATABASE_EXPORT/TABLESPACE
ORA-31693: Table data object "LUNAR"."FF" failed to load/unload and is being skipped due to error:
ORA-02354: error in exporting/importing data
ORA-01578: ORACLE data block corrupted (file # 4, block # 129)
ORA-01110: data file 4: '/stage/travel/users01.dbf'
. . exported "LUNAR"."LUNAR_PAR_TEST":"SYS_P80"."SYS_SUBP66"  13.94 KB       1 rows
     Completed 4 TABLESPACE objects in 1 seconds
Processing object type DATABASE_EXPORT/PROFILE
     Completed 1 PROFILE objects in 0 seconds
Processing object type DATABASE_EXPORT/SYS_USER/USER
     Completed 1 USER objects in 0 seconds
Processing object type DATABASE_EXPORT/SCHEMA/USER
     Completed 5 USER objects in 0 seconds
Processing object type DATABASE_EXPORT/ROLE
. . exported "SYSMAN"."MGMT_MESSAGES"                    4.156 MB   23311 rows
. . exported "LUNAR"."T"                                 1.594 MB   17632 rows
     Completed 18 ROLE objects in 1 seconds
Processing object type DATABASE_EXPORT/GRANT/SYSTEM_GRANT/PROC_SYSTEM_GRANT
     Completed 4 PROC_SYSTEM_GRANT objects in 0 seconds
Processing object type DATABASE_EXPORT/SCHEMA/GRANT/SYSTEM_GRANT
     Completed 41 SYSTEM_GRANT objects in 0 seconds
Processing object type DATABASE_EXPORT/SCHEMA/ROLE_GRANT
........
省略部分内容
........
. . exported "SYSMAN"."MGMT_LICENSE_DEFINITIONS"         54.65 KB      59 rows
. . exported "SYSMAN"."MGMT_METRICS_1HOUR"               10.56 KB      34 rows
. . exported "SYSMAN"."MGMT_POLICY_ASSOC"                34.06 KB     358 rows
. . exported "SYSMAN"."MGMT_POLICY_VIOL_CTXT_DEF"        68.09 KB     642 rows
. . exported "SYSMAN"."MGMT_SYSTEM_PERFORMANCE_LOG"      19.38 KB     185 rows
     Completed 8 SYNONYM objects in 5 seconds
Processing object type DATABASE_EXPORT/SCHEMA/TYPE/TYPE_SPEC
     Completed 673 TYPE objects in 2 seconds
Processing object type DATABASE_EXPORT/SCHEMA/TYPE/GRANT/OWNER_GRANT/OBJECT_GRANT
     Completed 1 OBJECT_GRANT objects in 1 seconds
Processing object type DATABASE_EXPORT/SYSTEM_PROCOBJACT/PRE_SYSTEM_ACTIONS/PROCACT_SYSTEM
     Completed 4 PROCACT_SYSTEM objects in 1 seconds
Processing object type DATABASE_EXPORT/SYSTEM_PROCOBJACT/PROCOBJ
     Completed 17 PROCOBJ objects in 1 seconds
Processing object type DATABASE_EXPORT/SYSTEM_PROCOBJACT/POST_SYSTEM_ACTIONS/PROCACT_SYSTEM
. . exported "SYSMAN"."MGMT_TASK_QTABLE"                 21.61 KB      27 rows
. . exported "SYSMAN"."AQ$_MGMT_LOADER_QTABLE_S"         10.75 KB       1 rows
. . exported "SYSMAN"."AQ$_MGMT_NOTIFY_QTABLE_S"         10.75 KB       1 rows
. . exported "SYSMAN"."EMDW_TRACE_CONFIG"                7.054 KB       9 rows
. . exported "SYSMAN"."EM_PAGE_CONDITION_METADATA"       5.640 KB       7 rows
........
省略部分内容
........
. . exported "SYSMAN"."MGMT_ARU_PRODUCTS"                34.71 KB     744 rows
     Completed 4 PROCACT_SYSTEM objects in 0 seconds
Processing object type DATABASE_EXPORT/SCHEMA/PROCACT_SCHEMA
. . exported "SYSMAN"."MGMT_ARU_RELEASES"                19.89 KB     863 rows
. . exported "SYSMAN"."MGMT_AUDIT_DESTINATION"           5.492 KB       1 rows
. . exported "SYSMAN"."MGMT_AUDIT_MASTER"                5.070 KB       1 rows
. . exported "SYSMAN"."MGMT_AVAILABILITY"                6.679 KB       1 rows
. . exported "SYSMAN"."MGMT_AVAILABILITY_MARKER"         5.875 KB       1 rows
. . exported "SYSMAN"."MGMT_AVAILABLE_SEARCHES"          7.023 KB      15 rows
. . exported "SYSMAN"."MGMT_BLACKOUT_PROXY_TARGETS"      5.054 KB       1 rows
. . exported "SYSMAN"."MGMT_BLACKOUT_REASON"             9.617 KB      60 rows
. . exported "SYSMAN"."MGMT_BSLN_METRICS"                7.351 KB       6 rows
........
省略部分内容
........
. . exported "SYSMAN"."MGMT_PAF_JOBTYPES"                10.17 KB       2 rows
. . exported "SYSMAN"."MGMT_PAF_JOBTYPE_PARAMS"          14.94 KB      16 rows
     Completed 7 PROCACT_SCHEMA objects in 5 seconds
Processing object type DATABASE_EXPORT/SCHEMA/TABLE/TABLE
. . exported "SYSMAN"."MGMT_PAF_PARAM_GROUPS"            10.79 KB       6 rows
. . exported "SYSMAN"."MGMT_PAF_PROCEDURES"              13.58 KB       2 rows
. . exported "SYSMAN"."MGMT_PAF_TEXTUAL_DATA"            24.24 KB       2 rows
. . exported "SYSMAN"."MGMT_PARAMETERS"                  13.77 KB      84 rows
.........
省略部分
.........
. . exported "SYSTEM"."REPCAT$_TEMPLATE_TARGETS"             0 KB       0 rows
. . exported "SYSTEM"."REPCAT$_USER_AUTHORIZATIONS"          0 KB       0 rows
. . exported "SYSTEM"."REPCAT$_USER_PARM_VALUES"             0 KB       0 rows
. . exported "SYSTEM"."SQLPLUS_PRODUCT_PROFILE"              0 KB       0 rows
     Completed 773 TABLE objects in 26 seconds
Processing object type DATABASE_EXPORT/SCHEMA/TABLE/PRE_TABLE_ACTION
     Completed 6 PRE_TABLE_ACTION objects in 0 seconds
Processing object type DATABASE_EXPORT/SCHEMA/TABLE/GRANT/OWNER_GRANT/OBJECT_GRANT
     Completed 25 OBJECT_GRANT objects in 0 seconds
Processing object type DATABASE_EXPORT/SCHEMA/TABLE/COMMENT
     Completed 1045 COMMENT objects in 3 seconds
Processing object type DATABASE_EXPORT/SCHEMA/PACKAGE/PACKAGE_SPEC
     Completed 194 PACKAGE objects in 2 seconds
Processing object type DATABASE_EXPORT/SCHEMA/PACKAGE/GRANT/OWNER_GRANT/OBJECT_GRANT
     Completed 1 OBJECT_GRANT objects in 1 seconds
Processing object type DATABASE_EXPORT/SCHEMA/FUNCTION/FUNCTION
     Completed 12 FUNCTION objects in 0 seconds
Processing object type DATABASE_EXPORT/SCHEMA/PROCEDURE/PROCEDURE
     Completed 7 PROCEDURE objects in 0 seconds
Processing object type DATABASE_EXPORT/SCHEMA/PROCEDURE/GRANT/OWNER_GRANT/OBJECT_GRANT
     Completed 1 OBJECT_GRANT objects in 0 seconds
Processing object type DATABASE_EXPORT/SCHEMA/FUNCTION/ALTER_FUNCTION
     Completed 12 ALTER_FUNCTION objects in 0 seconds
Processing object type DATABASE_EXPORT/SCHEMA/PROCEDURE/ALTER_PROCEDURE
     Completed 7 ALTER_PROCEDURE objects in 9 seconds
Processing object type DATABASE_EXPORT/SCHEMA/TABLE/INDEX/INDEX
     Completed 979 INDEX objects in 5 seconds
Processing object type DATABASE_EXPORT/SCHEMA/TABLE/INDEX/FUNCTIONAL_INDEX/INDEX
     Completed 2 INDEX objects in 1 seconds
Processing object type DATABASE_EXPORT/SCHEMA/TABLE/CONSTRAINT/CONSTRAINT
     Completed 685 CONSTRAINT objects in 5 seconds
Processing object type DATABASE_EXPORT/SCHEMA/TABLE/INDEX/STATISTICS/INDEX_STATISTICS
     Completed 1033 INDEX_STATISTICS objects in 1 seconds
Processing object type DATABASE_EXPORT/SCHEMA/TABLE/INDEX/STATISTICS/FUNCTIONAL_INDEX/INDEX_STATISTICS
     Completed 2 INDEX_STATISTICS objects in 2 seconds
Processing object type DATABASE_EXPORT/SCHEMA/VIEW/VIEW
     Completed 477 VIEW objects in 2 seconds
Processing object type DATABASE_EXPORT/SCHEMA/VIEW/GRANT/OWNER_GRANT/OBJECT_GRANT
     Completed 252 OBJECT_GRANT objects in 0 seconds
Processing object type DATABASE_EXPORT/SCHEMA/VIEW/COMMENT
     Completed 68 COMMENT objects in 1 seconds
Processing object type DATABASE_EXPORT/SCHEMA/PACKAGE_BODIES/PACKAGE/PACKAGE_BODY
     Completed 194 PACKAGE_BODY objects in 24 seconds
Processing object type DATABASE_EXPORT/SCHEMA/TYPE/TYPE_BODY
     Completed 49 TYPE_BODY objects in 0 seconds
Processing object type DATABASE_EXPORT/SCHEMA/TABLE/CONSTRAINT/REF_CONSTRAINT
     Completed 286 REF_CONSTRAINT objects in 1 seconds
Processing object type DATABASE_EXPORT/SCHEMA/TABLE/STATISTICS/TABLE_STATISTICS
     Completed 762 TABLE_STATISTICS objects in 6 seconds
Processing object type DATABASE_EXPORT/SCHEMA/TABLE/POST_TABLE_ACTION
     Completed 4 POST_TABLE_ACTION objects in 1 seconds
Processing object type DATABASE_EXPORT/SCHEMA/TABLE/TRIGGER
     Completed 81 TRIGGER objects in 0 seconds
Processing object type DATABASE_EXPORT/SCHEMA/VIEW/TRIGGER
     Completed 17 TRIGGER objects in 0 seconds
Processing object type DATABASE_EXPORT/SCHEMA/EVENT/TRIGGER
     Completed 1 TRIGGER objects in 4 seconds
Processing object type DATABASE_EXPORT/SCHEMA/MATERIALIZED_VIEW
     Completed 1 MATERIALIZED_VIEW objects in 0 seconds
Processing object type DATABASE_EXPORT/SCHEMA/JOB
     Completed 1 JOB objects in 0 seconds
Processing object type DATABASE_EXPORT/SCHEMA/TABLE/POST_INSTANCE/PROCACT_INSTANCE
     Completed 18 PROCACT_INSTANCE objects in 1 seconds
Processing object type DATABASE_EXPORT/SCHEMA/TABLE/POST_INSTANCE/PROCDEPOBJ
     Completed 18 PROCDEPOBJ objects in 0 seconds
Processing object type DATABASE_EXPORT/SCHEMA/POST_SCHEMA/PROCOBJ
     Completed 6 PROCOBJ objects in 3 seconds
Processing object type DATABASE_EXPORT/SCHEMA/POST_SCHEMA/PROCACT_SCHEMA
     Completed 3 PROCACT_SCHEMA objects in 0 seconds
Processing object type DATABASE_EXPORT/AUDIT
     Completed 28 AUDIT objects in 0 seconds
Master table "LUNAR"."SYS_EXPORT_FULL_01" successfully loaded/unloaded
******************************************************************************
Dump file set for LUNAR.SYS_EXPORT_FULL_01 is:
  /home/oracle/test/datapump/lunar_expdp_f01.dmp
  /home/oracle/test/datapump/lunar_expdp_f02.dmp
Job "LUNAR"."SYS_EXPORT_FULL_01" completed with 1 error(s) at 06:04:09

[oracle@lunar datapump]$ 

看一下各个部分执行所花费的时间:

[oracle@lunar datapump]$ cat lunar_expdp_f.log |grep "ompleted"
     Completed 4 TABLESPACE objects in 1 seconds
     Completed 1 PROFILE objects in 0 seconds
     Completed 1 USER objects in 0 seconds
     Completed 5 USER objects in 0 seconds
     Completed 18 ROLE objects in 1 seconds
     Completed 4 PROC_SYSTEM_GRANT objects in 0 seconds
     Completed 41 SYSTEM_GRANT objects in 0 seconds
     Completed 54 ROLE_GRANT objects in 0 seconds
     Completed 5 DEFAULT_ROLE objects in 0 seconds
     Completed 1 TABLESPACE_QUOTA objects in 0 seconds
     Completed 1 RESOURCE_COST objects in 0 seconds
     Completed 1 TRUSTED_DB_LINK objects in 0 seconds
     Completed 30 SEQUENCE objects in 1 seconds
     Completed 5 DIRECTORY objects in 0 seconds
     Completed 12 OBJECT_GRANT objects in 0 seconds
     Completed 6 CONTEXT objects in 0 seconds
     Completed 327 SYNONYM objects in 1 seconds
     Completed 8 SYNONYM objects in 5 seconds
     Completed 673 TYPE objects in 2 seconds
     Completed 1 OBJECT_GRANT objects in 1 seconds
     Completed 4 PROCACT_SYSTEM objects in 1 seconds
     Completed 17 PROCOBJ objects in 1 seconds
     Completed 4 PROCACT_SYSTEM objects in 0 seconds
     Completed 7 PROCACT_SCHEMA objects in 5 seconds
     Completed 773 TABLE objects in 26 seconds
     Completed 6 PRE_TABLE_ACTION objects in 0 seconds
     Completed 25 OBJECT_GRANT objects in 0 seconds
     Completed 1045 COMMENT objects in 3 seconds
     Completed 194 PACKAGE objects in 2 seconds
     Completed 1 OBJECT_GRANT objects in 1 seconds
     Completed 12 FUNCTION objects in 0 seconds
     Completed 7 PROCEDURE objects in 0 seconds
     Completed 1 OBJECT_GRANT objects in 0 seconds
     Completed 12 ALTER_FUNCTION objects in 0 seconds
     Completed 7 ALTER_PROCEDURE objects in 9 seconds
     Completed 979 INDEX objects in 5 seconds
     Completed 2 INDEX objects in 1 seconds
     Completed 685 CONSTRAINT objects in 5 seconds
     Completed 1033 INDEX_STATISTICS objects in 1 seconds
     Completed 2 INDEX_STATISTICS objects in 2 seconds
     Completed 477 VIEW objects in 2 seconds
     Completed 252 OBJECT_GRANT objects in 0 seconds
     Completed 68 COMMENT objects in 1 seconds
     Completed 194 PACKAGE_BODY objects in 24 seconds
     Completed 49 TYPE_BODY objects in 0 seconds
     Completed 286 REF_CONSTRAINT objects in 1 seconds
     Completed 762 TABLE_STATISTICS objects in 6 seconds
     Completed 4 POST_TABLE_ACTION objects in 1 seconds
     Completed 81 TRIGGER objects in 0 seconds
     Completed 17 TRIGGER objects in 0 seconds
     Completed 1 TRIGGER objects in 4 seconds
     Completed 1 MATERIALIZED_VIEW objects in 0 seconds
     Completed 1 JOB objects in 0 seconds
     Completed 18 PROCACT_INSTANCE objects in 1 seconds
     Completed 18 PROCDEPOBJ objects in 0 seconds
     Completed 6 PROCOBJ objects in 3 seconds
     Completed 3 PROCACT_SCHEMA objects in 0 seconds
     Completed 28 AUDIT objects in 0 seconds
Job "LUNAR"."SYS_EXPORT_FULL_01" completed with 1 error(s) at 06:04:09
[oracle@lunar datapump]$ 
发表在 expdp/impdp | 标签为 , | 一条评论

对于已经存在的exp导出文件或者expdp的导出文件,如何获取导出文件头的信息呢?

对于已经存在的exp导出文件或者expdp的导出文件,如何获取导出文件头的信息呢?
我们来测试下,我的expdp导出文件是:

[oracle@lunar datapump]$ pwd
/u01/test/datapump
[oracle@lunar datapump]$ ll
total 452
-rw-r----- 1 oracle asmadmin 458752 Aug 30 14:10 sp2014.dmp
[oracle@lunar datapump]$ 

方法1:利用dbms_datapump.get_dumpfile_info我们可以得到dump文件头的信息,具体脚本参考

抽取exp/expdp导出文件头的信息

[oracle@lunar test]$ sqlplus / as sysdba

SQL*Plus: Release 12.1.0.1.0 Production on Fri Aug 30 18:55:43 2013

Copyright (c) 1982, 2013, Oracle.  All rights reserved.


Connected to:
Oracle Database 12c Enterprise Edition Release 12.1.0.1.0 - 64bit Production
With the Partitioning, Automatic Storage Management, OLAP, Advanced Analytics
and Real Application Testing options

SYS@lunarbb>exec show_dumpfile_info(p_dir=> 'lunar_dir', p_file=> 'sp2014.dmp')  
----------------------------------------------------------------------------
Purpose..: Obtain details about export dumpfile.        Version: 18-DEC-2013
Required.: RDBMS version: 10.2.0.1.0 or higher
.          Export dumpfile version: 7.3.4.0.0 or higher
.          Export Data Pump dumpfile version: 10.1.0.1.0 or higher
Usage....: execute show_dumfile_info('DIRECTORY', 'DUMPFILE');
Example..: exec show_dumfile_info('MY_DIR', 'expdp_s.dmp')
----------------------------------------------------------------------------
Filename.: sp2014.dmp
Directory: lunar_dir
Disk Path: /u01/test/datapump
Filetype.: 1 (Export Data Pump dumpfile)
----------------------------------------------------------------------------
...Database Job Version..........: 12.01.00.00.00
...Internal Dump File Version....: 4.1 (Oracle12c Release 1: 12.1.0.x)
...Creation Date.................: Fri Aug 30 14:10:32 2013
...File Number (in dump file set): 1
...Master Present in dump file...: 1 (Yes)
...Master in how many dump files.: 1
...Master Piece Number in file...: 1
...Operating System of source db.: x86_64/Linux 2.4.xx
...Instance Name of source db....: lunarbb
...Characterset ID of source db..: 873 (AL32UTF8)
...Language Name of characterset.: AL32UTF8
...Job Name......................: "LUNAR"."SYS_EXPORT_TABLE_01"
...GUID (unique job identifier)..: E5250CB5A94A67ECE0430100007F08B5
...Block size dump file (bytes)..: 4096
...Metadata Compressed...........: 1 (Yes)
...Data Compressed...............: 0 (No)
...Compression Algorithm.........: 3 (Basic)
...Metadata Encrypted............: 0 (No)
...Table Data Encrypted..........: 0 (No)
...Column Data Encrypted.........: 0 (No)
...Encryption Mode...............: 2 (None)
...Internal Flag Values..........: 514
...Max Items Code (Info Items)...: 23
----------------------------------------------------------------------------

PL/SQL procedure successfully completed.

Elapsed: 00:00:00.27
SYS@lunarbb>

方法2: 使用string来看:

[oracle@lunar datapump]$ cat sp2014.dmp | head | strings |more
"LUNAR"."SYS_EXPORT_TABLE_01"  ----job名称
x86_64/Linux 2.4.xx   -------操作系统版本
lunarbb   ----------导出文件的数据库名字
AL32UTF8     -------导出文件的字符集
12.01.00.00.00     -----导出文件的版本信息
001:001:000001:000001
。。。

方法3:
impdp lunar/lunar DIRECTORY=lunar_dir DUMPFILE=lunartest.dmp NOLOGFILE=y SQLFILE=lunartest_impdp.sql TABLES=lunar_par_test TRACE=100300

这里TRACE=100300是生成data pump进程trace信息。其他trace信息还有很多,后面陆续会介绍其他的data pump的相关trace。
我们知道data pump进程启动的时候,会有两类进程,即:Datapump Master (DM) 和 Worker (DW) processes
他们生成的trace文件产生在BACKGROUND_DUMP_DEST目录里面,命名格式如下:
— Master Process trace file: _dm_.trc
— Worker Process trace file: _dw_.trc

[oracle@lunar trace]$ ls -lrt *dw*
-rw-r----- 1 oracle oinstall  352 Mar  4 04:58 travel_dw00_3097.trm
-rw-r----- 1 oracle oinstall 9091 Mar  4 04:58 travel_dw00_3097.trc
[oracle@lunar trace]$ ls -lrt *dm00*
-rw-r----- 1 oracle oinstall  421 Mar  4 04:58 travel_dm00_3095.trm
-rw-r----- 1 oracle oinstall 7057 Mar  4 04:58 travel_dm00_3095.trc
[oracle@lunar trace]$ 

我们具体看一下3个文件的内容:
1,SQLFILE=lunartest_impdp.sql
2,travel_dw00_3097.trc
3,travel_dm00_3095.trc

首先,看下lunartest_impdp.sql,这里面SQLFILE类似于imp工具的INDEXFILE参数,即生成dump文件的DDL信息:

[oracle@lunar datapump]$ impdp lunar/lunar DIRECTORY=lunar_dir DUMPFILE=lunartest.dmp NOLOGFILE=y SQLFILE=lunartest_impdp.sql TABLES=lunar_par_test TRACE=100300

Import: Release 11.2.0.3.0 - Production on Tue Mar 4 04:57:58 2014

Copyright (c) 1982, 2011, Oracle and/or its affiliates.  All rights reserved.

Connected to: Oracle Database 11g Enterprise Edition Release 11.2.0.3.0 - 64bit Production
With the Partitioning and Real Application Testing options
Master table "LUNAR"."SYS_SQL_FILE_TABLE_01" successfully loaded/unloaded
Starting "LUNAR"."SYS_SQL_FILE_TABLE_01":  lunar/******** DIRECTORY=lunar_dir DUMPFILE=lunartest.dmp NOLOGFILE=y SQLFILE=lunartest_impdp.sql TABLES=lunar_par_test TRACE=100300 
Processing object type TABLE_EXPORT/TABLE/TABLE
Processing object type TABLE_EXPORT/TABLE/INDEX/INDEX
Processing object type TABLE_EXPORT/TABLE/CONSTRAINT/CONSTRAINT
Job "LUNAR"."SYS_SQL_FILE_TABLE_01" successfully completed at 04:58:00

[oracle@lunar datapump]$ 

lunartest_impdp.sql中包含了dump文件中的DDL信息,但是相比以前的exp的indexfile参数生成的DDL文本信息的可读性,好了不是一星半点,O(∩_∩)O哈哈~:

[oracle@lunar datapump]$ cat lunartest_impdp.sql
-- CONNECT LUNAR
ALTER SESSION SET EVENTS '10150 TRACE NAME CONTEXT FOREVER, LEVEL 1';
ALTER SESSION SET EVENTS '10904 TRACE NAME CONTEXT FOREVER, LEVEL 1';
ALTER SESSION SET EVENTS '25475 TRACE NAME CONTEXT FOREVER, LEVEL 1';
ALTER SESSION SET EVENTS '10407 TRACE NAME CONTEXT FOREVER, LEVEL 1';
ALTER SESSION SET EVENTS '10851 TRACE NAME CONTEXT FOREVER, LEVEL 1';
ALTER SESSION SET EVENTS '22830 TRACE NAME CONTEXT FOREVER, LEVEL 192 ';
-- new object type path: TABLE_EXPORT/TABLE/TABLE
CREATE TABLE "LUNAR"."LUNAR_PAR_TEST" 
   (    "NAME" VARCHAR2(4000 BYTE) NOT NULL ENABLE, 
        "AAAAA" NUMBER NOT NULL ENABLE, 
        "BBBBB" VARCHAR2(180 BYTE) NOT NULL ENABLE, 
        "CCCCC" VARCHAR2(4000 BYTE)
   ) PCTFREE 10 PCTUSED 40 INITRANS 1 MAXTRANS 255 
  STORAGE(
  BUFFER_POOL DEFAULT FLASH_CACHE DEFAULT CELL_FLASH_CACHE DEFAULT)
  TABLESPACE "USERS" 
  PARTITION BY RANGE ("AAAAA") INTERVAL (1) TRANSITION ("PART_INIT") 
  SUBPARTITION BY RANGE ("BBBBB") 
  SUBPARTITION TEMPLATE ( 
    SUBPARTITION "SP_2008" VALUES LESS THAN ( '2009' ), 
    SUBPARTITION "SP_2009" VALUES LESS THAN ( '2010' ), 
    SUBPARTITION "SP_2010" VALUES LESS THAN ( '2011' ), 
    SUBPARTITION "SP_2011" VALUES LESS THAN ( '2012' ), 
    SUBPARTITION "SP_2012" VALUES LESS THAN ( '2013' ), 
    SUBPARTITION "SP_2013" VALUES LESS THAN ( '2014' ), 
    SUBPARTITION "SP_2014" VALUES LESS THAN ( '2015' ), 
........
省略部分内容
........
 NOCOMPRESS , 
  SUBPARTITION "SYS_SUBP77"  VALUES LESS THAN ('2025') 
  TABLESPACE "USERS" 
 NOCOMPRESS , 
  SUBPARTITION "SYS_SUBP78"  VALUES LESS THAN ('2026') 
  TABLESPACE "USERS" 
 NOCOMPRESS , 
  SUBPARTITION "SYS_SUBP79"  VALUES LESS THAN (MAXVALUE) 
  TABLESPACE "USERS" 
 NOCOMPRESS ) )  ENABLE ROW MOVEMENT ;
-- new object type path: TABLE_EXPORT/TABLE/INDEX/INDEX
CREATE UNIQUE INDEX "LUNAR"."PK_TEST_COM_PARTITION_1" ON "LUNAR"."LUNAR_PAR_TEST" ("NAME") 
  PCTFREE 10 INITRANS 2 MAXTRANS 167 
  STORAGE(INITIAL 65536 NEXT 1048576 MINEXTENTS 1 MAXEXTENTS 2147483645
  PCTINCREASE 0 FREELISTS 1 FREELIST GROUPS 1
  BUFFER_POOL DEFAULT FLASH_CACHE DEFAULT CELL_FLASH_CACHE DEFAULT)
  TABLESPACE "USERS" PARALLEL 1 ;

  ALTER INDEX "LUNAR"."PK_TEST_COM_PARTITION_1" NOPARALLEL;
-- new object type path: TABLE_EXPORT/TABLE/CONSTRAINT/CONSTRAINT
ALTER TABLE "LUNAR"."LUNAR_PAR_TEST" ADD CONSTRAINT "PK_TEST_COM_PARTITION_1" PRIMARY KEY ("NAME")
  USING INDEX PCTFREE 10 INITRANS 2 MAXTRANS 167 
  STORAGE(INITIAL 65536 NEXT 1048576 MINEXTENTS 1 MAXEXTENTS 2147483645
  PCTINCREASE 0 FREELISTS 1 FREELIST GROUPS 1
  BUFFER_POOL DEFAULT FLASH_CACHE DEFAULT CELL_FLASH_CACHE DEFAULT)
  TABLESPACE "USERS"  ENABLE;
[oracle@lunar datapump]$     

2,travel_dw00_3097.trc
从下面的trace可以看到,该文件主要是Data Pump Worker进程的详细操作过程:

KUPP:04:57:59.427: Current trace/debug flags: 00100300 = 1049344
*** MODULE NAME:(Data Pump Worker) 2014-03-04 04:57:59.436
*** ACTION NAME:(SYS_SQL_FILE_TABLE_01) 2014-03-04 04:57:59.436
 
KUPC:04:57:59.436: Setting remote flag for this process to FALSE
prvtaqis - Enter 
prvtaqis subtab_name upd 
prvtaqis sys table upd 
KUPF:04:57:59.489: In INIT_CB
kwqberlst !retval block 
kwqberlst rqan->lagno_kwqiia  4 
kwqberlst rqan->lascn_kwqiia > 0 block 
kwqberlst rqan->lascn_kwqiia  4 
kwqberlst ascn 511695 lascn 22 
kwqberlst !retval block 
kwqberlst rqan->lagno_kwqiia  4 
KUPF:04:57:59.499: Retrieved FILE_LIST, Count = 1
KUPF:04:57:59.499: dump file block size:   4096
KUPF:04:57:59.499: metadata buffer size:   131072
KUPF:04:57:59.499: table data buffer size: 262144
KUPF:04:57:59.499: min phy block size:     512
KUPF:04:57:59.499: max phy block size:     32768
KUPF:04:57:59.499: metadata compression:   1
KUPF:04:57:59.499: tabldata compression:   0
KUPF:04:57:59.499: metadata encryption:    0
KUPF:04:57:59.499: tabldata encryption:    0
KUPF:04:57:59.499: column encryption:      0
KUPF:04:57:59.499: job version:            11.02.00.03.00
KUPF:04:57:59.499: (kupfxInit) File Manager has been initialized...
.......
省略部分
.........
*** 2014-03-04 04:58:00.251
kwqberlst !retval block 
kwqberlst rqan->lagno_kwqiia  4 
kwqberlst rqan->lascn_kwqiia > 0 block 
kwqberlst rqan->lascn_kwqiia  4 
kwqberlst ascn 511695 lascn 22 
kwqberlst !retval block 
kwqberlst rqan->lagno_kwqiia  4 
KUPF:04:58:00.255: MD: filePiece(1).fid: 1
KUPF:04:58:00.255: MD: filePiece(1).bno: 2
KUPF:04:58:00.255: MD: filePiece(1).len: 1075
KUPF:04:58:00.255: MD: filePiece(1).alc: .1075
KUPF:04:58:00.255: MD: filePiece(1).off: 0
KUPF:04:58:00.255: MD: filePiece(1).nam: /home/oracle/test/datapump/lunartest.dmp
KUPF:04:58:00.255: In kupfxReadLob...
KUPF:04:58:00.255: In kupfiReadLob...
KUPF:04:58:00.255: In kupfiSetupMDFilePiece...
KUPF:04:58:00.255: In kupfuAllocFilePiece...
KUPF:04:58:00.255: In kupfioOpenForRead...
KUPF:04:58:00.255: In kupfioOpenForRead: file /home/oracle/test/datapump/lunartest.dmp has 63 block(s)
KUPF:04:58:00.255: In kupfTransformData...
.........
省略部分
.........
KUPF:04:58:00.314: In kupfuDecompress...
KUPF:04:58:00.314: ...processing input piece number: 1
KUPF:04:58:00.314: ...available in: 1421
KUPF:04:58:00.314: ...available out: 131072
KUPF:04:58:00.316: ...decompressor encountered EOS.
KUPF:04:58:00.316: ...writing 8400 bytes to CLOB
KUPF:04:58:00.316: ...wrote 4200 chars to CLOB at offset 1
KUPF:04:58:00.316: In kupfuiTrxCleanup...4
KUPF:04:58:00.316: MD: XML read complete...
KUPF:04:58:00.316: MD: Input: 1421 bytes Output: 4200 bytes
KUPF:04:58:00.379: In kupfxCloseCtx...
KUPF:04:58:00.379: In kupfiCloseCtx...
KUPF:04:58:00.379: In kupfioCloseFile...
KUPF:04:58:00.379: File number 1 has been closed
KUPF:04:58:00.379: Leaving kupfiCloseCtx...
kwqberlst !retval block 
kwqberlst rqan->lagno_kwqiia  4 
kwqberlst rqan->lascn_kwqiia > 0 block 
kwqberlst rqan->lascn_kwqiia  4 
kwqberlst ascn 511695 lascn 22 
kwqberlst !retval block 
kwqberlst rqan->lagno_kwqiia  4 
KUPF:04:58:00.385: In kupfxTerm...
[oracle@lunar trace]$ 

3,travel_dm00_3095.trc
从下面的trace可以看到,该文件主要是Data Pump Master进程的详细操作过程:

KUPP:04:57:59.157: Current trace/debug flags: 00100300 = 1049344
*** MODULE NAME:(Data Pump Master) 2014-03-04 04:57:59.163
*** ACTION NAME:(SYS_SQL_FILE_TABLE_01) 2014-03-04 04:57:59.163
 
KUPC:04:57:59.163: Setting remote flag for this process to FALSE
prvtaqis - Enter 
prvtaqis subtab_name upd 
prvtaqis sys table upd 
KUPP:04:57:59.201: Initialization complete for master process DM00
KUPF:04:57:59.302: In INIT_CB
KUPF:04:57:59.303: dump file block size:   4096
KUPF:04:57:59.303: metadata buffer size:   131072
KUPF:04:57:59.303: table data buffer size: 262144
KUPF:04:57:59.303: min phy block size:     512
KUPF:04:57:59.303: max phy block size:     32768
KUPF:04:57:59.303: metadata compression:   0
KUPF:04:57:59.303: tabldata compression:   0
KUPF:04:57:59.303: metadata encryption:    0
KUPF:04:57:59.303: tabldata encryption:    0
KUPF:04:57:59.303: column encryption:      0
KUPF:04:57:59.303: job version:            11.02.00.03.00
KUPF:04:57:59.303: (kupfxInit) File Manager has been initialized...
.........
省略部分
.........
kwqberlst ascn 511682 lascn 22 
KUPF:04:57:59.378: is_dba    = TRUE
KUPF:04:57:59.378: read_only = TRUE
KUPF:04:57:59.378: fileName  = lunartest.dmp          ------------导出文件名称
KUPF:04:57:59.379: directory = LUNAR_DIR              ------------directory的名称
KUPF:04:57:59.379: In kupfxParseFileName...
KUPF:04:57:59.379: directory = LUNAR_DIR
KUPF:04:57:59.379: In kupfxGetDefFileName...
KUPF:04:57:59.380: In kupfxExmDmpFile...
KUPF:04:57:59.380: In kupfuExmDmpFile...
KUPF:04:57:59.380: In kupfioReadHeader...
KUPF:04:57:59.380: newImpFile: EXAMINE_DUMP_FILE
KUPF:04:57:59.380: ......DB Version = 11.02.00.03.00       ------------这里就是数据库版本信息
KUPF:04:57:59.380: File Version Str = 3.1
KUPF:04:57:59.380: File Version Num = 769
KUPF:04:57:59.380: Version CapBits1 = 98559
KUPF:04:57:59.380: ......Has Master = 1
KUPF:04:57:59.380: ........Job Guid = F3C86AFC53A40BEFE0434238A8C03446
KUPF:04:57:59.380: Master Table Pos = 8
KUPF:04:57:59.380: Master Table Len = 226992
KUPF:04:57:59.380: Master Table Fsi = 001:001:000001:000001
KUPF:04:57:59.380: .....File Number = 1
KUPF:04:57:59.380: ......Charset ID = 873            ------------这里就是字符集ID
KUPF:04:57:59.381: ...Creation date = Tue Mar 04 04:55:39 2014
KUPF:04:57:59.381: ...........Flags = 2
KUPF:04:57:59.381: ......Media Type = 0
KUPF:04:57:59.381: ........Job Name = "LUNAR"."SYS_EXPORT_TABLE_01"   ------------这里就是job信息
KUPF:04:57:59.381: ........Platform = x86_64/Linux 2.4.xx
KUPF:04:57:59.381: ........Instance = travel
KUPF:04:57:59.381: ........Language = AL32UTF8   ------------这里就是字符集信息
KUPF:04:57:59.381: .......Blocksize = 4096
KUPF:04:57:59.386: Added FILE row; PO: -22; FID: 1; NAM: lunartest.dmp
KUPF:04:57:59.386: newImpFile: file; /home/oracle/test/datapump/lunartest.dmp, FID; 1
kwqberlst !retval block 
kwqberlst rqan->lagno_kwqiia  4 
kwqberlst rqan->lascn_kwqiia > 0 block 
kwqberlst rqan->lascn_kwqiia  4 
kwqberlst ascn 511682 lascn 22 
KUPF:04:57:59.391: In kupfxGetDefFileName...
KUPF:04:57:59.391: is_dba    = TRUE
KUPF:04:57:59.391: read_only = FALSE
KUPF:04:57:59.391: fileName  = lunartest_impdp.sql
KUPF:04:57:59.391: directory = LUNAR_DIR
KUPF:04:57:59.391: In kupfxParseFileName...
KUPF:04:57:59.392: directory = LUNAR_DIR
.........
省略部分
.........
发表在 expdp/impdp, FAQ, Scripts | 标签为 , | 留下评论

抽取exp/expdp导出文件头的信息

抽取exp和expdp的dump文件头信息,同时支持oracle 7.3.4以后的exp导出文件和oracle 10.1以后的expdp导出文件

CREATE OR REPLACE PROCEDURE show_dumpfile_info(
  p_dir  VARCHAR2 DEFAULT 'DATA_PUMP_DIR',
  p_file VARCHAR2 DEFAULT 'EXPDAT.DMP')
AS
-- p_dir        = directory object where dump file can be found
-- p_file       = simple filename of export dump file (case-sensitive)
  v_separator   VARCHAR2(80) := '--------------------------------------' ||
                                '--------------------------------------';
  v_path        all_directories.directory_path%type := '?';
  v_filetype    NUMBER;                 -- 0=unknown 1=expdp 2=exp 3=ext
  v_fileversion VARCHAR2(15);           -- 0.1=10gR1 1.1=10gR2 (etc.)
  v_info_table  sys.ku$_dumpfile_info;  -- PL/SQL table with file info
  type valtype  IS VARRAY(23) OF VARCHAR2(2048);
  var_values    valtype := valtype();
  no_file_found EXCEPTION;
  PRAGMA        exception_init(no_file_found, -39211);

BEGIN

-- Dump file details:
-- ==================
-- For Oracle10g Release 2 and higher:
--    dbms_datapump.KU$_DFHDR_FILE_VERSION        CONSTANT NUMBER := 1;
--    dbms_datapump.KU$_DFHDR_MASTER_PRESENT      CONSTANT NUMBER := 2;
--    dbms_datapump.KU$_DFHDR_GUID                CONSTANT NUMBER := 3;
--    dbms_datapump.KU$_DFHDR_FILE_NUMBER         CONSTANT NUMBER := 4;
--    dbms_datapump.KU$_DFHDR_CHARSET_ID          CONSTANT NUMBER := 5;
--    dbms_datapump.KU$_DFHDR_CREATION_DATE       CONSTANT NUMBER := 6;
--    dbms_datapump.KU$_DFHDR_FLAGS               CONSTANT NUMBER := 7;
--    dbms_datapump.KU$_DFHDR_JOB_NAME            CONSTANT NUMBER := 8;
--    dbms_datapump.KU$_DFHDR_PLATFORM            CONSTANT NUMBER := 9;
--    dbms_datapump.KU$_DFHDR_INSTANCE            CONSTANT NUMBER := 10;
--    dbms_datapump.KU$_DFHDR_LANGUAGE            CONSTANT NUMBER := 11;
--    dbms_datapump.KU$_DFHDR_BLOCKSIZE           CONSTANT NUMBER := 12;
--    dbms_datapump.KU$_DFHDR_DIRPATH             CONSTANT NUMBER := 13;
--    dbms_datapump.KU$_DFHDR_METADATA_COMPRESSED CONSTANT NUMBER := 14;
--    dbms_datapump.KU$_DFHDR_DB_VERSION          CONSTANT NUMBER := 15;
-- For Oracle11gR1:
--    dbms_datapump.KU$_DFHDR_MASTER_PIECE_COUNT  CONSTANT NUMBER := 16;
--    dbms_datapump.KU$_DFHDR_MASTER_PIECE_NUMBER CONSTANT NUMBER := 17;
--    dbms_datapump.KU$_DFHDR_DATA_COMPRESSED     CONSTANT NUMBER := 18;
--    dbms_datapump.KU$_DFHDR_METADATA_ENCRYPTED  CONSTANT NUMBER := 19;
--    dbms_datapump.KU$_DFHDR_DATA_ENCRYPTED      CONSTANT NUMBER := 20;
-- For Oracle11gR2:
--    dbms_datapump.KU$_DFHDR_COLUMNS_ENCRYPTED   CONSTANT NUMBER := 21;
--    dbms_datapump.KU$_DFHDR_ENCRIPTION_MODE     CONSTANT NUMBER := 22;
-- For Oracle12cR1:
--    dbms_datapump.KU$_DFHDR_COMPRESSION_ALG     CONSTANT NUMBER := 23;

-- For Oracle10gR2: KU$_DFHDR_MAX_ITEM_CODE       CONSTANT NUMBER := 15;
-- For Oracle11gR1: KU$_DFHDR_MAX_ITEM_CODE       CONSTANT NUMBER := 20;
-- For Oracle11gR2: KU$_DFHDR_MAX_ITEM_CODE       CONSTANT NUMBER := 22;
-- For Oracle12cR1: KU$_DFHDR_MAX_ITEM_CODE       CONSTANT NUMBER := 23;

-- Show header output info:
-- ========================

  dbms_output.put_line(v_separator);
  dbms_output.put_line('Purpose..: Obtain details about export ' ||
        'dumpfile.        Version: 18-DEC-2013');
  dbms_output.put_line('Required.: RDBMS version: 10.2.0.1.0 or higher');
  dbms_output.put_line('.          ' ||
        'Export dumpfile version: 7.3.4.0.0 or higher');
  dbms_output.put_line('.          ' ||
        'Export Data Pump dumpfile version: 10.1.0.1.0 or higher');
  dbms_output.put_line('Usage....: ' ||
        'execute show_dumfile_info(''DIRECTORY'', ''DUMPFILE'');');
  dbms_output.put_line('Example..: ' ||
        'exec show_dumfile_info(''MY_DIR'', ''expdp_s.dmp'')');
  dbms_output.put_line(v_separator);
  dbms_output.put_line('Filename.: ' || p_file);
  dbms_output.put_line('Directory: ' || p_dir);

-- Retrieve Export dumpfile details:
-- =================================

  SELECT directory_path INTO v_path FROM all_directories
   WHERE directory_name = p_dir
      OR directory_name = UPPER(p_dir);

  dbms_datapump.get_dumpfile_info(
           filename   => p_file,       directory => UPPER(p_dir),
           info_table => v_info_table, filetype  => v_filetype);

  var_values.EXTEND(23);
  FOR i in 1 .. 23 LOOP
    BEGIN
      SELECT value INTO var_values(i) FROM TABLE(v_info_table)
       WHERE item_code = i;
    EXCEPTION WHEN OTHERS THEN var_values(i) := '';
    END;
  END LOOP;

  dbms_output.put_line('Disk Path: ' || v_path);

  IF v_filetype >= 1 THEN
    -- Get characterset name:
    BEGIN
      SELECT var_values(5) || ' (' || nls_charset_name(var_values(5)) ||
        ')' INTO var_values(5) FROM dual;
    EXCEPTION WHEN OTHERS THEN null;
    END;
    IF v_filetype = 2 THEN
      dbms_output.put_line(
         'Filetype.: ' || v_filetype || ' (Original Export dumpfile)');
      dbms_output.put_line(v_separator);
      SELECT DECODE(var_values(13), '0', '0 (Conventional Path)',
        '1', '1 (Direct Path)', var_values(13))
        INTO var_values(13) FROM dual;
      dbms_output.put_line('...Characterset ID of source db..: ' || var_values(5));
      dbms_output.put_line('...Direct Path Export Mode.......: ' || var_values(13));
      dbms_output.put_line('...Export Version................: ' || var_values(15));
    ELSIF v_filetype = 1 OR v_filetype = 3 THEN
      SELECT SUBSTR(var_values(1), 1, 15) INTO v_fileversion FROM dual;
      SELECT DECODE(var_values(1),
                    '0.1', '0.1 (Oracle10g Release 1: 10.1.0.x)',
                    '1.1', '1.1 (Oracle10g Release 2: 10.2.0.x)',
                    '2.1', '2.1 (Oracle11g Release 1: 11.1.0.x)',
                    '3.1', '3.1 (Oracle11g Release 2: 11.2.0.x)',
                    '4.1', '4.1 (Oracle12c Release 1: 12.1.0.x)',
        var_values(1)) INTO var_values(1) FROM dual;
      SELECT DECODE(var_values(2), '0', '0 (No)', '1', '1 (Yes)',
        var_values(2)) INTO var_values(2) FROM dual;
      SELECT DECODE(var_values(14), '0', '0 (No)', '1', '1 (Yes)',
        var_values(14)) INTO var_values(14) FROM dual;
      SELECT DECODE(var_values(18), '0', '0 (No)', '1', '1 (Yes)',
        var_values(18)) INTO var_values(18) FROM dual;
      SELECT DECODE(var_values(19), '0', '0 (No)', '1', '1 (Yes)',
        var_values(19)) INTO var_values(19) FROM dual;
      SELECT DECODE(var_values(20), '0', '0 (No)', '1', '1 (Yes)',
        var_values(20)) INTO var_values(20) FROM dual;
      SELECT DECODE(var_values(21), '0', '0 (No)', '1', '1 (Yes)',
        var_values(21)) INTO var_values(21) FROM dual;
      SELECT DECODE(var_values(22),
                    '1', '1 (Unknown)',
                    '2', '2 (None)',
                    '3', '3 (Password)',
                    '4', '4 (Password and Wallet)',
                    '5', '5 (Wallet)',
        var_values(22)) INTO var_values(22) FROM dual;
      SELECT DECODE(var_values(23),
                    '2', '2 (None)',
                    '3', '3 (Basic)',
                    '4', '4 (Low)',
                    '5', '5 (Medium)',
                    '6', '6 (High)',
        var_values(23)) INTO var_values(23) FROM dual;
      IF v_filetype = 1 THEN
        dbms_output.put_line(
           'Filetype.: ' || v_filetype || ' (Export Data Pump dumpfile)');
        dbms_output.put_line(v_separator);
        dbms_output.put_line('...Database Job Version..........: ' || var_values(15));
        dbms_output.put_line('...Internal Dump File Version....: ' || var_values(1));
        dbms_output.put_line('...Creation Date.................: ' || var_values(6));
        dbms_output.put_line('...File Number (in dump file set): ' || var_values(4));
        dbms_output.put_line('...Master Present in dump file...: ' || var_values(2));
        IF dbms_datapump.KU$_DFHDR_MAX_ITEM_CODE > 15 AND v_fileversion >= '2.1' THEN
          dbms_output.put_line('...Master in how many dump files.: ' || var_values(16));
          dbms_output.put_line('...Master Piece Number in file...: ' || var_values(17));
        END IF;
        dbms_output.put_line('...Operating System of source db.: ' || var_values(9));
        IF v_fileversion >= '2.1' THEN
          dbms_output.put_line('...Instance Name of source db....: ' || var_values(10));
        END IF;
        dbms_output.put_line('...Characterset ID of source db..: ' || var_values(5));
        dbms_output.put_line('...Language Name of characterset.: ' || var_values(11));
        dbms_output.put_line('...Job Name......................: ' || var_values(8));
        dbms_output.put_line('...GUID (unique job identifier)..: ' || var_values(3));
        dbms_output.put_line('...Block size dump file (bytes)..: ' || var_values(12));
        dbms_output.put_line('...Metadata Compressed...........: ' || var_values(14));
        IF dbms_datapump.KU$_DFHDR_MAX_ITEM_CODE > 15 THEN
          dbms_output.put_line('...Data Compressed...............: ' || var_values(18));
          IF dbms_datapump.KU$_DFHDR_MAX_ITEM_CODE > 22 AND v_fileversion >= '4.1' THEN
            dbms_output.put_line('...Compression Algorithm.........: ' || var_values(23));
          END IF;
          dbms_output.put_line('...Metadata Encrypted............: ' || var_values(19));
          dbms_output.put_line('...Table Data Encrypted..........: ' || var_values(20));
          dbms_output.put_line('...Column Data Encrypted.........: ' || var_values(21));
          dbms_output.put_line('...Encryption Mode...............: ' || var_values(22));
        END IF;
      ELSE
        dbms_output.put_line(
           'Filetype.: ' || v_filetype || ' (External Table dumpfile)');
        dbms_output.put_line(v_separator);
        dbms_output.put_line('...Database Job Version..........: ' || var_values(15));
        dbms_output.put_line('...Internal Dump File Version....: ' || var_values(1));
        dbms_output.put_line('...Creation Date.................: ' || var_values(6));
        dbms_output.put_line('...File Number (in dump file set): ' || var_values(4));
        dbms_output.put_line('...Operating System of source db.: ' || var_values(9));
        IF v_fileversion >= '2.1' THEN
          dbms_output.put_line('...Instance Name of source db....: ' || var_values(10));
        END IF;
        dbms_output.put_line('...Characterset ID of source db..: ' || var_values(5));
        dbms_output.put_line('...Language Name of characterset.: ' || var_values(11));
        dbms_output.put_line('...GUID (unique job identifier)..: ' || var_values(3));
        dbms_output.put_line('...Block size dump file (bytes)..: ' || var_values(12));
        IF dbms_datapump.KU$_DFHDR_MAX_ITEM_CODE > 15 THEN
          dbms_output.put_line('...Data Compressed...............: ' || var_values(18));
          IF dbms_datapump.KU$_DFHDR_MAX_ITEM_CODE > 22 AND v_fileversion >= '4.1' THEN
            dbms_output.put_line('...Compression Algorithm.........: ' || var_values(23));
          END IF;
          dbms_output.put_line('...Table Data Encrypted..........: ' || var_values(20));
          dbms_output.put_line('...Encryption Mode...............: ' || var_values(22));
        END IF;
      END IF;
      dbms_output.put_line('...Internal Flag Values..........: ' || var_values(7));
      dbms_output.put_line('...Max Items Code (Info Items)...: ' ||
                  dbms_datapump.KU$_DFHDR_MAX_ITEM_CODE);
    END IF;
  ELSE
    dbms_output.put_line('Filetype.: ' || v_filetype);
    dbms_output.put_line(v_separator);
    dbms_output.put_line('ERROR....: Not an export dumpfile.');
  END IF;
  dbms_output.put_line(v_separator);

EXCEPTION
  WHEN no_data_found THEN
    dbms_output.put_line('Disk Path: ?');
    dbms_output.put_line('Filetype.: ?');
    dbms_output.put_line(v_separator);
    dbms_output.put_line('ERROR....: Directory Object does not exist.');
    dbms_output.put_line(v_separator);
  WHEN no_file_found THEN
    dbms_output.put_line('Disk Path: ' || v_path);
    dbms_output.put_line('Filetype.: ?');
    dbms_output.put_line(v_separator);
    dbms_output.put_line('ERROR....: File does not exist.');
    dbms_output.put_line(v_separator);
END;
/
发表在 expdp/impdp, Scripts | 标签为 , , | 留下评论

快速创建1000用户,每用户1000表,1000索引,1000个trigger

有时候为了方便测试,我们需要制造一些复杂的数据,比如这里,我们快速的创建1000用户,每用户1000表,1000索引,1000个trigger

-- create tablespace
create tablespace lunartbs datafile '/u01/oradata/lunar/lunartbs01.dbf' size 30m autoextend on;

-- create directory
create directory dpu as '/test';

declare
stmt varchar2(1000);
begin
	for i in 1..&&1 loop
			-- create user
			stmt := 'create user lunar'||lpad (to_char (i), 4, '0')||' identified by lunar default tablespace lunar temporary tablespace temp';
			execute immediate stmt;
			
			-- grant user
			stmt := 'grant connect, resource,dba to lunar'||lpad (to_char (i), 4, '0');
			execute immediate stmt;
			
			-- for each user create 1000 tables
			for j in 1..1000 loop
					stmt := 'create table lunar'||lpad (to_char (i), 4, '0')||'.tab'||lpad(to_char (j), 3, '0')||' (id number, text varchar2(10))';
					execute immediate stmt;
			end loop;
			
			-- 1000 indexes
			for j in 1..1000 loop
					stmt := 'create index lunar'||lpad (to_char (i), 4, '0')||'.ind'||lpad(to_char (j), 3, '0')||' on lunar'||lpad (to_char (i), 4, '0')||'.tab'||lpad(to_char (j), 3, '0')||' (id)';
					execute immediate stmt;
			end loop;
			
			-- and 1000 triggers
			for j in 1..1000 loop
					stmt := 'create trigger lunar'||lpad (to_char (i), 4,'0')||'.trg'||lpad (to_char (j), 3, '0')||' before insert on lunar'||lpad(to_char (i), 4, '0')||'.tab'||lpad (to_char (j), 3, '0')||' for each row begin null; end;';
					execute immediate stmt;
			end loop;
			
	end loop;
end;
/

发表在 POC和性能调整, Scripts | 标签为 , | 一条评论