
站内搜索
Oracle证书


分类目录
- ASM (30)
- Database (86)
- backup&recovery (21)
- expdp/impdp (5)
- Installation and Deinstall (31)
- network (7)
- ORA-600 or ORA-7445 (6)
- Performence Tuning (13)
- troubleshoooting (2)
- Dataguard (7)
- EBS (3)
- Exadata (120)
- FAQ (19)
- POC和性能调整 (11)
- 体系架构 (19)
- 内部机制 (22)
- 安装和升级 (14)
- 性能指标 (8)
- Exadata V1 (1)
- Exadata V2 (1)
- Exadata X2-2 (2)
- Exadata X3-2 (1)
- Exadata X4-2 (1)
- FAQ (1)
- 故障诊断 (3)
- 日常运维 (15)
- 硬件配置 (43)
- Exadata V1 (6)
- Exadata V2 (6)
- Exadata X2-2 (6)
- Exadata X3-2 (8)
- Exadata X4-2 (8)
- FAQ (1)
- FAQ (16)
- Internal (21)
- Linux (20)
- MYSQL (8)
- OGG (1)
- ORA-600/7445 (2)
- ORA-XXXXX (5)
- Oracle 11.1 & Oracle11.2 (6)
- ORACLE 12C (21)
- Oracle 8 & Oracle 8i (1)
- RAC (47)
- SAP (2)
- Scripts (6)
- 未分类 (1)
- 虚拟化 (1)
2026 年七月 S M T W T F S « Nov 1 2 3 4 5 6 7 8 9 10 11 12 13 14 15 16 17 18 19 20 21 22 23 24 25 26 27 28 29 30 31 文章归档
-
近期文章
- 针对最近黑客攻击数据库的解决方案和预防建议
- CentOS7.2(RHEL 7.2)的CPU占用高(%system 占用高)
- Oracle 12.1 RAC 系列 – 配置第二个网络和相应的SCAN2
- Oracle 12.1 RAC 系列-安装新主机,识别老存储和恢复数据库
- Oracle 12.2的Sharding-1-基础概念
- 11.2 RAC 系列-安装新主机,识别老存储-3-配置老存储的数据库
- 11.2 RAC 系列-安装新主机,识别老存储-2-准备识别数据库
- 11.2 RAC 系列-安装新主机,识别老存储-1-识别ASM磁盘
- 2016年1月PSU列表
- 单实例数据库转换为RAC数据库–使用rconfig转换
近期评论
- tom 发表在《exadata巡检报告的模板》
- cyx 发表在《关于我》
- 李科胜 发表在《EBS克隆–db和app分开在两个服务器上》
- xiao 发表在《exadata巡检报告的模板》
- Chris Sun 发表在《使用Oracle 11.2的DBMS_RESOURCE_MANAGER.CALIBRATE_IO对Exadata X5(HC)进行测试》
Exadata读取数据和传统数据库环境中读取数据的方式有什么关键区别?
在Exadata上,数据库节点跟db节点是通过libcell11.a并缺省使用RDS协议来进行通信的,我们跟踪下看看:
这里我跟踪Exadata的DB节点的ora_dbw0_lunar1进程:
[root@dm01db01 ~]# ps -ef|grep lunar|grep dbw
oracle   11771     1  0  2013 ?        00:48:17 ora_dbw0_lunar1
oracle   11773     1  0  2013 ?        00:43:17 ora_dbw1_lunar1
oracle   11775     1  0  2013 ?        00:44:06 ora_dbw2_lunar1
oracle   11777     1  0  2013 ?        00:43:33 ora_dbw3_lunar1
[root@dm01db01 ~]#
[root@dm01db01 ~]# strace -c -p 11771
Process 11771 attached - interrupt to quit
^CProcess 11771 detached
% time     seconds  usecs/call     calls    errors syscall
------ ----------- ----------- --------- --------- ----------------
100.00    0.000031           0       821        13 recvmsg    ---------通过socket读取信息
  0.00    0.000000           0        18           poll
  0.00    0.000000           0       204           sendmsg    ---------通过socket发送信息
  0.00    0.000000           0       404       202 setsockopt
  0.00    0.000000           0        10           getrusage
  0.00    0.000000           0        31           times
  0.00    0.000000           0         5         5 semtimedop
------ ----------- ----------- --------- --------- ----------------
100.00    0.000031                  1493       220 total
[root@dm01db01 ~]#
这里我们看到主要的IO操作都是recvmsg和sendmsg等等,我们看一下,在Linux环境下的11.2.0.3的libcell11.a中含有哪些目标文件(即 .o 文件,object file)
[root@dm01db01 lib]# ar tv libcell11.a
rw-rw-r-- 94110/42424  37504 Sep 17 22:27 2011 ossdisk.o
rw-rw-r-- 94110/42424   7928 Sep 17 22:27 2011 osshdl.o
rw-rw-r-- 94110/42424  73240 Sep 17 22:27 2011 osslib.o
rw-rw-r-- 94110/42424   4512 Sep 17 22:27 2011 ossmem.o
rw-rw-r-- 94110/42424 210352 Sep 17 22:27 2011 ossnet.o
rw-rw-r-- 94110/42424  15392 Sep 17 22:27 2011 ossutl.o
rw-rw-r-- 94110/42424  27480 Sep 17 22:27 2011 ossdebug.o
rw-rw-r-- 94110/42424  27152 Sep 17 22:27 2011 ossdscv.o
rw-rw-r-- 94110/42424   5424 Sep 17 22:27 2011 osssec.o
rw-rw-r-- 94110/42424   6936 Sep 17 22:27 2011 osssec_lib.o
rw-rw-r-- 94110/42424  21264 Sep 17 22:27 2011 osscdscv.o
rw-rw-r-- 94110/42424  44152 Sep 17 22:27 2011 osserr.o
rw-rw-r-- 94110/42424   9216 Sep 17 22:27 2011 osscap.o
rw-rw-r-- 94110/42424  21696 Sep 17 22:31 2011 sosscom.o          ------Linux上特有的,AIX没有
rw-rw-r-- 94110/42424  20752 Sep 17 22:31 2011 osshugetlb.o       ------Linux上特有的,AIX没有
rw-rw-r-- 94110/42424   6352 Sep 17 22:31 2011 sipmiops.o         ------Linux上特有的,AIX没有
rw-rw-r-- 94110/42424  97072 Sep 17 22:27 2011 ossconf.o
rw-rw-r-- 94110/42424  18008 Sep 17 22:28 2011 sosstcp.o
rw-rw-r-- 94110/42424   9520 Sep 17 22:32 2011 osscapcom.o
rw-rw-r-- 94110/42424   5944 Sep 17 22:42 2011 osscomdg.o        ------Linux上特有的,AIX没有
rw-rw-r-- 94110/42424   3576 Sep 17 22:31 2011 ossrmcvers.o      ------Linux上特有的,AIX没有
rw-rw-r-- 94110/42424  10656 Sep 17 23:44 2011 oss_buildversion.o  ------Linux上特有的,AIX没有
rw-rw-r-- 94110/42424  15896 Sep 17 22:42 2011 ossfilcs.o
rw-rw-r-- 94110/42424   9280 Sep 17 22:42 2011 ossdbcom.o
[root@dm01db01 lib]#
那么这里recvmsg和sendmsg函数来自libskgxp11.so,关于libskgxp11.so的由来这里不赘述了,大致的介绍请参见:
在Exadata上,为什么 DUL 和 ODU不能读取ASM数据库的数据,但是Kfed却可以?
我们看到,oracle主要是通过这个libcell11.so函数来跟cell通信,并通过libskgxp11.so在本地调用socket:
[root@dm01db01 lib]# nm -D /u01/app/11.2.0.3/grid/lib/libcell11.so|grep socket
                 U socket
[root@dm01db01 lib]#
[root@dm01db01 lib]# nm -D /u01/app/11.2.0.3/grid/lib/libskgxp11.so|grep msg
                 U __cmsg_nxthdr
00000000000b3f60 T lwipc_rcvmsg
00000000000b4f66 T lwipc_rcvmsg_e
00000000000b402c T lwipc_sendmsg
                 U recvmsg
                 U sendmsg
[root@dm01db01 lib]#
[root@dm01db01 lib]# nm -D /u01/app/11.2.0.3/grid/lib/libskgxp11.so|grep poll
                 U poll
[root@dm01db01 lib]#
[root@dm01db01 network-config]# nm -D /u01/app/11.2.0.3/grid/lib/libcell11.so|grep cell
000000000001e7da T oss_cell_discovery_close
000000000001e88a T oss_cell_discovery_fetch
000000000001e944 T oss_cell_discovery_open
000000000001ce2c T oss_cellconfig_close
000000000001ce5a T oss_cellconfig_get_next_cell
000000000001cfb4 T oss_cellconfig_open
000000000001d680 T oss_cellipora_getvalue
000000000001ed62 T oss_fd_to_cellsrvpid
000000000001cc26 T oss_monitor_cell   -------监控来自cell的请求
000000000001c2f0 T oss_reconnect_cell   -------跟cell建立连接通道
000000000001cd6e T oss_report_when_cell_alive
000000000001cb9e T oss_unmonitor_cell
00000000000454b2 T reserve_hugepages_for_cellsrv
[root@dm01db01 network-config]#
那么在传统的Oracle数据库环境下,DBWR是怎么工作的的?
这里我们通过一个AIX环境举例说明。
首先,我们跟踪一下ora_dbw0_test570和ora_dbw1_test570进程:
AIX Version 5
Copyright IBM Corporation, 1982, 2010.
login: root
root's Password:
*******************************************************************************
*                                                                             *
*                                                                             *
*  Welcome to AIX Version 5.3!                                                *
*                                                                             *
*                                                                             *
*  Please see the README file in /usr/lpp/bos for information pertinent to    *
*  this release of the AIX Operating System.                                  *
*                                                                             *
*                                                                             *
*******************************************************************************
# ps -ef|grep pmon
  oracle  114904       1   0   Feb 07      -  6:05 ora_pmon_test570
    root  835912  499932   0 15:12:54  pts/0  0:00 grep pmon
# ps -ef|grep test|grep dbw
  oracle  156396       1   0   Feb 07      -  1:47 ora_dbw1_test570
  oracle   41840       1   0   Feb 07      -  1:47 ora_dbw0_test570
#

# truss -cf -p 41840
^CPstatus: process is not stopped
syscall               seconds   calls  errors
thread_wait                             11.82       4
times                     .00       8
                         ----     ---    ---
sys totals:               .00      12      0
usr time:                 .00
elapsed:                  .00
#
这里看到ora_dbw0_test570进程空闲,因此,再开辟一个会话,制造一些测试数据,比如,我这里创建了一个表:
—session 2
# su - oracle
$ sqlplus / as sysdba

SQL*Plus: Release 11.2.0.2.0 Production on Mon Mar 3 15:15:37 2014

Copyright (c) 1982, 2010, Oracle.  All rights reserved.


Connected to:
Oracle Database 11g Enterprise Edition Release 11.2.0.2.0 - 64bit Production
With the Partitioning, OLAP, Data Mining and Real Application Testing options

SQL> create table test as select * from dba_objects;

Table created.

SQL> alter system switch logfile;

System altered.

SQL>
跟踪一下ora_dbw1_test570进程:
# truss -cf -p 156396
^CPstatus: process is not stopped
syscall               seconds   calls  errors
thread_wait                             12.19      25
times                     .00      48
close                     .00       1
kread                     .00       1    ----读取操作
open                      .00       1
listio64                  .00       4
aio_nwait_timeout64       .00       4   ---AIO
                         ----     ---
sys totals:               .00      84      0
usr time:                 .00
elapsed:                  .00
#
我们发现,在AIX上的IO操作是通过传统的kread等完成的。
下面我再看看传统的linux环境下,这是一个ASM数据库,是Exadata的ADG,我们跟踪一下ora_dbw0_lunar进程:
[root@oradg ~]# uname -a
Linux oradg 2.6.18-238.el5xen #1 SMP Sun Dec 19 14:42:02 EST 2010 x86_64 x86_64 x86_64 GNU/Linux
[root@oradg ~]# ps -ef|grep pmon
root      1396  1221  0 16:28 pts/1    00:00:00 grep pmon
oracle   11320     1  0  2013 ?        00:00:01 asm_pmon_+ASM
oracle   21475     1  0  2013 ?        00:00:08 ora_pmon_lunar
[root@oradg ~]# ps -ef|grep lunar|grep dbw
oracle   21493     1 25  2013 ?        43-11:00:27 ora_dbw0_lunar
[root@oradg ~]#
[root@oradg ~]# strace -c -p 21493
Process 21493 attached - interrupt to quit
Process 21493 detached
% time     seconds  usecs/call     calls    errors syscall
------ ----------- ----------- --------- --------- ----------------
 68.92    0.059212           2     28790           pwrite   -------写入
 27.07    0.023259           0    855188           gettimeofday
  4.01    0.003447           0    278515           times
  0.00    0.000000           0         1           read      -----读取
  0.00    0.000000           0         1           open
  0.00    0.000000           0         1           close
  0.00    0.000000           0        16           semctl
  0.00    0.000000           0        80           getrusage
  0.00    0.000000           0         1           semtimedop
------ ----------- ----------- --------- --------- ----------------
100.00    0.085918               1162593           total
[root@oradg ~]#
我们发现,非Exadata的Linux环境上,IO操作是通过传统的read和pwrite等完成的。
最后,我们记录一下AIX环境下libcell11.a包含了哪些目标文件:
*******************************************************************************
*                                                                             *
*                                                                             *
*  Welcome to AIX Version 5.3!                                                *
*                                                                             *
*                                                                             *
*  Please see the README file in /usr/lpp/bos for information pertinent to    *
*  this release of the AIX Operating System.                                  *
*                                                                             *
*                                                                             *
*******************************************************************************

# su - oracle
$ cd $ORACLE_HOME
$ cd lib
$ ar -X32_64 -t -v libcell11.a
rw-rw-r-- 94110/42424  34613 Oct  7 18:01 2010 ossdisk.o
rw-rw-r-- 94110/42424   8654 Oct  7 18:01 2010 osshdl.o
rw-rw-r-- 94110/42424  67755 Oct  7 18:01 2010 osslib.o
rw-rw-r-- 94110/42424   5055 Oct  7 18:01 2010 ossmem.o
rw-rw-r-- 94110/42424 147638 Oct  7 18:02 2010 ossnet.o
rw-rw-r-- 94110/42424  15127 Oct  7 18:02 2010 ossutl.o
rw-rw-r-- 94110/42424  25030 Oct  7 18:02 2010 ossdebug.o
rw-rw-r-- 94110/42424  23666 Oct  7 18:02 2010 ossdscv.o
rw-rw-r-- 94110/42424   5227 Oct  7 18:02 2010 osssec.o
rw-rw-r-- 94110/42424   6131 Oct  7 18:02 2010 osssec_lib.o
rw-rw-r-- 94110/42424  16155 Oct  7 18:02 2010 osscdscv.o
rw-rw-r-- 94110/42424  15992 Oct  7 18:02 2010 osserr.o
rw-rw-r-- 94110/42424   7950 Oct  7 18:02 2010 osscap.o
rw-rw-r-- 94110/42424  12028 Oct  7 18:03 2010 ossfilcs.o
rw-rw-r-- 94110/42424   7643 Oct  7 18:03 2010 ossdbcom.o
rw-rw-r-- 94110/42424  10507 Oct  7 18:03 2010 sosstcp.o
rw-rw-r-- 94110/42424  68422 Oct  7 18:03 2010 ossconf.o
rw-rw-r-- 94110/42424  11514 Oct  7 18:03 2010 osscapcom.o
$
在Exadata上,为什么 DUL 和 ODU不能读取ASM数据库的数据,但是Kfed却可以?
普通的dul在exadata上是不能读取 cell 节点的数据的:
。。。。。。。。。。。
7132       0.000119 read(4, "disk o/192.168.56.11/data_CD_dis"..., 4096) = 46
7132       0.004402 read(4, "", 4096)   = 0
7132       0.156246 open("o/192.168.56.11/data_CD_disk01_dm01cel01", O_RDONLY|O_LARGEFILE) = -1 ENOENT (No such file or directory)
7132       0.000211 write(1, "\n", 1)   = 1
7132       0.000186 write(1, "DUL: Error: ", 12) = 12
7132       0.000163 write(1, "open( 'o/192.168.56.11/data_CD_d"..., 60) = 60
7132       0.000170 write(1, "\n", 1)   = 1
7132       0.000170 write(1, "OS error 2: No such file or dire"..., 38) = 38
7132       0.000196 write(3, "DUL version 10.2.0.5.28 with 64-"..., 1377) = 1377
7132       0.063801 write(1, "DUL: Error: ", 12) = 12
7132       0.000426 write(1, "Could not read disk header block"..., 82) = 82
7132       0.000166 write(1, "\n", 1)   = 1
7132       0.000366 close(4)            = 0
7132       0.000000 munmap(0xe8610000, 4096) = 0
7132       0.000188 brk(0xa93d000)      = 0xa93d000
7132       0.000151 write(1, "DUL> ", 5) = 5
7132       0.000294 write(3, "DUL: Error: Could not read disk "..., 101) = 101
7132       0.000751 fstat64(0, {st_mode=S_IFCHR|0620, st_rdev=makedev(136, 0), ...}) = 0
7132       0.000242 old_mmap(NULL, 4096, PROT_READ|PROT_WRITE, MAP_PRIVATE|MAP_ANONYMOUS, -1, 0) = 0xffffffffe8610000
7132       0.000237 read(0,
这里很清晰看到DUL报错了“OS error 2: No such file or dire”和“DUL: Error: “, 12″,由于篇幅关系,这里我就不贴前台DUL的报错界面了,这个trace已经很清晰了。
.
那么,我猜ODU也是同样的采用传统的read和write的方式读取数据的,跟踪一下,主要内容如下:
。。。。。。。。。。。
7940       0.000739 write(1, "loading default asm disk file .."..., 37) = 37
7940       0.000132 write(1, "\n", 1)   = 1
7940       0.000178 open("asmdisk.txt", O_RDONLY|O_LARGEFILE) = 4
7940       0.000101 fstat64(4, {st_mode=S_IFREG|0755, st_size=90, ...}) = 0
7940       0.000113 mmap2(NULL, 4096, PROT_READ|PROT_WRITE, MAP_PRIVATE|MAP_ANONYMOUS, -1, 0) = 0xfffffffff7f88000
7940       0.000455 read(4, "# disk_no  disk_path       group"..., 4096) = 90
7940       0.000141 read(4, "", 4096)   = 0
7940       0.000086 close(4)            = 0
7940       0.000084 munmap(0xf7f88000, 4096) = 0
7940       0.000114 write(1, "\n", 1)   = 1
7940       0.000139 write(1, "grp# dsk# bsize ausize disksize "..., 69) = 69
7940       0.000157 write(1, "---- ---- ----- ------ -------- "..., 109) = 109
7940       0.000102 write(1, "\n", 1)   = 1
7940       0.000089 write(1, "load asm disk file 'asmdisk.txt'"..., 44) = 44
7940       0.000102 write(1, "loading default control file ..."..., 36) = 36
7940       0.000102 write(1, "\n", 1)   = 1
7940       0.000252 open("oductl.dat", O_RDONLY) = -1 ENOENT (No such file or directory)
7940       0.000133 open("control.txt", O_RDONLY|O_LARGEFILE) = 4
7940       0.000106 fstat64(4, {st_mode=S_IFREG|0755, st_size=118, ...}) = 0
7940       0.000116 mmap2(NULL, 4096, PROT_READ|PROT_WRITE, MAP_PRIVATE|MAP_ANONYMOUS, -1, 0) = 0xfffffffff7f88000
7940       0.000088 read(4, "#ts fno   rfno     filename     "..., 4096) = 118
7940       0.000105 read(4, "", 4096)   = 0
7940       0.002253 close(4)            = 0
7940       0.000086 munmap(0xf7f88000, 4096) = 0
7940       0.000114 write(1, "\n", 1)   = 1
7940       0.000134 write(1, " ts#   fn  rfn bsize   blocks bf"..., 49) = 49
7940       0.000274 write(1, "---- ---- ---- ----- -------- --"..., 85) = 85
7940       0.000096 write(1, "load control file 'control.txt' "..., 43) = 43
7940       0.000000 open("user.odu", O_RDONLY|O_LARGEFILE) = -1 ENOENT (No such file or directory)
7940       0.000085 open("obj.odu", O_RDONLY|O_LARGEFILE) = -1 ENOENT (No such file or directory)
7940       0.000111 open("col.odu", O_RDONLY|O_LARGEFILE) = -1 ENOENT (No such file or directory)
7940       0.000097 open("tab.odu", O_RDONLY|O_LARGEFILE) = -1 ENOENT (No such file or directory)
7940       0.000109 open("ind.odu", O_RDONLY|O_LARGEFILE) = -1 ENOENT (No such file or directory)
7940       0.000105 open("lob.odu", O_RDONLY|O_LARGEFILE) = -1 ENOENT (No such file or directory)
7940       0.000101 open("lobfrag.odu", O_RDONLY|O_LARGEFILE) = -1 ENOENT (No such file or directory)
7940       0.000115 write(1, "loading dictionary data......don"..., 34) = 34
7940       0.000140 write(1, "\n", 1)   = 1
7940       0.001075 open("ext.odu", O_RDONLY|O_LARGEFILE) = -1 ENOENT (No such file or directory)
7940       0.000112 open("lobind.odu", O_RDONLY|O_LARGEFILE) = -1 ENOENT (No such file or directory)
7940       0.001063 open("lobpage.odu", O_RDONLY|O_LARGEFILE) = -1 ENOENT (No such file or directory)
7940       0.000235 write(1, "loading scanned data......done\n", 31) = 31
7940       0.000122 write(1, "\n", 1)   = 1
7940       0.000115 fstat64(0, {st_mode=S_IFCHR|0620, st_rdev=makedev(136, 0), ...}) = 0
7940       0.000140 mmap2(NULL, 4096, PROT_READ|PROT_WRITE, MAP_PRIVATE|MAP_ANONYMOUS, -1, 0) = 0xfffffffff7f88000
7940       0.000093 write(1, "ODU> ", 5) = 5
7940       0.000114 read(0,
我们看到,ODU读取了配置文件:“write(1, “load asm disk file ‘asmdisk.txt'”…, 44) = 44”
然后根据配置文件中的信息直接读取磁盘内容。
很明显,这种情况下ODU还是直接根据文件路径读取信息,那么在Exadata上,自然是搜索不到的。
因为,Exadata上,数据是放在cell上的,db节点调用 libcell11.a 并通过 socket 的方式通信。
.
但是kfed可以读取cell的数据,具体方法参见
Exadata上验证ASM磁盘头备份的位置
我跟踪了一下kfed读取cell上数据块的过程,大致如下:
kfed打开socket,并读取/etc/nsswitch.conf来进行域名解析:
。。。。。。。。。。。
9624       0.000204 socket(PF_FILE, SOCK_STREAM, 0) = 3
9624       0.000103 fcntl(3, F_SETFL, O_RDWR|O_NONBLOCK) = 0
9624       0.000082 connect(3, {sa_family=AF_FILE, path="/var/run/nscd/socket"...}, 110) = -1 ENOENT (No such file or directory)
9624       0.000132 close(3)            = 0
9624       0.000084 socket(PF_FILE, SOCK_STREAM, 0) = 3
9624       0.000165 fcntl(3, F_SETFL, O_RDWR|O_NONBLOCK) = 0
9624       0.000085 connect(3, {sa_family=AF_FILE, path="/var/run/nscd/socket"...}, 110) = -1 ENOENT (No such file or directory)
9624       0.000157 close(3)            = 0
9624       0.000128 open("/etc/nsswitch.conf", O_RDONLY) = 3
9624       0.000146 fstat(3, {st_mode=S_IFREG|0644, st_size=1696, ...}) = 0
9624       0.000127 mmap(NULL, 4096, PROT_READ|PROT_WRITE, MAP_PRIVATE|MAP_ANONYMOUS, -1, 0) = 0x2b6cccf0f000
9624       0.000087 read(3, "#\n# /etc/nsswitch.conf\n#\n# An ex"..., 4096) = 1696
9624       0.000132 read(3, "", 4096)   = 0
9624       0.000098 close(3)            = 0

。。。。。。。。。。。
kfed 读取自己的fd(/proc/self/fd/),fd是linux系统上进程的文件描述符:
。。。。。。。。。。。
9624       0.000108 open("/proc/self/fd/", O_RDONLY|O_NONBLOCK|O_DIRECTORY) = 4
9624       0.000139 fcntl(4, F_SETFD, FD_CLOEXEC) = 0
9624       0.000081 brk(0xe6e5000)      = 0xe6e5000

。。。。。。。。。。。。。
kfed 读取 ADR 的配置信息(怀疑Oracle的进程都会有类似过程,因为他们要讲log或者trace写入ADR):
。。。。。。。。。。。。。

9624       0.000154 fcntl(5, F_GETFL)   = 0x8002 (flags O_RDWR|O_LARGEFILE)
9624       0.000087 fcntl(5, F_SETLK, {type=F_WRLCK, whence=SEEK_SET, start=0, len=0}) = 0
9624       0.000277 times({tms_utime=0, tms_stime=2, tms_cutime=0, tms_cstime=0}) = 1718557960
9624       0.000105 times({tms_utime=0, tms_stime=2, tms_cutime=0, tms_cstime=0}) = 1718557960
9624       0.000144 lstat("/u01/app/oracle/diag/asmtool/user_oracle/host_3488797338_80/metadata/ADR_CONTROL.ams", 0x7fff2d998640) = -1 ENOENT (No such file or directory)
9624       0.000120 stat("/u01/app/oracle/diag/asmtool/user_oracle/host_3488797338_80/metadata/ADR_CONTROL.ams", 0x7fff2d9986f0) = -1 ENOENT (No such file or directory)
9624       0.000181 stat("/u01/app/oracle/diag/asmtool/user_oracle/host_3488797338_80/metadata/ADR_CONTROL.ams", 0x7fff2d9983b8) = -1 ENOENT (No such file or directory)
9624       0.000127 open("/u01/app/oracle/diag/asmtool/user_oracle/host_3488797338_80/metadata/ADR_CONTROL.ams", O_RDWR|O_CREAT|O_EXCL|O_SYNC, 0660) = 6
9624       0.005864 fstat(6, {st_mode=S_IFREG|0640, st_size=0, ...}) = 0
9624       0.000149 fstatfs(6, {f_type="EXT2_SUPER_MAGIC", f_bsize=4096, f_blocks=14807532, f_bfree=11368131, f_bavail=10603818, f_files=15287712, f_ffree=15007712, f_fsid={0, 0}, f_namelen=255, f_frsize=4096}) = 0
9624       0.000129 close(6)            = 0
9624       0.000085 open("/u01/app/oracle/diag/asmtool/user_oracle/host_3488797338_80/metadata/ADR_CONTROL.ams", O_RDWR|O_SYNC|O_DIRECT) = 6
9624       0.000131 ftruncate(6, 65536) = 0
9624       0.000089 close(6)            = 0
9624       0.000127 stat("/u01/app/oracle/diag/asmtool/user_oracle/host_3488797338_80/metadata/ADR_CONTROL.ams", {st_mode=S_IFREG|0640, st_size=65536, ...}) = 0
9624       0.000196 stat("/u01/app/oracle/diag/asmtool/user_oracle/host_3488797338_80/metadata/ADR_CONTROL.ams", {st_mode=S_IFREG|0640, st_size=65536, ...}) = 0
9624       0.000148 open("/u01/app/oracle/diag/asmtool/user_oracle/host_3488797338_80/metadata/ADR_CONTROL.ams", O_RDONLY) = 6
9624       0.000114 ioctl(6, BLKSSZGET, 0x7fff2d990078) = -1 ENOTTY (Inappropriate ioctl for device)
9624       0.000254 close(6)            = 0
9624       0.000108 statfs("/u01/app/oracle/diag/asmtool/user_oracle/host_3488797338_80/metadata/ADR_CONTROL.ams", {f_type="EXT2_SUPER_MAGIC", f_bsize=4096, f_blocks=14807532, f_bfree=11368130, f_bavail=10603817, f_files=15287712, f_ffree=15007712, f_fsid={0, 0}, f_namelen=255, f_frsize=4096}) = 0
9624       0.000153 open("/u01/app/oracle/diag/asmtool/user_oracle/host_3488797338_80/metadata/ADR_CONTROL.ams", O_RDONLY|O_DIRECT) = 6
9624       0.000108 fstatfs(6, {f_type="EXT2_SUPER_MAGIC", f_bsize=4096, f_blocks=14807532, f_bfree=11368130, f_bavail=10603817, f_files=15287712, f_ffree=15007712, f_fsid={0, 0}, f_namelen=255, f_frsize=4096}) = 0
9624       0.000133 close(6)            = 0
9624       0.000081 statfs("/u01/app/oracle/diag/asmtool/user_oracle/host_3488797338_80/metadata/ADR_CONTROL.ams", {f_type="EXT2_SUPER_MAGIC", f_bsize=4096, f_blocks=14807532, f_bfree=11368130, f_bavail=10603817, f_files=15287712, f_ffree=15007712, f_fsid={0, 0}, f_namelen=255, f_frsize=4096}) = 0
9624       0.000171 statfs("/u01/app/oracle/diag/asmtool/user_oracle/host_3488797338_80/metadata/ADR_CONTROL.ams", {f_type="EXT2_SUPER_MAGIC", f_bsize=4096, f_blocks=14807532, f_bfree=11368130, f_bavail=10603817, f_files=15287712, f_ffree=15007712, f_fsid={0, 0}, f_namelen=255, f_frsize=4096}) = 0
9624       0.000151 open("/u01/app/oracle/diag/asmtool/user_oracle/host_3488797338_80/metadata/ADR_CONTROL.ams", O_RDWR|O_SYNC|O_DIRECT) = 6
9624       0.000126 getrlimit(RLIMIT_NOFILE, {rlim_cur=128*1024, rlim_max=128*1024}) = 0
9624       0.000086 fcntl(6, F_DUPFD, 256) = 256
9624       0.000083 close(6)

。。。。。。。。。。。。。
ADR_CONTROL.ams 是一个二进制文件,主要保存了ADR的配置等的相关信息,其大致内容如下:
[oracle@dm01db01 lck]$ ll /u01/app/oracle/diag/asmtool/user_oracle/host_3488797338_80/metadata/ADR_CONTROL.ams
-rw-r----- 1 oracle oinstall 65536 Feb 22 00:30 /u01/app/oracle/diag/asmtool/user_oracle/host_3488797338_80/metadata/ADR_CONTROL.ams
[oracle@dm01db01 lck]$ strings /u01/app/oracle/diag/asmtool/user_oracle/host_3488797338_80/metadata/ADR_CONTROL.ams
TADR_CONTROL
ADRID
SHORTP_POLICY
LONGP_POLICY
LAST_MOD_TIME
LAST_AUTOPRG_TIME
LAST_MANUPRG_TIME
ADRDIR_VERSION
ADRSCHM_VERSION
ADRSCHMV_SUMMARY
ADRALERT_VERSION
CREATE_TIME
[oracle@dm01db01 lck]$
接下来,我们看到,kfed读取”/etc/oracle/cell/network-config/cellinit.ora”文件和”/etc/oracle/cell/network-config/cellip.ora”
。。。。。。。。。。。。。

9624       0.000116 open("/etc/oracle/cell/network-config/cellinit.ora", O_RDONLY) = 10
9624       0.000103 stat("/etc/oracle/cell/network-config/cellinit.ora", {st_mode=S_IFREG|0644, st_size=142, ...}) = 0
9624       0.000317 fstat(10, {st_mode=S_IFREG|0644, st_size=142, ...}) = 0
9624       0.000179 mmap(NULL, 4096, PROT_READ|PROT_WRITE, MAP_PRIVATE|MAP_ANONYMOUS, -1, 0) = 0x2b6ccd37b000
9624       0.000056 read(10, "ipaddress1=192.168.56.31/24\n_cel"..., 4096) = 142
9624       0.000279 close(10)           = 0
9624       0.000182 munmap(0x2b6ccd37b000, 4096) = 0
9624       0.000388 close(9)            = 0
9624       0.003771 gettimeofday({1393000211, 706856}, NULL) = 0
9624       0.000904 gettimeofday({1393000211, 707752}, NULL) = 0
9624       0.000185 open("/u01/app/oracle/product/11.2.0.3/dbhome_1/oracore/mesg/lrmus.msb", O_RDONLY) = 9
9624       0.000120 fcntl(9, F_SETFD, FD_CLOEXEC) = 0
9624       0.000085 lseek(9, 0, SEEK_SET) = 0
9624       0.000081 read(9, "\25\23\"\1\23\3\t\t\0\0\0\0\0\0\0\0\0\0\0\0\0\0\0\0\0\0\0\0\0\0\0\0"..., 256) = 256
9624       0.000159 open("/etc/oracle/cell/network-config/cellip.ora", O_RDONLY) = 10
9624       0.000171 stat("/etc/oracle/cell/network-config/cellip.ora", {st_mode=S_IFREG|0644, st_size=42, ...}) = 0
9624       0.000192 fstat(10, {st_mode=S_IFREG|0644, st_size=42, ...}) = 0
9624       0.000137 mmap(NULL, 4096, PROT_READ|PROT_WRITE, MAP_PRIVATE|MAP_ANONYMOUS, -1, 0) = 0x2b6ccd37b000
9624       0.000096 read(10, "cell=\"192.168.56.11\"\ncell=\"192.1"..., 4096) = 42
9624       0.000198 close(10)           = 0
9624       0.000104 munmap(0x2b6ccd37b000, 4096) = 0
9624       0.000123 close(9)            = 0
9624       0.000128 open("/u01/app/oracle/product/11.2.0.3/dbhome_1/oracore/mesg/lrmus.msb", O_RDONLY) = 9
9624       0.000113 fcntl(9, F_SETFD, FD_CLOEXEC) = 0
9624       0.000095 lseek(9, 0, SEEK_SET) = 0
9624       0.000084 read(9, "\25\23\"\1\23\3\t\t\0\0\0\0\0\0\0\0\0\0\0\0\0\0\0\0\0\0\0\0\0\0\0\0"..., 256) = 256
9624       0.000260 open("/etc/oracle/cell/network-config/cellip.ora", O_RDONLY) = 10
9624       0.000110 stat("/etc/oracle/cell/network-config/cellip.ora", {st_mode=S_IFREG|0644, st_size=42, ...}) = 0
9624       0.000240 fstat(10, {st_mode=S_IFREG|0644, st_size=42, ...}) = 0
9624       0.000129 mmap(NULL, 4096, PROT_READ|PROT_WRITE, MAP_PRIVATE|MAP_ANONYMOUS, -1, 0) = 0x2b6ccd37b000
9624       0.000085 read(10, "cell=\"192.168.56.11\"\ncell=\"192.1"..., 4096) = 42
9624       0.000171 close(10)           = 0
9624       0.000082 munmap(0x2b6ccd37b000, 4096) = 0
9624       0.000127 close(9)

。。。。。。。。。。。。
在Exadata上,db节点会配置/etc/oracle/cell/network-config/cellinit.ora,大致内容如下:
[root@dm01db01 odu]# cat /etc/oracle/cell/network-config/cellinit.ora
ipaddress1=192.168.56.31/24
_cell_print_all_params=true
_skgxp_gen_ant_off_rpc_timeout_in_sec=60
_skgxp_udp_interface_detection_time_secs=15 ----------我的是Exadata的VM,自然只能用UDP协议了,O(∩_∩)O哈哈~
[root@dm01db01 odu]#
我们看到,这里面主要是配置了db节点跟cell节点通信时必要的网络环境:
比如第一行 ipaddress1=192.168.56.31/24 ,这表示当前db节点的IP是192.168.56.31,子网掩码是255.255.255.0
.
24的意思就是说子网掩码中表示网络的二进制位数是24位,即: 11111111.11111111.11111111.00000000,数一下刚好24个1,变成十进制就是:255.255.255.0
.
后面两个_skgxp开头的参数,熟悉RAC的可能一下就想的了大名鼎鼎的$ORACLE_HOME/lib/libskgxpN.so。
N代表版本号,从9~11,12c没确定,还以依旧……
skgxp 是oracle开放的一个应用接口(System Kernel Generic Interface Inter-Process Communications),GCS和GES通信和传输数据会之用这个API
缺省的,libskgxp文件定义的传输协议是UDP/IP,但是如果条件具备(有Infiniband连接),你可以enable RDS协议,以提高实例间通信的效率。
例如,在AIX上缺省使用UDP:
$ uname -a
AIX server1 3 5 00C8E8124C00
$ $ORACLE_HOME/bin/skgxpinfo -v
Oracle UDP/IP (generic)
$
例如,在Exadata,上缺省使用RDS协议:
[grid@dm01db01 ~]$ $ORACLE_HOME/bin/skgxpinfo -v
Oracle RDS/IP (generic)
[grid@dm01db01 ~]$
我这里是11.2.0.3,那么自然是libskgxp11.so:
[root@dm01db01 network-config]# ls -lrt $ORACLE_HOME/lib/libskgxp*
-rw-r--r-- 1 grid oinstall 1010327 Sep 17  2011 /u01/app/11.2.0.3/grid/lib/libskgxpr.so
-rw-r--r-- 1 grid oinstall   20494 Sep 17  2011 /u01/app/11.2.0.3/grid/lib/libskgxpd.so
-rw-r--r-- 1 grid oinstall   20494 Sep 17  2011 /u01/app/11.2.0.3/grid/lib/libskgxpcompat.so
-rw-r--r-- 1 grid oinstall 1010297 Sep 17  2011 /u01/app/11.2.0.3/grid/lib/libskgxpg.so
-rw-r--r-- 1 root oinstall 1010297 Jun 13  2013 /u01/app/11.2.0.3/grid/lib/libskgxp11.so
[root@dm01db01 network-config]#
[root@dm01db01 network-config]# nm -D /u01/app/11.2.0.3/grid/lib/libskgxp11.so|grep msg
                 U __cmsg_nxthdr
00000000000b3f60 T lwipc_rcvmsg
00000000000b4f66 T lwipc_rcvmsg_e
00000000000b402c T lwipc_sendmsg
                 U recvmsg
                 U sendmsg
[root@dm01db01 network-config]#
这里可以看到,Exadata上,db节点跟cell节点通信(完成IO请求)就采用了recvmsg和sendmsg。而传统数据库是采用read/pread和write/pwrite等来完成IO操作的。
.
例如 libskgxp9.so,这个函数最早在9i就已经有了,当时这个是有第三方厂商提供的集群功能。
.
还有一个cellip.ora 文件,该文件的内容是具体的cell的地址,我这里配置了两个cell服务器的IP地址:
[root@dm01db01 network-config]#  cat /etc/oracle/cell/network-config/cellip.ora
cell="192.168.56.11"
cell="192.168.56.12"
[root@dm01db01 network-config]#
.
到这里,我们知道了kfed会读取cell的配置信息,并通过预先配置的协议进行节点间的通信。
.
接下来,我们看到kfed通过socket的方式跟cell节点进行通信,发出请求并接受返回的信息:
。。。。。。。。。。。。

9624       0.000125 futex(0x3946354a08, FUTEX_WAKE_PRIVATE, 2147483647) = 0
9624       0.000147 socket(PF_NETLINK, SOCK_RAW, 0) = 9
9624       0.000101 bind(9, {sa_family=AF_NETLINK, pid=0, groups=00000000}, 12) = 0
9624       0.000094 getsockname(9, {sa_family=AF_NETLINK, pid=9624, groups=00000000}, [5049059786767728652]) = 0
9624       0.000123 time(NULL)          = 1393000211
9624       0.000088 sendto(9, "\24\0\0\0\26\0\1\3\23\177\7S\0\0\0\0\0\0\0\0", 20, 0, {sa_family=AF_NETLINK, pid=0, groups=00000000}, 12) = 20
9624       0.000122 recvmsg(9, {msg_name(12)={sa_family=AF_NETLINK, pid=0, groups=00000000}, msg_iov(1)=[{"<\0\0\0\24\0\2\0\23\177\7S\230%\0\0\2\10\200\376\1\0\0\0\10\0\1\0\177\0\0\1"..., 4096}], msg_controllen=0, msg_flags=0}, 0) = 400
9624       0.000131 recvmsg(9, {msg_name(12)={sa_family=AF_NETLINK, pid=0, groups=00000000}, msg_iov(1)=[{"\24\0\0\0\3\0\2\0\23\177\7S\230%\0\0\0\0\0\0\1\0\0\0\10\0\1\0\177\0\0\1"..., 4096}], msg_controllen=0, msg_flags=0}, 0) = 20
9624       0.000121 close(9)            = 0
9624       0.000340 socket(PF_INET, SOCK_STREAM, IPPROTO_IP) = 9
9624       0.000173 fcntl(9, F_SETFL, O_RDONLY|O_NONBLOCK) = 0
9624       0.000130 connect(9, {sa_family=AF_INET, sin_port=htons(5042), sin_addr=inet_addr("192.168.56.11")}, 16) = -1 EINPROGRESS (Operation now in progress)
9624       0.000385 poll([{fd=9, events=POLLOUT}], 1, 2000) = 1 ([{fd=9, revents=POLLOUT}])
9624       0.000560 getsockopt(9, SOL_SOCKET, SO_ERROR, [17179869184], [4]) = 0
9624       0.000108 fcntl(9, F_GETFL)   = 0x802 (flags O_RDWR|O_NONBLOCK)
9624       0.000113 fcntl(9, F_SETFL, O_RDWR) = 0
9624       0.000453 uname({sys="Linux", node="dm01db01", ...}) = 0
9624       0.000220 times({tms_utime=10, tms_stime=90, tms_cutime=0, tms_cstime=0}) = 1718558361
9624       0.000131 uname({sys="Linux", node="dm01db01", ...}) = 0
9624       0.000224 sendto(9, "\4\3\2\1\0\0\0\0\1\0\0\0\1\0\0\0\1\0\0\0\6\0\0\0\1\0\0\0\3\0\0\0"..., 776, 0, NULL, 0) = 776
9624       0.000197 times({tms_utime=10, tms_stime=90, tms_cutime=0, tms_cstime=0}) = 1718558361
9624       0.000122 poll([{fd=9, events=POLLIN}], 1, 2000) = 1 ([{fd=9, revents=POLLIN}])
9624       0.000898 recvfrom(9, "\0\0\0\0\1\0\0\0\1\0\0\0\1\0\0\0\1\0\0\0\6\0\0\0\0\0\0\0\0\0\0\0"..., 776, 0, NULL, NULL) = 776
9624       0.000188 fcntl(9, F_SETFL, O_RDONLY|O_NONBLOCK) = 0
9624       0.000121 poll([{fd=9, events=POLLOUT}], 1, 2000) = 1 ([{fd=9, revents=POLLOUT}])
9624       0.000163 sendto(9, "\4\3\2\1\0\0\0\0\1\0\0\0\1\0\0\0\1\0\0\0\6\0\0\0\1\0\0\0\3\0\0\0"..., 776, 0, NULL, 0) = 776
9624       0.000188 fcntl(9, F_GETFL)   = 0x802 (flags O_RDWR|O_NONBLOCK)
9624       0.000111 fcntl(9, F_SETFL, O_RDWR) = 0
9624       0.000105 times({tms_utime=10, tms_stime=90, tms_cutime=0, tms_cstime=0}) = 1718558361
9624       0.000100 poll([{fd=9, events=POLLIN}], 1, 2000) = 1 ([{fd=9, revents=POLLIN}])
9624       0.016341 recvfrom(9, "\0\0\0\0\1\0\0\0\1\0\0\0\1\0\0\0\1\0\0\0\6\0\0\0\0\0\0\0\0\0\0\0"..., 776, 0, NULL, NULL) = 776
9624       0.000115 close(9)            = 0

。。。。。。。。。。。。。。

9624       0.000127 gettimeofday({1393000211, 754633}, NULL) = 0
9624       0.000108 sendmsg(7, {msg_name(16)={sa_family=AF_INET, sin_port=htons(45901), sin_addr=inet_addr("192.168.56.11")}, msg_iov(4)=[{"\4\3\2\1\340\2\0\0\0\0\0\0MRON\0\3\0\0\0\0\0\0\352\254\17\20\0\0\0\0"..., 76}, {"\1\0\1\0\0\0\0\0\20\1\0\0004\1\0\0\0\0\0\0\0\0\377\377\1\0\0\0", 28}, {"\4\3\2\1\34\0\0\0b\365\2403\0\0\0\0\0\0\0\0\1\2\0\0\216S\232\17\34\353Xw"..., 272}, {"\0\0\0\0\352\254\17\20\0\0$\0\20\0\20\0\4\3\2\1\1\1\0\0\316\302\213\353\31\0\0\0"..., 36}], msg_controllen=0, msg_flags=0}, 0) = 412
9624       0.000288 gettimeofday({1393000211, 755062}, NULL) = 0
9624       0.000166 gettimeofday({1393000211, 755195}, NULL) = 0
9624       0.000086 gettimeofday({1393000211, 755279}, NULL) = 0
9624       0.000090 poll([{fd=8, events=POLLIN|POLLPRI|POLLRDNORM|POLLRDBAND}, {fd=7, events=POLLIN|POLLPRI|POLLRDNORM|POLLRDBAND}], 2, 913) = 1 ([{fd=7, revents=POLLIN|POLLRDNORM}])
9624       0.000325 gettimeofday({1393000211, 755696}, NULL) = 0
9624       0.000120 recvmsg(7, {msg_name(16)={sa_family=AF_INET, sin_port=htons(45901), sin_addr=inet_addr("192.168.56.11")}, msg_iov(3)=[{"\4\3\2\1\232rN\0\0\0\0\0MRON\4\3\0\0\0\0\0\0b\365\2403\0\0\0\0"..., 76}, {"\1\0\0\0\0\0\0\0\240\0\0\0\0\0\0\0\0\16QT\0\0\0\0\0\0\0\0", 28}, {"\4\3\2\1\36\0\0\0\352\254\17\20\0\0\0\0\0\0\0\0\1\2\0\0\0\0\0\0\0\0\0\0"..., 576}], msg_controllen=0, msg_flags=0}, 0) = 264
9624       0.000293 recvmsg(7, 0x7fff2d997d30, 0) = -1 EAGAIN (Resource temporarily unavailable)
9624       0.000106 gettimeofday({1393000211, 756213}, NULL) = 0

。。。。。。。。。。。。。。
.
最后,kfed获取信息的工作结束后,关闭了相关的文件描述符,释放资源(close(10),close(9),close(7),close(8)):
。。。。。。。。。。。。。。


9624       0.000352 times({tms_utime=10, tms_stime=108, tms_cutime=0, tms_cstime=0}) = 1718558421
9624       0.000092 gettimeofday({1393000212, 342023}, NULL) = 0
9624       0.000089 gettimeofday({1393000212, 342112}, NULL) = 0
9624       0.000194 socket(PF_NETLINK, SOCK_RAW, 0) = 10
9624       0.000136 bind(10, {sa_family=AF_NETLINK, pid=0, groups=00000000}, 12) = 0
9624       0.000130 getsockname(10, {sa_family=AF_NETLINK, pid=9624, groups=00000000}, [1038475675733852172]) = 0
9624       0.000173 time(NULL)          = 1393000212
9624       0.000249 sendto(10, "\24\0\0\0\26\0\1\3\24\177\7S\0\0\0\0\0\0\0\0", 20, 0, {sa_family=AF_NETLINK, pid=0, groups=00000000}, 12) = 20
9624       0.000303 recvmsg(10, {msg_name(12)={sa_family=AF_NETLINK, pid=0, groups=00000000}, msg_iov(1)=[{"<\0\0\0\24\0\2\0\24\177\7S\230%\0\0\2\10\200\376\1\0\0\0\10\0\1\0\177\0\0\1"..., 4096}], msg_controllen=0, msg_flags=0}, 0) = 400
9624       0.000187 recvmsg(10, {msg_name(12)={sa_family=AF_NETLINK, pid=0, groups=00000000}, msg_iov(1)=[{"\24\0\0\0\3\0\2\0\24\177\7S\230%\0\0\0\0\0\0\1\0\0\0\10\0\1\0\177\0\0\1"..., 4096}], msg_controllen=0, msg_flags=0}, 0) = 20
9624       0.000186 close(10)           = 0
9624       0.000154 socket(PF_INET, SOCK_STREAM, IPPROTO_IP) = 10
9624       0.000146 fcntl(10, F_SETFL, O_RDONLY|O_NONBLOCK) = 0
9624       0.000201 connect(10, {sa_family=AF_INET, sin_port=htons(5042), sin_addr=inet_addr("192.168.56.11")}, 16) = -1 EINPROGRESS (Operation now in progress)
9624       0.000229 poll([{fd=10, events=POLLOUT}], 1, 2000) = 1 ([{fd=10, revents=POLLOUT}])
9624       0.000572 getsockopt(10, SOL_SOCKET, SO_ERROR, [17179869184], [4]) = 0
9624       0.000174 fcntl(10, F_GETFL)  = 0x802 (flags O_RDWR|O_NONBLOCK)
9624       0.000082 fcntl(10, F_SETFL, O_RDWR) = 0
9624       0.000113 uname({sys="Linux", node="dm01db01", ...}) = 0
9624       0.000143 fcntl(10, F_SETFL, O_RDONLY|O_NONBLOCK) = 0
9624       0.000075 poll([{fd=10, events=POLLOUT}], 1, 2000) = 1 ([{fd=10, revents=POLLOUT}])
9624       0.000092 sendto(10, "\4\3\2\1\0\0\0\0\1\0\0\0\1\0\0\0\1\0\0\0\6\0\0\0\1\0\0\0\3\0\0\0"..., 776, 0, NULL, 0) = 776
9624       0.000233 fcntl(10, F_GETFL)  = 0x802 (flags O_RDWR|O_NONBLOCK)
9624       0.000307 fcntl(10, F_SETFL, O_RDWR) = 0
9624       0.000150 times({tms_utime=10, tms_stime=109, tms_cutime=0, tms_cstime=0}) = 1718558422
9624       0.000132 poll([{fd=10, events=POLLIN}], 1, 2000) = 1 ([{fd=10, revents=POLLIN}])
9624       0.000509 recvfrom(10, "\0\0\0\0\1\0\0\0\1\0\0\0\1\0\0\0\1\0\0\0\6\0\0\0\0\0\0\0\0\0\0\0"..., 776, 0, NULL, NULL) = 776
9624       0.000097 close(10)           = 0
9624       0.000192 close(9)            = 0
9624       0.000247 close(7)            = 0
9624       0.000234 close(8)            = 0
9624       0.000136 gettimeofday({1393000212, 347899}, NULL) = 0
9624       0.000177 munmap(0x2b6ccd153000, 143360) = 0
9624       0.000780 munmap(0x2b6cccf1c000, 143360) = 0
9624       0.007067 exit_group(0)       = ?
那么如果需要使用DUL和ODU抽取数据怎么办呢?
我想,首先是跟kfed一样,加入必要的动态库,然后采用socket的方式读取数据,O(∩_∩)O哈哈~
安装Exadata时,如果checkip有报错怎么办?
在安装老版本 Exadata (Image 11.2.3.2.0以前)时,我们通常会使用一个叫做
大概在2013年1月份后,新的版本 Exadata ( Image 11.2.3.2.0以后 )上,我们会使用一个基于java的onecommand工具,图形化的生成配置文件。
通常安装前,我们会跟客户有一个沟通,把Exadata上的各个网络配置等信息跟客户做一个充分沟通,然后根据客户的要求使用onecommand生成配置脚本,其中有一个checkip.zip
这个checkip.zip(使用里面的 checkip.sh )我们会交给客户,用来检查现有环境。
有时候,运行checkip后,发现错误,不是说环境就一定不ready,需要看具体的情况而定:
例如:先插现有环境,发现有2个地方放报错了:
[root@dm01db01 onecommand]# ./checkip.sh -m pre_deploy112

Exadata Database Machine Network Verification version 1.12


Network verification mode post_applyconfig starting ...

Saving output file from previous run as dbm.out_29002

Using name server 9.9.9.3 found in dbm.dat for all DNS lookups

Processing section DOMAIN  : SUCCESS
Processing section NAME    : ERROR - see dbm.out for details   -------这里发现错误
Processing section NTP     : SUCCESS
Processing section GATEWAY : SUCCESS
Processing section SCAN    : SUCCESS
Processing section COMPUTE : SUCCESS
Processing section CELL    : SUCCESS
Processing section FACTORY : SUCCESS
Processing section ILOM    : SUCCESS
Processing section SWITCH  : ERROR - see dbm.out for details   -------这里发现错误
Processing section VIP     : SUCCESS

One or more checks report ERROR. Review dbm.out for details
[root@dm01db01 onecommand]#
这里,我们发现了两个错误,但是这两个错误是不是致命错误,以至于不能安装呢?
我们来检查一下 checkip.sh 的详细日志,分析下,到底什么问题:
[root@dm01db01 onecommand]# cat dbm.out
Running in mode post_applyconfig
Using name server 9.9.9.3 found in dbm.dat for all DNS lookups

Processing section DOMAIN
lunar.com

Processing section NAME
GOOD : 9.9.9.3 responds to resolve request for dm01db01.lunar.com
ERROR : 9.9.9.4 did not respond to resolve request for dm01db01.lunar.com in 3 seconds   ---这里报错,因为在onecommand中配置了两个DNS,但是安装的时候,我们的环境当时只配置了一个DNS Server

Processing section NTP
GOOD : 9.9.9.3 responds to time server query (/usr/sbin/ntpdate -q)

Processing section GATEWAY
GOOD : 9.9.9.4 pings successfully
GOOD : 192.168.11.254 pings successfully

Processing section SCAN
GOOD : dm01-scan.lunar.com resolves to 3 IP addresses
GOOD : dm01-scan.lunar.com forward resolves to 192.168.11.185
GOOD : 192.168.11.185 reverse resolves to dm01-scan.lunar.com.
GOOD : 192.168.11.185 does not ping
GOOD : dm01-scan.lunar.com forward resolves to 192.168.11.186
GOOD : 192.168.11.186 reverse resolves to dm01-scan.lunar.com.
GOOD : 192.168.11.186 does not ping
GOOD : dm01-scan.lunar.com forward resolves to 192.168.11.187
GOOD : 192.168.11.187 reverse resolves to dm01-scan.lunar.com.
GOOD : 192.168.11.187 does not ping

Processing section COMPUTE
GOOD : dm01db01.lunar.com forward resolves to 10.29.66.1
GOOD : 10.29.66.1 reverse resolves to dm01db01.lunar.com.
GOOD : 10.29.66.1 pings successfully
GOOD : dm01db02.lunar.com forward resolves to 10.29.66.2
GOOD : 10.29.66.2 reverse resolves to dm01db02.lunar.com.
GOOD : 10.29.66.2 pings successfully
GOOD : dm01client01.lunar.com forward resolves to 192.168.11.181
GOOD : 192.168.11.181 reverse resolves to dm01client01.lunar.com.
GOOD : 192.168.11.181 pings successfully
GOOD : dm01client02.lunar.com forward resolves to 192.168.11.182
GOOD : 192.168.11.182 reverse resolves to dm01client02.lunar.com.
GOOD : 192.168.11.182 pings successfully

Processing section CELL
GOOD : dm01cel01.lunar.com forward resolves to 10.29.66.3
GOOD : 10.29.66.3 reverse resolves to dm01cel01.lunar.com.
GOOD : 10.29.66.3 pings successfully
GOOD : dm01cel02.lunar.com forward resolves to 10.29.66.4
GOOD : 10.29.66.4 reverse resolves to dm01cel02.lunar.com.
GOOD : 10.29.66.4 pings successfully
GOOD : dm01cel03.lunar.com forward resolves to 10.29.66.5
GOOD : 10.29.66.5 reverse resolves to dm01cel03.lunar.com.
GOOD : 10.29.66.5 pings successfully

Processing section FACTORY

Processing section ILOM
GOOD : dm01db01-ilom.lunar.com forward resolves to 10.29.66.6
GOOD : 10.29.66.6 reverse resolves to dm01db01-ilom.lunar.com.
GOOD : 10.29.66.6 pings successfully
GOOD : dm01db02-ilom.lunar.com forward resolves to 10.29.66.7
GOOD : 10.29.66.7 reverse resolves to dm01db02-ilom.lunar.com.
GOOD : 10.29.66.7 pings successfully
GOOD : dm01cel01-ilom.lunar.com forward resolves to 10.29.66.8
GOOD : 10.29.66.8 reverse resolves to dm01cel01-ilom.lunar.com.
GOOD : 10.29.66.8 pings successfully
GOOD : dm01cel02-ilom.lunar.com forward resolves to 10.29.66.9
GOOD : 10.29.66.9 reverse resolves to dm01cel02-ilom.lunar.com.
GOOD : 10.29.66.9 pings successfully
GOOD : dm01cel03-ilom.lunar.com forward resolves to 10.29.66.10
GOOD : 10.29.66.10 reverse resolves to dm01cel03-ilom.lunar.com.
GOOD : 10.29.66.10 pings successfully

Processing section SWITCH
GOOD : dm01sw-iba0.lunar.com forward resolves to 10.29.66.12
GOOD : 10.29.66.12 reverse resolves to dm01sw-iba0.lunar.com.
GOOD : 10.29.66.12 pings successfully
GOOD : dm01sw-adm0.lunar.com forward resolves to 10.29.66.11
GOOD : 10.29.66.11 reverse resolves to dm01sw-adm0.lunar.com.
GOOD : 10.29.66.11 pings successfully
GOOD : dm01sw-ibb0.lunar.com forward resolves to 10.29.66.13
GOOD : 10.29.66.13 reverse resolves to dm01sw-ibb0.lunar.com.
GOOD : 10.29.66.13 pings successfully
GOOD : dm01sw-pdua0.lunar.com forward resolves to 10.29.66.14
GOOD : 10.29.66.14 reverse resolves to dm01sw-pdua0.lunar.com.
ERROR : 10.29.66.14 does not ping                              --这里报错,因为我们的系统工程师没有在2个PDU上连接网线到Exadata内置的Cisco交换机,O(∩_∩)O哈哈~
GOOD : dm01sw-pdub0.lunar.com forward resolves to 10.29.66.15
GOOD : 10.29.66.15 reverse resolves to dm01sw-pdub0.lunar.com.
ERROR : 10.29.66.15 does not ping                             --这里报错,原因同上

Processing section VIP
GOOD : dm01client01-vip.lunar.com forward resolves to 192.168.11.183
GOOD : 192.168.11.183 reverse resolves to dm01client01-vip.lunar.com.
GOOD : 192.168.11.183 does not ping
GOOD : dm01client02-vip.lunar.com forward resolves to 192.168.11.184
GOOD : 192.168.11.184 reverse resolves to dm01client02-vip.lunar.com.
GOOD : 192.168.11.184 does not ping
[root@dm01db01 onecommand]#
从上面的分析,我们可以看到,主要是2个错误:
1,在onecommand中生成配置文件时填写了两个DNS,但是安装的时候,我们的环境当时只配置了一个DNS Server
2,在2个PDU上连接网线到Exadata内置的Cisco交换机
这些都是非致命的问题,解决方法:
1,重新生成配置文件,只填写一个DNS
2,给PDU加上连线,连接到Cisco
再或者,其实这2个错误,可以忽略,O(∩_∩)O哈哈~
Exadata 环境下修改NTP Server的方法
如果NTP SERVER 的配置有问题,那么在使用 onecommand 进行安装时,会在最初的环境校验过程报错。
当然,从11.2.3.2.0开始,Exadata 上执行 onecommand 之前,必须先使用 checkip 脚本进行环境验证,如果该脚本返回关键错误,那么必须先根据提示解决问题,再继续安装。
例如,“Step 0 = ValidateEnv”就是执行环境校验:
[root@dm01db01 onecommand]# ./deploy11203.sh -l
INFO: Logging all actions in /opt/oracle.SupportTools/onecommand/tmp/dm01db01-20120330102340.log and traces in /opt/oracle.SupportTools/onecommand/tmp/dm01db01-20120330102340.trc
INFO: Loading configuration file /opt/oracle.SupportTools/onecommand/onecommand.params...
The steps in order are...
Step  0 = ValidateEnv
Step  1 = CreateWorkDir
Step  2 = UnzipFiles
Step  3 = setupSSHroot
Step  4 = UpdateEtcHosts
Step  5 = CreateCellipinitora
Step  6 = ValidateIB
Step  7 = ValidateCell
Step  8 = PingRdsCheck
Step  9 = RunCalibrate
Step 10 = CreateUsers
Step 11 = SetupSSHusers
Step 12 = CreateGridDisks
Step 13 = GridSwInstall
Step 14 = PatchGridHome
Step 15 = RelinkRDSGI
Step 16 = GridRootScripts
Step 17 = DbSwInstall
Step 18 = PatchDBHomes
Step 19 = CreateASMDiskgroups
Step 20 = DbcaDB
Step 21 = DoUnlock
Step 22 = RelinkRDSDb
Step 23 = LockUpGI
Step 24 = ApplySecurityFixes
Step 25 = SetupCellEmailAlerts
Step 26 = ResecureMachine
[root@dm01db01 onecommand]#
这里我们看到NTP server在安装时都已经ok了:
[root@dm01db01 onecommand]# ./deploy11203.sh -s0
INFO: Logging all actions in /opt/oracle.SupportTools/onecommand/tmp/dm01db01-20120331165347.log and traces in /opt/oracle.SupportTools/onecommand/tmp/dm01db01-20120331165347.trc
INFO: Loading configuration file /opt/oracle.SupportTools/onecommand/onecommand.params...
==================================================================================
。。。。。。。。。。。。。。。。
INFO: Output from /opt/oracle.cellos/ipconf -preconf /opt/oracle.SupportTools/onecommand/preconf.csv -verify -ignoremismatch -verbose is
 Verifying configuration for dm01cel01.lunar.com
 Load config file: /tmp/dm01cel01.lunar.com.cell.conf
 Config file exists /tmp/dm01cel01.lunar.com.cell.conf                                              : PASSED
 Load configuration                                                                                : PASSED
 Configuration version is defined in Exadata configuration file                                    : PASSED
 Configuration version 11.2.2.1.0 has valid value in Exadata configuration file                    : PASSED
 DNS server 10.10.16.5 has valid IP address syntax in the Exadata configuration file                : PASSED
 DNS server 10.10.16.6 has valid IP address syntax in the Exadata configuration file                : PASSED
 DNS server 10.10.16.7 has valid IP address syntax in the Exadata configuration file                : PASSED
 Canonical hostname is defined in Exadata configuration file                                       : PASSED
 Canonical hostname dm01cel01.lunar.com has valid syntax in Exadata configuration file              : PASSED
 Node type is defined in Exadata configuration file                                                : PASSED
 Node type cell is valid in Exadata configuration file                                             : PASSED
 Timezone is defined in Exadata configuration file                                                 : PASSED
 Timezone is found in /usr/share/zoneinfo                                                          : PASSED
 NTP server 10.10.16.6 has valid syntax in Exadata configuration file                               : PASSED
 NTP server 10.10.16.7 has valid syntax in Exadata configuration file                               : PASSED
 NTP drift file /var/lib/ntp/drift is defined in Exadata configuration file                        : PASSED
 Network interface eth0 is defined in Exadata configuration file                                   : PASSED
 IP address 10.10.16.132 is defined for eth0 in Exadata configuration file                          : PASSED
 IP address 10.10.16.132 has valid syntax for eth0 in Exadata configuration file                    : PASSED
 Netmask 255.255.255.0 is defined for eth0 in Exadata configuration file                           : PASSED
 Netmask 255.255.255.0 has valid syntax for eth0 in Exadata configuration file                     : PASSED
 Gateway 10.10.16.1 has valid syntax for eth0 in Exadata configuration file                         : PASSED
 Gateway 10.10.16.1 is inside network for eth0 in Exadata configuration file                        : PASSED
 Network type Management is defined for eth0 in Exadata configuration file                         : PASSED
 Network type Management has proper value for eth0 in Exadata configuration file                   : PASSED
。。。。。。。。。。。。。。。。
在使用中,有时候客户有更改NTP SERVER的IP的需求。
如果没有在 Exadata 的db节点和cell节点上完成相应配置文件的修改,那么cell节点的alert中会类似如下报错:
CellCLI> list alerthistory
         5_1     2012-07-30T11:19:11+08:00       info            "The disk controller battery is executing a learn cycle and may temporarily enter WriteThrough Caching mode as part of the learn cycle. Disk write throughput might be temporarily lower during this time. The flash drives are not affected. The battery learn cycle is a normal maintenance activity that occurs quarterly and runs for approximately 1 to 12 hours.  Note that many learn cycles do not require entering WriteThrough caching mode.  When the disk controller cache returns to the normal WriteBack caching mode, an additional informational alert will be sent.  Battery Serial Number : 13718  Battery Type          : iBBU08  Battery Temperature   : 30 C  Full Charge Capacity  : 1340 mAh  Relative Charge       : 48 %  Ambient Temperature   : unknown"
         5_2     2012-07-30T11:56:37+08:00       clear           "All disk drives are in WriteBack caching mode.  Battery Serial Number : 13718  Battery Type          : iBBU08  Battery Temperature   : 47 C  Full Charge Capacity  : 1346 mAh  Relative Charge       : 73 %  Ambient Temperature   : 22 C"
         6_1     2012-08-10T14:38:35+08:00       critical        "Cell configuration check discovered the following problems:   Check Exadata configuration via ipconf utility Verifying of Exadata configuration file /opt/oracle.cellos/cell.conf Checking NTP server on 10.9.26.230                                                              : FAILED Error. Overall status of verification of Exadata configuration file: FAILED [INFO] The ipconf check may generate a failure for temporary inability to reach NTP or DNS server. You may ignore this alert, if the NTP or DNS servers are valid and available. [INFO] You may ignore this alert, if the NTP or DNS servers are valid and available. [INFO] As root user run /usr/local/bin/ipconf -verify -semantic to verify consistent network configurations."
         6_2     2012-08-15T11:29:41+08:00       critical        "Cell configuration check discovered the following problems:   Check Exadata configuration via ipconf utility Verifying of Exadata configuration file /opt/oracle.cellos/cell.conf Checking NTP server on 10.9.26.230                                                              : FAILED NTP server 10.9.26.230 exists only in Exadata configuration file                                : FAILED Checking NTP server on 10.9.26.63                                                               : FAILED NTP server 10.9.26.63 exists only in /etc/ntp.conf                                              : FAILED Error. Overall status of verification of Exadata configuration file: FAILED [INFO] The ipconf check may generate a failure for temporary inability to reach NTP or DNS server. You may ignore this alert, if the NTP or DNS servers are valid and available. [INFO] You may ignore this alert, if the NTP or DNS servers are valid and available. [INFO] As root user run /usr/local/bin/ipconf -verify -semantic to verify consistent network configurations."
         6_3     2012-08-16T11:29:51+08:00       critical        "Cell configuration check discovered the following problems:   Check Exadata configuration via ipconf utility Verifying of Exadata configuration file /opt/oracle.cellos/cell.conf Checking NTP server on 10.9.26.230                                                              : FAILED NTP server 10.9.26.230 exists only in Exadata configuration file                                : FAILED Checking NTP server on 10.9.26.62                                                               : FAILED NTP server 10.9.26.62 exists only in /etc/ntp.conf                                              : FAILED Error. Overall status of verification of Exadata configuration file: FAILED [INFO] The ipconf check may generate a failure for temporary inability to reach NTP or DNS server. You may ignore this alert, if the NTP or DNS servers are valid and available. [INFO] You may ignore this alert, if the NTP or DNS servers are valid and available. [INFO] As root user run /usr/local/bin/ipconf -verify -semantic to verify consistent network configurations."
         6_4     2012-09-15T11:40:34+08:00       critical        "Cell configuration check discovered the following problems:   Check Exadata configuration via ipconf utility Verifying of Exadata configuration file /opt/oracle.cellos/cell.conf Checking DNS server on 10.48.0.10                                                                : FAILED Checking NTP server on 10.9.26.230                                                              : FAILED NTP server 10.9.26.230 exists only in Exadata configuration file                                : FAILED Checking NTP server on 10.9.26.62                                                               : FAILED NTP server 10.9.26.62 exists only in /etc/ntp.conf                                              : FAILED Error. Overall status of verification of Exadata configuration file: FAILED [INFO] The ipconf check may generate a failure for temporary inability to reach NTP or DNS server. You may ignore this alert, if the NTP or DNS servers are valid and available. [INFO] You may ignore this alert, if the NTP or DNS servers are valid and available. [INFO] As root user run /usr/local/bin/ipconf -verify -semantic to verify consistent network configurations."
         6_5     2012-09-18T11:38:28+08:00       critical        "Cell configuration check discovered the following problems:   Check Exadata configuration via ipconf utility Verifying of Exadata configuration file /opt/oracle.cellos/cell.conf Checking NTP server on 10.9.26.230                                                              : FAILED NTP server 10.9.26.230 exists only in Exadata configuration file                                : FAILED Checking NTP server on 10.9.26.62                                                               : FAILED NTP server 10.9.26.62 exists only in /etc/ntp.conf                                              : FAILED Error. Overall status of verification of Exadata configuration file: FAILED [INFO] The ipconf check may generate a failure for temporary inability to reach NTP or DNS server. You may ignore this alert, if the NTP or DNS servers are valid and available. [INFO] You may ignore this alert, if the NTP or DNS servers are valid and available. [INFO] As root user run /usr/local/bin/ipconf -verify -semantic to verify consistent network configurations."
         6_6     2012-09-26T11:40:08+08:00       critical        "Cell configuration check discovered the following problems:   Check Exadata configuration via ipconf utility Verifying of Exadata configuration file /opt/oracle.cellos/cell.conf Checking NTP server on 10.9.26.230                                                              : FAILED NTP server 10.9.26.230 exists only in Exadata configuration file                                : FAILED NTP server 10.9.26.62 exists only in /etc/ntp.conf                                              : FAILED Error. Overall status of verification of Exadata configuration file: FAILED [INFO] The ipconf check may generate a failure for temporary inability to reach NTP or DNS server. You may ignore this alert, if the NTP or DNS servers are valid and available. [INFO] You may ignore this alert, if the NTP or DNS servers are valid and available. [INFO] As root user run /usr/local/bin/ipconf -verify -semantic to verify consistent network configurations."
         7       2012-08-14T11:13:12+08:00       info            "Factory defaults restored for Adapter 0"

CellCLI>
此时,在cell节点上验证会报失败“FAILED”:
[root@dm01cel01 ~]# /usr/local/bin/ipconf -verify -semantic
Verifying of Exadata configuration file /opt/oracle.cellos/cell.conf
Checking NTP server on 10.9.26.230                                                               : FAILED
NTP server 10.9.26.230 exists only in Exadata configuration file                                 : FAILED
NTP server 10.9.26.62 exists only in /etc/ntp.conf                                               : FAILED
Error. Overall status of verification of Exadata configuration file: FAILED
[root@dm01cel01 ~]#
场景1:使用过程中,客户更改了NTP Server的解决方法
解决方法:
直接修改/opt/oracle.cellos/cell.conf,将10.9.26.230替换成 10.9.26.62
修改之后,再次使用“ /usr/local/bin/ipconf -verify -semantic ”来验证。
可以看到,已经验证通过了:
[root@dm01cel01 ~]# /usr/local/bin/ipconf -verify -semantic
Verifying of Exadata configuration file /opt/oracle.cellos/cell.conf
Done. Configuration file /opt/oracle.cellos/cell.conf passed all verification checks
[root@dm01cel01 ~]#
1

然后重启ntp服务
#/etc/init.d/ntpd stop
#/etc/init.d/ntpd start 或者 #service ntpd restart

例如:
1
#service ntpd restart
 Shutting down ntpd: [  OK  ]
 ntpd: Synchronizing with time server: [  OK  ]
 Syncing hardware clock to system time [  OK  ]
 Starting ntpd: [  OK  ]
场景2:初始安装过程中,错误的填写了NTP Server的地址
解决办法:
(1)重新生成配置文件:
按照新的NTP SERVER的IP,重新生成配置文件。
Image 11.2.3.2.0 以前是一个excel,我们会将生成的配置文件上传到 onecommand 目录
Image 11.2.3.2.0 开始,onecommand使用java界面生成配置文件,我们会将生成的checkip.sh交给客户,让客户check现有环境是否具备安装条件。
这里,我们执行 checkip.sh 来校验环境已经ready(NTP SERVER的IP地址已经修改成功):
[root@dm01db01 onecommand]# ./checkip.sh -m pre_deploy112
Exadata Database Machine Network Verification version 1.12


Network verification mode post_applyconfig starting ...

Saving output file from previous run as dbm.out_29002

Using name server 9.9.9.3 found in dbm.dat for all DNS lookups

Processing section DOMAIN  : SUCCESS
Processing section NAME    : SUCCESS
Processing section NTP     : SUCCESS  ---------这里看到已经可以通过检查
Processing section GATEWAY : SUCCESS
Processing section SCAN    : SUCCESS
Processing section COMPUTE : SUCCESS
Processing section CELL    : SUCCESS
Processing section FACTORY : SUCCESS
Processing section ILOM    : SUCCESS
Processing section SWITCH  : SUCCESS
Processing section VIP     : SUCCESS

[root@dm01db01 onecommand]#
(2)验证 preconf.csv 文件的有效性(已经配置了正确的mac地址的):
/opt/oracle.cellos/ipconf.pl -verify -preconf /opt/oracle.SupportTools/onecommand/preconf.csv
(3)[root@dm01db01 onecommand]#./checkip.sh -m pre_applyconfig
(4)使用 ipconf -verify 进行再次验证:
[root@dm01db01 onecommand]# /opt/oracle.cellos/ipconf -verify
Verifying of Exadata configuration file /opt/oracle.cellos/cell.conf
Done. Configuration file /opt/oracle.cellos/cell.conf passed all verification checks
[root@dm01db01 onecommand]#
(5)现在重启个节点的NPT服务,例如:
#/etc/init.d/ntpd stop
#/etc/init.d/ntpd start 或者 #service ntpd restart
例如:
#service ntpd restart
 Shutting down ntpd: [  OK  ]
 ntpd: Synchronizing with time server: [  OK  ]
 Syncing hardware clock to system time [  OK  ]
 Starting ntpd: [  OK  ]
(6)进行安装前,建议将所有节点reboot一下,尤其是感觉自己的环境改来改去,修改的乱七八糟的,O(∩_∩)O哈哈~
使用ILOM收集Exadata的硬件故障信息(snapshot)
当遇到硬件故障时,我们通常会收集硬件故障的信息提交到SR或者硬件工程师,那么如何收集故障信息呢?
在Exadata或者配置了ILOM模块的X86机器上,我们都可以使用两种方法收集信息。
方法一,使用Web界面登陆ILOM:
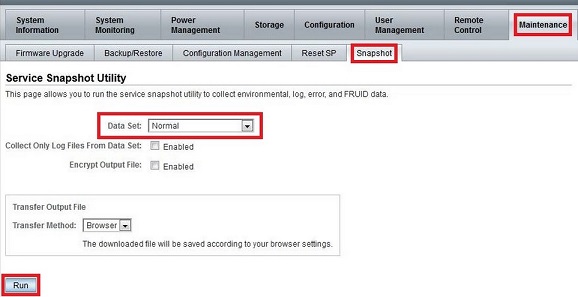
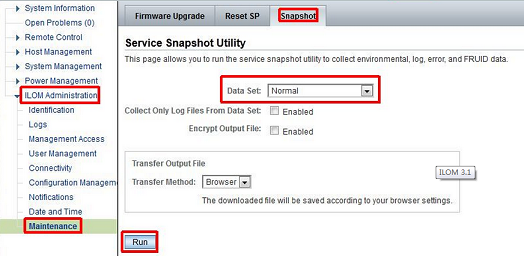
点击run后,会弹出一个窗口让你选择将收集的信息保存在那个目录,之后,点击保存按钮,然后就可以将这些日志发送到SR或者给硬件工程师确认。
这个过程也可以通过命令行完成。
方法2:使用命令行收集故障信息,大致步骤如下:
使用SSH登陆故障节点的ILOM(IP地址在配置文件中可以查找到):
# ssh dm01db01-ilom
Password:

Sun(TM) Integrated Lights Out Manager
Version 3.0.9.19.a r55943
Copyright 2009 Sun Microsystems, Inc. All rights reserved.
Use is subject to license terms.
->
-> set /SP/diag/snapshot dataset=normal
-> set /SP/diag/snapshot dump_uri=sftp://root:welcome@192.168.1.2/tmp
这里dump_uri的格式如下:
dump_uri=sftp://root:<password>@<ip address of host>/<dir to upload snapshot to>

-> cd /SP/diag/snapshot
-> show
执行完这不后,看到“Snapshot Complete”提示就可以完成了.
生成的日志在该主机的(这里是 192.168.1.2 )的“/tmp”目录下。
Exadata更换硬盘的操作过程和解释
在巡检时,发现cell的alert有如下告警:
[root@dm01cel02 ~]# cellcli -e list alerthistory
53 2013-09-09T16:59:32+08:00 info "This is a test trap"
54 2013-10-17T02:00:11+08:00 info "HDD disk controller battery on disk contoller at adapter 0 is going into a learn cycle. This is a normal maintenance activity that occurs quarterly and runs for approximately 1 to 12 hours. The disk controller cache might go into WriteThrough caching mode during the learn cycle. Disk write throughput might be temporarily lower during this time. The message is informational only, no action is required."
55_1 2013-10-29T22:52:11+08:00 critical "Hard disk failed. Status : CRITICAL Manufacturer : SEAGATE Model Number : ST360057SSUN600G Size : 600G Serial Number : E0P387 Firmware : 0805 Slot Number : 9 Cell Disk : CD_09_dm01cel02 Grid Disk : DATA_DM01_CD_09_dm01cel02, RECO_DM01_CD_09_dm01cel02, DBFS_DG_CD_09_dm01cel02"
55_2 2013-12-06T18:17:27+08:00 critical "Hard disk removed. Status : NOT PRESENT Manufacturer : SEAGATE Model Number : ST360057SSUN600G Size : 600G Serial Number : E0P387 Firmware : 0805 Slot Number : 9 Cell Disk : CD_09_dm01cel02 Grid Disk : DATA_DM01_CD_09_dm01cel02, RECO_DM01_CD_09_dm01cel02, DBFS_DG_CD_09_dm01cel02 Error Count : 0 Last Failure : unknown"
55_3 2013-12-06T18:18:21+08:00 clear "Hard disk replaced. Status : NORMAL Manufacturer : SEAGATE Model Number : ST360057SSUN600G Size : 600G Serial Number : E0SQFJ Firmware : 0805 Slot Number : 9 Cell Disk : CD_09_dm01cel02 Grid Disk : DATA_DM01_CD_09_dm01cel02, RECO_DM01_CD_09_dm01cel02, DBFS_DG_CD_09_dm01cel02"
[root@dm01cel02 ~]#
我们注意到有这样的信息,就表示磁盘有损坏的情况,结合sundiag信息,可以发现磁盘确实损坏,需要更换。
另外,此时也可以通过直接看机柜,该磁盘为闪蓝色灯,表示进行拔出的操作了。
关键信息:
SEAGATE Model Number : ST360057SSUN600G
Serial Number : E0P387
Slot Number : 9
Cell Disk : CD_09_dm01cel02
换盘前,我们一般作比较细致的检查:
1.在db节点上grid用户登录,这是要确认一下asm disk是不是被drop掉。drop掉就可以直接更换,如果没有,就需要手动去drop了。
[grid@dm01db01 ~]$ sqlplus / as sysasm


SQL*Plus: Release 11.2.0.2.0 Production on Fri Dec 6 18:04:35 2013


Copyright (c) 1982, 2010, Oracle. All rights reserved.


Connected to:
Oracle Database 11g Enterprise Edition Release 11.2.0.2.0 - 64bit Production
With the Real Application Clusters and Automatic Storage Management options


SQL> select group_number,name,state from v$asm_diskgroup;
GROUP_NUMBER NAME STATE
------------ ------------------------------ -----------
 1 DATA_DM01 MOUNTED
 2 DBFS_DG MOUNTED
 3 RECO_DM01 MOUNTED


SQL> set linesize 132
SQL> col path format a50
SQL> select group_number,path,header_status,mount_status,mode_status,name from V$ASM_DISK where path like '%CD_09_dm01cel02';
no rows selected
SQL>
SQL> select * from gv$asm_operation where state='RUN';
no rows selected


SQL>
这里表示磁盘celldisk:CD_09_dm01cel02已经被ASM自动删除了,且当前没有正在运行的rebalance操作。
2. 在相应的存储节点(dm01cel02)上进行确认检查:
[root@dm01cel02 ~]# cellcli -e list griddisk
 DATA_DM01_CD_00_dm01cel02 active
 DATA_DM01_CD_01_dm01cel02 active
 DATA_DM01_CD_02_dm01cel02 active
 DATA_DM01_CD_03_dm01cel02 active
 DATA_DM01_CD_04_dm01cel02 active
 DATA_DM01_CD_05_dm01cel02 active
 DATA_DM01_CD_06_dm01cel02 active
 DATA_DM01_CD_07_dm01cel02 active
 DATA_DM01_CD_08_dm01cel02 active
 DATA_DM01_CD_09_dm01cel02 not present -------------标记“not present”:gridisk DATA_DM01_CD_09_dm01cel02
 DATA_DM01_CD_10_dm01cel02 active
 DATA_DM01_CD_11_dm01cel02 active
 DBFS_DG_CD_02_dm01cel02 active
 DBFS_DG_CD_03_dm01cel02 active
 DBFS_DG_CD_04_dm01cel02 active
 DBFS_DG_CD_05_dm01cel02 active
 DBFS_DG_CD_06_dm01cel02 active
 DBFS_DG_CD_07_dm01cel02 active
 DBFS_DG_CD_08_dm01cel02 active
 DBFS_DG_CD_09_dm01cel02 not present -------------标记“not present”:gridisk DBFS_DG_CD_09_dm01cel02
 DBFS_DG_CD_10_dm01cel02 active
 DBFS_DG_CD_11_dm01cel02 active
 RECO_DM01_CD_00_dm01cel02 active
 RECO_DM01_CD_01_dm01cel02 active
 RECO_DM01_CD_02_dm01cel02 active
 RECO_DM01_CD_03_dm01cel02 active
 RECO_DM01_CD_04_dm01cel02 active
 RECO_DM01_CD_05_dm01cel02 active
 RECO_DM01_CD_06_dm01cel02 active
 RECO_DM01_CD_07_dm01cel02 active
 RECO_DM01_CD_08_dm01cel02 active
 RECO_DM01_CD_09_dm01cel02 not present -------------标记“not present”:gridisk RECO_DM01_CD_09_dm01cel02
 RECO_DM01_CD_10_dm01cel02 active
 RECO_DM01_CD_11_dm01cel02 active
[root@dm01cel02 ~]#
确认物理盘状态:
[celladmin@dm01cel02 ~]$ cellcli
CellCLI: Release 11.2.2.3.5 - Production on Fri Dec 06 18:01:08 CST 2013


Copyright (c) 2007, 2009, Oracle. All rights reserved.
Cell Efficiency Ratio: 4,314


CellCLI> list cell attributes cellsrvStatus,msStatus,rsStatus detail
 cellsrvStatus: running -----------cell状态时running
 msStatus: running
 rsStatus: running


CellCLI> LIST PHYSICALDISK WHERE diskType=HardDisk AND status LIKE ".*failure.*" DETAIL


CellCLI> LIST PHYSICALDISK WHERE diskType=HardDisk AND status=critical DETAIL
 name: 20:9 ---------物理盘的设备名: 20:9
 deviceId: 10
 diskType: HardDisk
 enclosureDeviceId: 20
 errMediaCount: 0
 errOtherCount: 1
 foreignState: false
 luns: 0_9
 makeModel: "SEAGATE ST360057SSUN600G" ------磁盘型号 :SEAGATE ST360057SSUN600
 physicalFirmware: 0805
 physicalInsertTime: 2011-09-16T18:01:57+08:00
 physicalInterface: sas
 physicalSerial: E0P387 --------Serial Number:E0P387
 physicalSize: 558.9109999993816G
 slotNumber: 9 ----------Slot Number: 9
 status: critical


CellCLI>
CellCLI> list griddisk where celldisk=CD_09_dm01cel02
 DATA_DM01_CD_09_dm01cel02 not present -----状态“not present”
 DBFS_DG_CD_09_dm01cel02 not present
 RECO_DM01_CD_09_dm01cel02 not present


CellCLI>
这里发现磁盘的报错信息跟alert是一致的:
SEAGATE Model Number : ST360057SSUN600G
Serial Number : E0P387
Slot Number : 9
Cell Disk : CD_09_dm01cel02
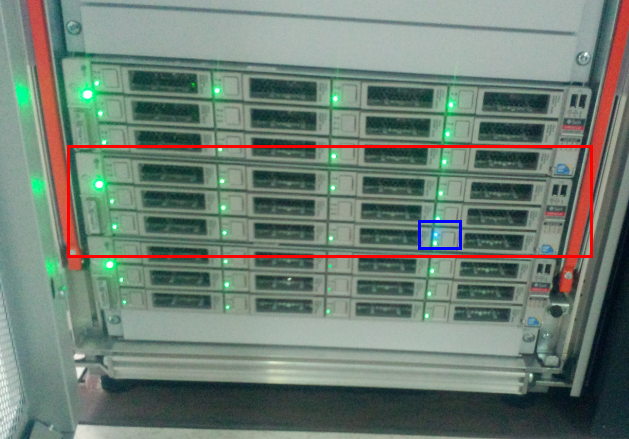
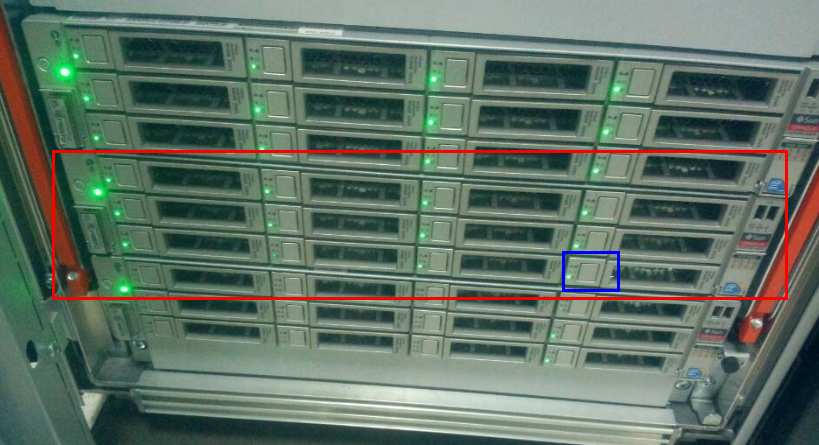
磁盘的物理位置和编号如下:

我们这里是HDD9损坏。
此时从机柜边上观察,如果磁盘闪蓝灯则可以直接拔出,如果是闪橘色灯,那么需要手工关闭这个磁盘设备,然后再拔出:
alter physicaldisk 20:9 serviceled off
更换完成后需要检查:
1,磁盘的LED指示灯变为绿色
2,确认新换盘的celldisk,griddisk状态是normal
list celldisk where lun=0_9 detail
注意看: status: normal
CellCLI> list griddisk where celldisk=CD_09_dm01cel02
name: DATA_CD_09_dm01cel02
availableTo:
cellDisk: CD_09_dm01cel02
。。。
errorCount: 0
。。。。。
status: active
name: RECO_CD_09_dm01cel02
availableTo:
cellDisk: CD_09_dm01cel02
。。。。。
errorCount: 0
。。。。。
status: active
name: SYSTEMDG_CD_09_dm01cel02
availableTo:
cellDisk: CD_09_dm01cel02
。。。。。
errorCount: 0
。。。。。。
status: active
在dm01cel02的alert中会有自动创建celldisk和griddisk的日志:
Fri Dec 06 18:18:20 2013
create CELLDISK CD_09_dm01cel02 on device /dev/sdj
Fri Dec 06 18:18:20 2013
create GRIDDISK DATA_DM01_CD_09_dm01cel02 on CELLDISK CD_09_dm01cel02
Storage Index Allocation for GridDisk DATA_DM01_CD_09_dm01cel02 successful [code: 1]
Griddisk DATA_DM01_CD_09_dm01cel02 - number is (21152)
NOTE: Initiating ASM instance operation:
 Operation: DROP and ADD of ASM disks for 1 Grid disks guids.
NOTE: Initiating ASM Instance operation: ASM DROP ADD disk on 1 disks
Published 1 grid disk events ASM DROP ADD disk on DG DATA_DM01 to:
ClientHostName = dm01db02.lunar.gov, ClientPID = 9994
Fri Dec 06 18:18:20 2013
create GRIDDISK RECO_DM01_CD_09_dm01cel02 on CELLDISK CD_09_dm01cel02
Storage Index Allocation for GridDisk RECO_DM01_CD_09_dm01cel02 successful [code: 1]
Griddisk RECO_DM01_CD_09_dm01cel02 - number is (21156)
NOTE: Initiating ASM instance operation:
 Operation: DROP and ADD of ASM disks for 1 Grid disks guids.
NOTE: Initiating ASM Instance operation: ASM DROP ADD disk on 1 disks
Published 1 grid disk events ASM DROP ADD disk on DG RECO_DM01 to:
ClientHostName = dm01db01.lunar.gov, ClientPID = 10060
Fri Dec 06 18:18:20 2013
create GRIDDISK DBFS_DG_CD_09_dm01cel02 on CELLDISK CD_09_dm01cel02
Storage Index Allocation for GridDisk DBFS_DG_CD_09_dm01cel02 successful [code: 1]
Griddisk DBFS_DG_CD_09_dm01cel02 - number is (21160)
NOTE: Initiating ASM instance operation:
 Operation: DROP and ADD of ASM disks for 1 Grid disks guids.
NOTE: Initiating ASM Instance operation: ASM DROP ADD disk on 1 disks
Published 1 grid disk events ASM DROP ADD disk on DG DBFS_DG to:
ClientHostName = dm01db01.lunar.gov, ClientPID = 10060
我们都知道,在存储节点上,有3个重要的服务:cellsrv,ms,restart service
其中,cellsrv负责跟计算节点通信,并执行相关的ioctl的操作
而ms负责监控服务,比如磁盘是否有add或者drop等,并把消息通知给cellsrv
而restart服务,主要是负责监控和重启其他的服务。
这里,我们清晰的看到,当新的磁盘插入后,cellsrv自动创建了celldisk,然后每创建一个griddisk就把先关信息通知到计算节点的ASM实例。
“Operation: DROP and ADD of ASM disks for 1 Grid disks guids.”
再看下ASM的日志:
计算节点的ASM实例收到来自cellsrv的通知,会启动XDWK进程(后面会讲),由该进程完成磁盘的drop和add等操作。
cellsrv通知ASM的XDMG进程,XDMG是负责监控磁盘的变化,捕获变化后,具体add和drop的工作是由XDWK完成的。
注意,XDMG和XDWK都是Exadata特有的,在计算节点的进程,其主要是能如下:
Exadata Automation Manager (XDMG) initiates automation tasks involved in managing Exadata storage. It monitors all configured storage cells for state changes, such as a failed disk getting replaced, and performs the required tasks for such events. Its primary tasks are to watch for inaccessible disks and cells and when they become accessible again, to initiate the ASM ONLINE operation.
Exadata Automation Manager (XDWK) performs automation tasks requested by XDMG.
It gets started when asynchronous actions such as disk ONLINE, DROP and ADD are requested by XDMG. After a 5 minute period of inactivity, this process will shut itself down.
cell上相关的配置文件位置:
$OSSCONF/cell_disk_config.xml 和 $OSSCONF/griddisk.owners.dat
ASM里面相关的初始化参数:
_AUTO_MANAGE_EXADATA_DISKS controls the auto disk management feature. To disable the feature set this parameter to FALSE. Range of values: TRUE [default] or FALSE.
_AUTO_MANAGE_NUM_TRIES controls the maximum number of attempts to perform an automatic operation. Range of values: 1-10. Default value is 2.
_AUTO_MANAGE_MAX_ONLINE_TRIES controls maximum number of attempts to ONLINE a disk. Range of values: 1-10. Default value is 3.
这两个进程都是可以kill的进程,也就是说某种意义上我们说的非核心进程,需要的时候,他们会自动启动。
这里,我们清晰的看到XDWK进程会自动每隔15分钟启动一次:
.......
Sat Jun 08 15:21:57 2013
Starting background process XDWK
Sat Jun 08 15:21:57 2013
XDWK started with pid=39, OS id=13234
Sat Jun 08 15:37:00 2013
Starting background process XDWK
Sat Jun 08 15:37:00 2013
XDWK started with pid=39, OS id=27010
Sat Jun 08 15:52:03 2013
Starting background process XDWK
Sat Jun 08 15:52:03 2013
XDWK started with pid=39, OS id=8806
Sat Jun 08 16:07:06 2013
Starting background process XDWK
Sat Jun 08 16:07:06 2013
XDWK started with pid=39, OS id=23223
Sat Jun 08 16:22:09 2013
Starting background process XDWK
Sat Jun 08 16:22:09 2013
XDWK started with pid=39, OS id=4888
Sat Jun 08 16:37:12 2013
Starting background process XDWK
Sat Jun 08 16:37:12 2013
XDWK started with pid=39, OS id=19193
Sat Jun 08 16:52:15 2013
Starting background process XDWK
Sat Jun 08 16:52:15 2013
XDWK started with pid=39, OS id=495
Sat Jun 08 17:07:18 2013
Starting background process XDWK
Sat Jun 08 17:07:18 2013
XDWK started with pid=39, OS id=15095
Sat Jun 08 17:22:21 2013
Starting background process XDWK
Sat Jun 08 17:22:21 2013
XDWK started with pid=39, OS id=29028
Sat Jun 08 17:37:24 2013
Starting background process XDWK
Sat Jun 08 17:37:24 2013
XDWK started with pid=39, OS id=11007
......
在有些老版本的11.2上,会有类似如下信息:
Wed Oct 30 13:18:33 2013
Starting background process XDWK
Wed Oct 30 13:18:33 2013
XDWK started with pid=33, OS id=5049
WARNING: Exadata Auto Management: OS PID: 5049 Operation ID: 2782: DROP and ADD disk DBFS_DG_CD_07_xxx in diskgroup DBFSEXP Failed
 SQL :
 Cause :
 Action : Check alert log to see why this operation failed.
 Also check process trace file for matching Operation ID.
WARNING: Exadata Auto Management: OS PID: 5049 Operation ID: 2786: DROP and ADD disk ARCH_CD_07_xxx in diskgroup ARCH Failed
 SQL :
 Cause :
 Action : Check alert log to see why this operation failed.
 Also check process trace file for matching Operation ID.
而相应的trace类似如下信息:
+ASM1_xdwk_2368 trace:
===============================
2013-10-30 10:33:01.075659 : kxdam_drop_add_disk: Disk DBFS_DG_CD_07_xxx dropped from Diskgroup DBFSEXP has a valid header.
Cannot add it to diskgroup due to inconsistent state
2013-10-30 10:33:01.076217 : kxdam_drop_add_disk: Operation ID: 2672: DROP and ADD disk DBFS_DG_CD_07_xxx in diskgroup DBFSEXP Failed.
 SQL :
 Cause :
 Action : Check alert log to see why this operation failed.
 Also check process trace file for matching Operation ID.
2013-10-30 10:33:01.080131 : kxdam_validate_online: Operation ID: 2672: DROP and ADD disk DBFS_DG_CD_07_xxx in diskgroup DBFSEXP Failed.
 SQL :
 Cause :
 Action : Check alert log to see why this operation failed.
 Also check process trace file for matching Operation ID.
2013-10-30 10:33:01.087534 : kxdam_drop_add_disk: Disk ARCH_CD_07_xxx dropped from Diskgroup ARCH has a valid header.
Cannot add it to diskgroup due to inconsistent state
2013-10-30 10:33:01.087602 : kxdam_drop_add_disk: Operation ID: 2676: DROP and ADD disk ARCH_CD_07_xxx in diskgroup ARCH Failed.
 SQL :
 Cause :
 Action : Check alert log to see why this operation failed.
 Also check process trace file for matching Operation ID.
也就是说,有可能会有自动添加磁盘失败的情况,那么可以kill掉xdmg和xdwk,然后手工添加磁盘:
ps -ef | grep -i xdmg kill -9 <xdmg PID> ps -ef | grep -i xdwk kill -9 <xdwk PID> sqlplus / as sysasm SQL> alter diskgroup <DG name> add disk <path of disk being added>;
XDWK添加了磁盘后,GMON进程会将新的磁盘信息等更新到ASM的metadata区域(更新ASM的元数据)
再之后,ARB0进程会负责具体的rebalance工作。
本次加盘的ASM日志如下:
Fri Dec 06 18:18:20 2013
Starting background process XDWK
Fri Dec 06 18:18:20 2013
XDWK started with pid=32, OS id=12131
Fri Dec 06 18:18:23 2013
NOTE: disk validation pending for group 1/0x36c8734d (DATA_DM01)
SUCCESS: validated disks for 1/0x36c8734d (DATA_DM01)
NOTE: disk validation pending for group 1/0x36c8734d (DATA_DM01)
NOTE: Assigning number (1,21) to disk (o/192.168.10.4/DATA_DM01_CD_09_dm01cel02)
SUCCESS: validated disks for 1/0x36c8734d (DATA_DM01)
NOTE: membership refresh pending for group 1/0x36c8734d (DATA_DM01)
Fri Dec 06 18:18:32 2013
GMON querying group 1 at 63 for pid 19, osid 10052
NOTE: cache opening disk 21 of grp 1: DATA_DM01_CD_09_DM01CEL02 path:o/192.168.10.4/DATA_DM01_CD_09_dm01cel02
GMON querying group 1 at 64 for pid 19, osid 10052
SUCCESS: refreshed membership for 1/0x36c8734d (DATA_DM01)
Fri Dec 06 18:18:34 2013
Errors in file /u01/app/grid/diag/asm/+asm/+ASM1/trace/+ASM1_xdwk_12131.trc:
Errors in file /u01/app/grid/diag/asm/+asm/+ASM1/trace/+ASM1_xdwk_12131.trc:
SQL> /* Exadata Auto Mgmt: ADD ASM Disk in given FAILGROUP */
alter diskgroup RECO_DM01 add
 failgroup DM01CEL02
 disk 'o/192.168.10.4/RECO_DM01_CD_09_dm01cel02'
 name RECO_DM01_CD_09_DM01CEL02

 rebalance nowait

NOTE: Assigning number (3,21) to disk (o/192.168.10.4/RECO_DM01_CD_09_dm01cel02)
NOTE: requesting all-instance membership refresh for group=3
Fri Dec 06 18:18:36 2013
NOTE: Attempting voting file refresh on diskgroup DATA_DM01
NOTE: initializing header on grp 3 disk RECO_DM01_CD_09_DM01CEL02
NOTE: requesting all-instance disk validation for group=3
NOTE: skipping rediscovery for group 3/0x36d8734f (RECO_DM01) on local instance.
NOTE: requesting all-instance disk validation for group=3
NOTE: skipping rediscovery for group 3/0x36d8734f (RECO_DM01) on local instance.
Fri Dec 06 18:18:43 2013
GMON updating for reconfiguration, group 3 at 65 for pid 32, osid 12131
NOTE: group 3 PST updated.
NOTE: initiating PST update: grp = 3
GMON updating group 3 at 66 for pid 32, osid 12131
NOTE: PST update grp = 3 completed successfully
NOTE: membership refresh pending for group 3/0x36d8734f (RECO_DM01)
GMON querying group 3 at 67 for pid 19, osid 10052
NOTE: cache opening disk 21 of grp 3: RECO_DM01_CD_09_DM01CEL02 path:o/192.168.10.4/RECO_DM01_CD_09_dm01cel02
Fri Dec 06 18:18:48 2013
NOTE: Attempting voting file refresh on diskgroup RECO_DM01
GMON querying group 3 at 68 for pid 19, osid 10052
SUCCESS: refreshed membership for 3/0x36d8734f (RECO_DM01)
Fri Dec 06 18:18:48 2013
SUCCESS: /* Exadata Auto Mgmt: ADD ASM Disk in given FAILGROUP */
alter diskgroup RECO_DM01 add
 failgroup DM01CEL02
 disk 'o/192.168.10.4/RECO_DM01_CD_09_dm01cel02'
 name RECO_DM01_CD_09_DM01CEL02

 rebalance nowait


NOTE: starting rebalance of group 3/0x36d8734f (RECO_DM01) at power 4
Errors in file /u01/app/grid/diag/asm/+asm/+ASM1/trace/+ASM1_xdwk_12131.trc:
Errors in file /u01/app/grid/diag/asm/+asm/+ASM1/trace/+ASM1_xdwk_12131.trc:
Starting background process ARB0
SQL> /* Exadata Auto Mgmt: ADD ASM Disk in given FAILGROUP */
alter diskgroup DBFS_DG add
 failgroup DM01CEL02
 disk 'o/192.168.10.4/DBFS_DG_CD_09_dm01cel02'
 name DBFS_DG_CD_09_DM01CEL02

 rebalance nowait

Fri Dec 06 18:18:48 2013
ARB0 started with pid=39, OS id=12553
NOTE: assigning ARB0 to group 3/0x36d8734f (RECO_DM01) with 4 parallel I/Os
NOTE: Assigning number (2,17) to disk (o/192.168.10.4/DBFS_DG_CD_09_dm01cel02)
NOTE: requesting all-instance membership refresh for group=2
NOTE: Attempting voting file refresh on diskgroup RECO_DM01
NOTE: initializing header on grp 2 disk DBFS_DG_CD_09_DM01CEL02
NOTE: requesting all-instance disk validation for group=2
NOTE: skipping rediscovery for group 2/0x36d8734e (DBFS_DG) on local instance.
NOTE: requesting all-instance disk validation for group=2
NOTE: skipping rediscovery for group 2/0x36d8734e (DBFS_DG) on local instance.
Fri Dec 06 18:18:58 2013
GMON updating for reconfiguration, group 2 at 69 for pid 32, osid 12131
Fri Dec 06 18:18:58 2013
NOTE: group 2 PST updated.
NOTE: initiating PST update: grp = 2
GMON updating group 2 at 70 for pid 32, osid 12131
NOTE: PST update grp = 2 completed successfully
Fri Dec 06 18:19:02 2013
NOTE: membership refresh pending for group 2/0x36d8734e (DBFS_DG)
GMON querying group 2 at 71 for pid 19, osid 10052
NOTE: cache opening disk 17 of grp 2: DBFS_DG_CD_09_DM01CEL02 path:o/192.168.10.4/DBFS_DG_CD_09_dm01cel02
NOTE: Attempting voting file refresh on diskgroup DBFS_DG
Fri Dec 06 18:19:16 2013
GMON querying group 2 at 72 for pid 19, osid 10052
Fri Dec 06 18:19:16 2013
SUCCESS: refreshed membership for 2/0x36d8734e (DBFS_DG)
Fri Dec 06 18:19:16 2013
SUCCESS: /* Exadata Auto Mgmt: ADD ASM Disk in given FAILGROUP */
alter diskgroup DBFS_DG add
 failgroup DM01CEL02
 disk 'o/192.168.10.4/DBFS_DG_CD_09_dm01cel02'
 name DBFS_DG_CD_09_DM01CEL02

 rebalance nowait


NOTE: Attempting voting file refresh on diskgroup DBFS_DG
Fri Dec 06 18:33:49 2013
Starting background process XDWK
Fri Dec 06 18:33:49 2013
XDWK started with pid=32, OS id=26304
。。。。。。。。。。。。
此时,你可以在ASM实例中检查rebanlance操作:
select * from gv$asm_operation;
通常在添加完磁盘后,我们会检查几件事情:
1,查看机柜的磁盘LED指示灯是否变成了绿色
2,用cellcli查看celldisk和griddisk等的信息
3,查看cell的alert日志
4,查看ASM的日志
5,查看ASM磁盘组和磁盘组信息
Exadata上的手工创建celldisk,griddisk(比如手工增加一个cell节点)
一个客户,因为现有的一台Exadata要从一个地方搬迁到另一个地方的机房,因此机器中所有部件的IP都需要修改(ILOM,SWITCH,DNS,NTP SERVER,VIP,SCAN,PDU等等)……
这些都可以修改IP的方式完成,也并不复杂。
但是,考虑到机器上以前部署了很多应用(包括SAP的一些东西),本地空间凌乱且空闲不多。
因此,给客户的解决方案:
1,机器不用重刷,只更改相关IP
2,重装RAC(GI和Database)
3,安装Bundle Patch和SAP需要的patch
清理已经的RAC环境很简单,参考我以前写的一个《Linux下手工卸载11.2 RAC(非MOS的deinstall方法)》
类似这种方法,在11.2以前,是常用的,简单干净,O(∩_∩)O哈哈~
顺便也提一下,《AIX环境下11.2 rac的快速卸载脚本》
下载环境并重新安装时,发现可用的找不到ASM盘,客户想起来清理环境的时候忘记先删除ASM磁盘了。
这里我们说下,ASM中,如果不指定asm_diskgroups和asm_diskstring(比如现在,我们重新安装),那么ASM在不同平台会按照缺省路径来扫描磁盘。
具体请参考:Default Disk Discovery Path by Platform (Doc ID 1389618.1)
缺省平台的扫描路径:
Operating System Default Search String
 =======================================
 Solaris (32/64 bit) /dev/rdsk/*
 Windows NT/XP \\.\orcldisk*
 Linux (32/64 bit) /dev/raw/*


LINUX (ASMLIB) ORCL:*
 LINUX (ASMLIB) /dev/oracleasm/disks/* ( as a workaround )


HPUX /dev/rdsk/*
 HP-UX(Tru 64) /dev/rdisk/*
 AIX /dev/rhdisk*
那么Exadata呢,我猜它的缺省路径是o/cell_ip/* 。
例如,我这里是Exadata的VM,asm_diskgroups和asm_diskstring都为空,ASM启动没有问题,因为他按照缺省路径已经扫描到了需要的磁盘组和磁盘信息:
SQL> show parameter asm

NAME TYPE VALUE
 ------------------------------------ ----------- ------------------------------
 asm_diskgroups string
 asm_diskstring string
 asm_power_limit integer 1
 asm_preferred_read_failure_groups string
 SQL>
 SQL>select g.inst_id, g.number_kfgrp, g.name_kfgrp,g.state_kfgrp from x$kfgrp g;

INST_ID NUMBER_KFGRP NAME_KFGRP STATE_KFGRP
 ---------- ------------ ------------------------------ -----------
 1 0 0
 1 1 DATA 5
 1 0 ASMDATA 2
 SQL>
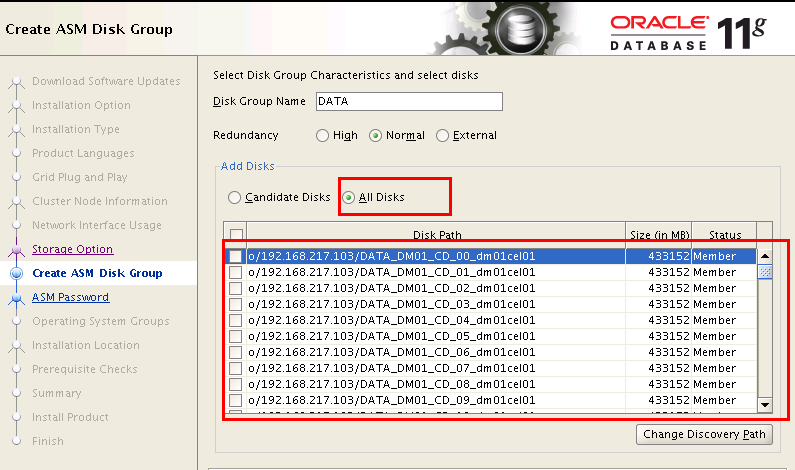
下面的图,更加清晰,所有盘都不在Candidate Disk中,也就是以前划分的cell上griddisk都不可用:
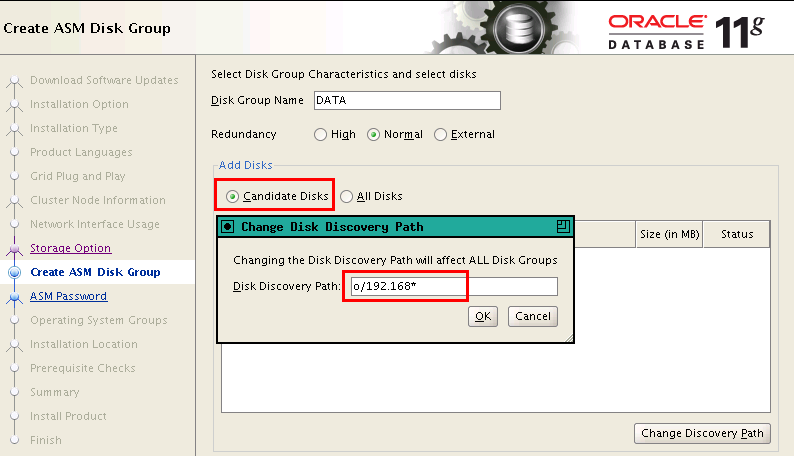
因为没有清理磁盘头,这些盘被ASMB进程扫描到了,也就是以前我们常说,11.2开始,重装RAC后,ASM和数据库都可以手工保留以前的状态,如果以前数据库和ASM是完好的,那么重装完成后,ASMB进程将信息注册到CSS中,数据库直接识别到ASM磁盘,因此,直接手工启动数据库就可以(如果要crs启动,那么必须使用crsctl命令将asm和db都注册到crs中): 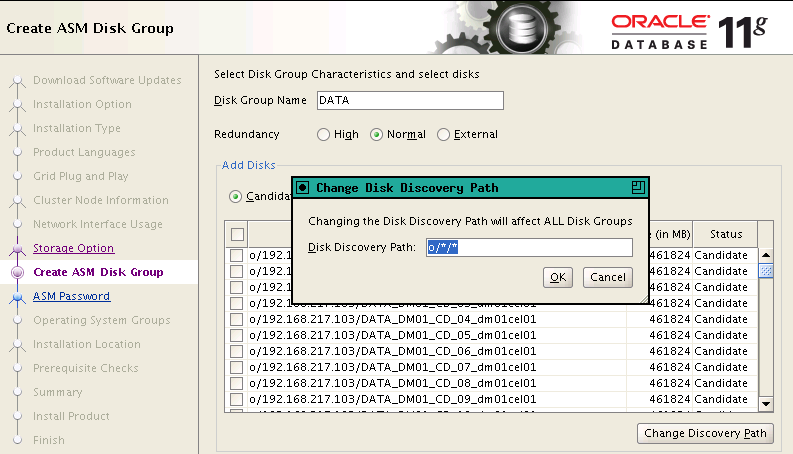
现在,我们需要手工的删除griddisk,celldisk等等,然后手工创建这些盘……
我们都知道Exadata上使用onecommand来创建celldisk和griddisk的时候,是按照磁盘效率分布不同的数据的,比如数据库文件需要较高的访问效率,而用来存放归档和备份的磁盘组则需要不那么高的访问效率,这些是通过创建cell的时候指定offsize来实现的。
你可以手工写命令,当然,我这里讨巧了,直接借用了onecommand中其中一个步骤“CreateGridDisks”,我这个image是11.2.2.4.x,因此我需要执行setp 19:
[root@dm01db01 onecommand]# ./deploy112.sh -l
INFO: Logging all actions in /opt/oracle.SupportTools/onecommand/tmp/dm01db01-20140312105540.log and traces in /opt/oracle.SupportTools/onecommand/tmp/dm01db01-20140312105540.trc
INFO: Loading configuration file /opt/oracle.SupportTools/onecommand/onecommand.params…
The steps in order are…
Step 0 = ValidateEnv
Step 1 = CreateWorkDir
Step 2 = UnzipFiles
Step 3 = setupSSHroot
Step 4 = UpdateEtcHosts
Step 5 = CreateCellipinitora
Step 6 = ValidateIB
Step 7 = ValidateCell
Step 8 = PingRdsCheck
Step 9 = RunCalibrate
Step 10 = CreateUsers
Step 11 = SetupSSHusers
Step 12 = CreateGridDisks
Step 13 = GridSwInstall
Step 14 = PatchGridHome
Step 15 = RelinkRDSGI
Step 16 = GridRootScripts
Step 17 = DbSwInstall
Step 18 = PatchDBHomes
Step 19 = CreateASMDiskgroups
Step 20 = DbcaDB
Step 21 = DoUnlock
Step 22 = RelinkRDSDb
Step 23 = LockUpGI
Step 24 = SetupCellEmailAlerts
Step 25 = ApplySecurityFixes
Step 26 = ResecureMachine
[root@dm01db01 onecommand]#
这个步骤大致做了如下几件事情:
1,重启cell的所有服务
2,删除现有所有的celldisk和flashdisk等:
drop flashcache
drop celldisk ALL HARDDISK force
drop celldisk ALL FLASHDISK force
3,如果有需要可以根据更改cell的名称:
alter cell name=dm01cel01
(我这次没这个需求)
4,重新创建所有的celldisk和flashcache:
create celldisk all
create flashcache all
5,create griddisk ALL HARDDISK prefix=testgd,size=528.6875G”
这里面就是创建了一个Griddisk前缀为testgd,大小是528G。请注意,最先创建的这块空间是位于磁盘效率最高点部分(忘记了是最内侧还是最外侧了,O(∩_∩)O哈哈~)
这个testgd只划分了528G,HP盘每块是600G,于是还剩下29G,借着把这29G用于创建DBFS griddisk,当然,如果你不需要这个磁盘组,可以不要这部分。
6,创建DBFS使用的griddisk(由于DBFS使用的是余下的空间,因此通常DBFS griddisk是创建在磁盘的最外侧,也就是效率较低的位置):
create griddisk DBFS_DG_CD_02_dm01cel01 celldisk=CD_02_dm01cel01,size=29.125G”
create griddisk DBFS_DG_CD_03_dm01cel01 celldisk=CD_03_dm01cel01,size=29.125G”
create griddisk DBFS_DG_CD_04_dm01cel01 celldisk=CD_04_dm01cel01,size=29.125G”
create griddisk DBFS_DG_CD_05_dm01cel01 celldisk=CD_05_dm01cel01,size=29.125G”
create griddisk DBFS_DG_CD_06_dm01cel01 celldisk=CD_06_dm01cel01,size=29.125G”
create griddisk DBFS_DG_CD_07_dm01cel01 celldisk=CD_07_dm01cel01,size=29.125G”
create griddisk DBFS_DG_CD_08_dm01cel01 celldisk=CD_08_dm01cel01,size=29.125G”
create griddisk DBFS_DG_CD_09_dm01cel01 celldisk=CD_09_dm01cel01,size=29.125G”
create griddisk DBFS_DG_CD_10_dm01cel01 celldisk=CD_10_dm01cel01,size=29.125G”
create griddisk DBFS_DG_CD_11_dm01cel01 celldisk=CD_11_dm01cel01,size=29.125G”
7,删除了testdg,把空间释放出来给后面的DATA griddisk和RECO griddisk:
drop griddisk ALL prefix=testgd force
8,将DATA griddisk和REDO griddisk创建在以前testdg使用的空间上,这样就保证了DATA_DM01使用了磁盘中最高效的位置:
create griddisk ALL HARDDISK prefix=DATA_DM01, size=451G
create griddisk ALL HARDDISK prefix=RECO_DM01
如果是Exadata上全部cell都要重新化盘,类似我今天遇到的情况,那么直接run onecommand脚本就好,不用这么费劲。
如果是只有其中1个cell或者几个cell要做,那么直接将新的节点刷机到跟其他cell匹配的image版本,然后,创建用户,配置互信等等,最后,可以修改上述脚本完成celldisk和griddisk等的创建,以适应你自己的环境,也很方便的。
创建完成后,顺利安装完成,接下来就是apply patch了,O(∩_∩)O哈哈~
发表在 安装和升级, 日常运维
标签为 add cell, create celldisk, create griddisk, drop griddisk, Exadata, 手工添加cell
留下评论
Exadata上本地盘的使用(reclaimdisks.sh)
Exadata出厂时,其计算节点本地有4块盘,两两做RAID 1,安装了双OS,一个是Linux,一个是Solaris X86(不是Sparc,O(∩_∩)O哈哈~)
X2是每块本地盘300G,从X3开始,每块本地盘600G。
多出一个没用的OS,这样就浪费了很多空间,因此,安装或者重装后,一般都做Reclaim的操作,将出厂时的双OS改为单独的Linux系统启动,并释放空间。
例如这里:
[root@dm01db02 ~]# /opt/oracle.SupportTools/reclaimdisks.sh -check
[INFO] This is SUN FIRE X4170 M2 SERVER machine
[INFO] Number of LSI controllers: 1
[INFO] Physical disks found: 4 (252:0 252:1 252:2 252:3)
[INFO] Logical drives found: 3
[INFO] Dual boot installation: yes
[INFO] Linux logical drive: 0
[INFO] RAID Level for the Linux logical drive: 1
[INFO] Physical disks in the Linux logical drive: 2 (252:0 252:1)
[INFO] Dedicated Hot Spares for the Linux logical drive: 0
[INFO] Global Hot Spares: 0
[INFO] Valid dual boot configuration found for Linux: RAID1 from 2 disks
[root@dm01db02 ~]#
这里显示当前4块本地盘,做了双启动系统,每两块盘做了RAID 1,没有Hot Spares盘
使用reclaimdisks.sh -free -reclaim可以更改为一个单独的系统,大部分客户会选择使用Linux,例如:
[root@dm01db02 ~]# /opt/oracle.SupportTools/reclaimdisks.sh -free -reclaim

Started from /opt/oracle.SupportTools/reclaimdisks.sh
[INFO] Free mode is set
[INFO] Reclaim mode is set
[INFO] This is SUN FIRE X4170 M2 SERVER machine
[INFO] Number of LSI controllers: 1
[INFO] Physical disks found: 4 (252:0 252:1 252:2 252:3)
[INFO] Logical drives found: 3
[INFO] Dual boot installation: yes
[INFO] Linux logical drive: 0
[INFO] RAID Level for the Linux logical drive: 1
[INFO] Physical disks in the Linux logical drive: 2 (252:0 252:1)
[INFO] Dedicated Hot Spares for the Linux logical drive: 0
[INFO] Global Hot Spares: 0
[INFO] Non-linux physical disks that will be reclaimed: 2 (252:2 252:3)
[INFO] Non-linux logical drives that will be reclaimed: 2 (1 2)
Remove logical drive 1

Adapter 0: Deleted Virtual Drive-1(target id-1)

Exit Code: 0x00
Remove logical drive 2

Adapter 0: Deleted Virtual Drive-2(target id-2)

Exit Code: 0x00
[INFO] Remove Solaris entries from /boot/grub/grub.conf
[INFO] Disk reclaiming started in the background with parent process id 110717.
[INFO] Check the log file /var/log/cellos/reclaimdisks.bg.log.
<strong>[INFO] This process may take about two hours.</strong>
<strong>[INFO] DO NOT REBOOT THE NODE.</strong>
<strong>[INFO] The node will be rebooted automatically upon completion.</strong>
reclaim的过程大概2小时左右,完成后的结果类似下面:
[root@dm01db02 ~]# /opt/oracle.SupportTools/reclaimdisks.sh -check
[INFO] This is SUN FIRE X4170 M2 SERVER machine
[INFO] Number of LSI controllers: 1
[INFO] Physical disks found: 4 (252:0 252:1 252:2 252:3)
[INFO] Logical drives found: 1
[INFO] Dual boot installation: no
[INFO] Linux logical drive: 1
[INFO] RAID Level for the Linux logical drive: 5

[INFO] Physical disks in the Linux logical drive: 3 (252:1 252:2 252:3)
[INFO] Dedicated Hot Spares for the Linux logical drive: 0
[INFO] Global Hot Spares: 1 (252:0)
[INFO] Valid single boot configuration found for Linux: RAID5 from 3 disks and 1 global hot spare disk
[root@dm01db02 ~]#
这里,我们看到,4块本地盘,一个做了Hot spare disk,其余3块做RAID5,只有一个Linux OS了。
这样就把以前Solaris X86 OS 的空间释放出来了,但是这部分空间缺省并没有自动mount上,你需要手工的mount上,或者自己使用LVM扩充到根目录(/)或者非根目录(比如/u01等等),或者扩到Swap区。
例如:
[root@dm01db01 ~]# lvs
 LV VG Attr LSize Origin Snap% Move Log Copy% Convert
 LVDbOra1 VGExaDb -wi-ao 100.00G
 LVDbSwap1 VGExaDb -wi-ao 24.00G
 LVDbSys1 VGExaDb -wi-ao 30.00G
[root@dm01db01 ~]#
[root@dm01db01 ~]# vgs
 VG #PV #LV #SN Attr VSize VFree
 VGExaDb 1 3 0 wz--n- 557.62G <strong>403.62G</strong>
[root@dm01db01 ~]#
这里我们看到做完reclaim后,释放出来400G左右的空间,这个是X2,每块本地盘300G。
如果是X3,每块本地盘600G,做完reclaim后释放出来600G左右的空间,就类似下面的样子:
[root@dm04db01 ~]# lvs
 LV VG Attr LSize Origin Snap% Move Log Copy% Convert
 LVDbOra1 VGExaDb -wi-ao 100.00G
 LVDbSwap1 VGExaDb -wi-ao 24.00G
 LVDbSys1 VGExaDb -wi-ao 30.00G
 LVDbSys2 VGExaDb -wi-a- 30.00G
 temp VGExaDb -wi-ao 50.00G
[root@dm04db01 ~]# vgs
 VG #PV #LV #SN Attr VSize VFree
 VGExaDb 1 5 0 wz--n- 834.89G<strong> 600.89G</strong>
[root@dm04db01 ~]#
[root@dm04db01 ~]#
[root@dm04db01 ~]#
现在你就可以使用lvm lvexten等命令,将这些空间扩到你需要的放了,O(∩_∩)O哈哈~。